#plex
Update: As of October 15th, 2015 (about 10 months after I originally wrote these instructions), Plex has finally removed the hard coded maximum bitrate. This guide will remain for historical reasons, but you should now not be required to follow these steps to stream high bitrate video to your Chromecast.
I am an enthusiastic user of Plex, but recently I discovered that they were making the poor choice of hard-coding a bitrate limitation in their Chromecast application. Essentially, this enforced a 12,000 kbps (~12 mbps) limitation on media, meaning that anything that has a higher bitrate would be transcoded. This isn't a problem when you have a decent server running Plex, but I am running it on an old laptop that can barely keep up with 4 mbps transcodes.
I was able to get around the hard coded limitation (the technical how-I-did-it is also available), and you can do it to:
Requirements
Before you begin, you need a couple of different things:
- Chrome web browser
- A Plex server
- A Chromecast
- A Chromecast developer account
- $5.00 USD (payable to Google for your Chromecast developer account)
- Static file hosting, such as GitHub Gists or Amazon S31
Note, this hack only works in Chrome. It does not allow you to start casting high bitrate content from your iOS or Android devices.
Setting Up Your Chromecast
First, we will setup your Chromecast as a developer device. Because Chromecast applications (custom ones like Plex uses, at least) are vetted through a similar model as a mobile phone app store (i.e. they need to be approved before being runnable by others), we can't just point a Chromecast to your new application. Also, I cannot personally host the modified application because of copyright laws (the code is property of Plex), so you must do the modification yourself.
Before you can actually make the modification, though, you need to turn on developer mode on your Chromecast. You will need a Cast Developer Account, which is used to make your devices "developer" friendly. This has a one time fee of $5.00.
To register for a Cast Developer Account, visit the web console and sign in with your Google account:
https://cast.google.com/publish/
You will see something like the following.

Simply follow the registration process and pay the $5.00 registration fee, and you will be taken to the dashboard.

Now, go ahead and click "Add a New Device". Go to your physical Chromecast device and look for the serial number on the plastic housing, and input it into the form. You can also set a friendly description so that you know which Chromecast is which if you are registering more than once device.
You may want to register all of your Chromecast devices at once, since they take about 15 minutes to become ready.
Once you've added all of your devices to the console, you will need to wait about 15 minutes2 for the status to change to "Ready for Testing". Once the device is ready for testing, you will need to reboot your device. The best way to do this is to unplug your Chromecast for a 60 seconds or more, then plug it back in.
Important: If you have a Chromecast (and not another Google Cast device), you will need to ensure your device sends its serial number when checking for updates, before rebooting the device. To do this, you can open the Chromecast app on your phone or tablet, and look in the device's settings. On iOS, you can get here by tapping the Chromecast's name in the list of devices, then "General":

After your Chromecast is set to send its serial number when checking for updates, you can perform the reboot by unplugging the device for 60 seconds and plugging it back in.
Modifying Plex's Chromecast Application
We can now remove the hard coded limitation of 12,000 kbps that Plex has set in their application. To do this, you need to download two files to your desktop:
To save the files, right click anywhere on the page (that is not on the image, if you're looking at the "index.html" file), choose the "View Page Source" option. Browsers other than Chrome may use different wording for this menu item.
This will allow you to copy the raw source of the page without the browser tampering with it. Copy and paste the "source" of each of the above files into files on your desktop with the same names (i.e. "index.html" and "plex.js").
Now, you will need to actually perform the modifications.
plex.js
Open the "plex.js" file in a text editor.
If you are on Windows, I highly suggest that you do not use Notepad. Notepad++ is a great, free alternative text editor. It is designed for programmers (unlike regular Notepad), so it won't mess up the files you are trying to edit. Mac users can use any text editor they wish, except TextEdit. TextEdit mangles the HTML file even worse than Notepad on Windows, and tries to convert it into a rich text document. TextWrangler is a good, free, and lightweight text editor.
You can use the find command in your text editor (usually "Ctrl + F" or "Cmd + F" on a Mac) to look for the following text:
{"maxBitrate":12e3,"maxBitDepth":8,"maxLevel":42}
Simply change that section of code, so the code surrounding it now looks like the following:
{"maxBitDepth":8,"maxLevel":42}
Notice the missing code: "maxBitrate":12e3,. This is the bitrate limitation converted to scientific notation.
Save the file-- we're now going to upload it to GitHub's Gist service.
Go to GitHub's Gist service, and paste the content of your modified "plex.js" file into the text window. Because the file is so large, it will take a couple seconds. Also, in the "Name this file..." textbox, enter "plex.js":

Once you hit the "Create Secret Gist" button, you will see something like the following:

Go ahead and click the "Raw" button in the top right hand corner of the file's contents, and you will be taken to a page with just your Javascript's content. Make a note of the URL, which will look like the following:
https://gist.githubusercontent.com/anonymous/893e8e7d30cc62d78a2e/raw/a9de6d7d48cc201322235de6315a136b2d2beec1/plex.js
Change the domain in the URL to githack.com, like so:
https://gist.githack.com/anonymous/893e8e7d30cc62d78a2e/raw/a9de6d7d48cc201322235de6315a136b2d2beec1/plex.js
GitHack is a service that transforms raw GitHub Gists into files that render in the browser. By default, if you visited your page the browser would just consider the file to be plain text.
Now, we need to modify the page that is actually loaded by the Chromecast.
index.html
Open the "index.html" in a text editor.
You will need to make a couple of modifications to this file.
If you used the "View Page Source" method, find a line with the following:
<link rel="stylesheet" href="css/main-chromecast.css?hash=b4261cc">
Simply add a new line above it with the following content:
<base href="https://plexapp.com/chromecast/qa/"/>
Also, find the line with the following content near the end of the file:
<script id="plex-script" src="js/plex.js?hash=b4261cc&version=2.2.6"></script>
Change this to the URL that you made a note of earlier, with the "githack.com" domain:
<script id="plex-script" src="https://gist.githack.com/anonymous/893e8e7d30cc62d78a2e/raw/a9de6d7d48cc201322235de6315a136b2d2beec1/plex.js"></script>
Now, save the file and copy its contents. Create a new GitHub Gist and paste the contents of the "index.html" file into it. Change the name to "index.html", and then create the secret Gist.
After the Gist is created, click the "Raw" button. Make a note of this URL, and also change the domain to "githack.com" like you did for the other file. Now, if you open this new URL in your web browser, you should see the following:

This means your application is now working correctly, so we can go ahead and publish the URL into the Cast Developer Console!
Side note: You can use other hosting services, such as Amazon S3 or shared hosting, if you have them available. Simply change the above instructions to point to the relevant locations.
Publishing the Application
Go back to the Cast Developer Console, and click "Add New Application". Choose the "Custom Receiver" application type and choose a name for your application. For the URL, use the "githack.com" URL that points to your "index.html" file.
You will see a "successfully registered" message, and be presented with an application ID that looks like: 4580A3F9. Make a note of this.
Installing the Chrome Extension
I developed a Chrome extension that performs the modifications necessary to the Plex website to inject your new app ID into the Plex web application. This allows for you to use your modified Chromecast application instead of the default one.
You can download the extension from my website.
The download will pop up a scary message saying that the extension may be able to harm your browser-- this is only because it has not been uploaded through the Chrome web store. You can check the source of the extension if you are a developer, or just ignore the message and hit "Keep".
Because the extension is not through the web store, you have to install it from the Chrome extensions page. Go to your Chrome settings and click "Extensions" in the sidebar, or navigate to "chrome://extensions" in another tab.
Open your downloads folder in Windows Explorer or your Mac's Finder, and then drag the extension you just downloaded onto the Chrome extensions window. You will be prompted to add the extension.

Now, you can add your application ID to the extension. Simply click the "Options" link next to the "High Bitrate Plex for Chromecast" extension in the list, enter the application ID you made a note of earlier, and hit save. You may wish to restart your browser for good measure.
Fixing the Chromecast Profile
Before you can actually stream higher bitrate media, you also need to change the XML profile for the Chromecast. On your Plex Media Server, find the "Chromecast.xml" profile located in the resources folder of the Plex server.
On Windows, this is found in:
C:Program Files (x86)Plex Media ServerResourcesProfilesChromecast.xml
On the Mac, the profile is located in:
/Applications/Plex Media Server.app/Contents/Resources/Profiles/Chromecast.xml
On Ubuntu, the profile should be located here:
/usr/lib/plexmediaserver/Resources/Profiles/Chromecast.xml
Open the XML profile, and find the following line:
<UpperBound name="video.bitrate" value="12000" isRequired="false"/>
Simply change the 12000 to a larger number, such as 300003, and save the profile. Restart your Plex server to apply the new profile changes.
Wrapping it Up
Now, go ahead and go to the Plex web application. With any luck, you'll see the Chromecast icon pop up as usual. Now, when you try and cast content, you should actually see your application's name in the Chromecast extension instead of just "Plex".
This also means you can now cast high bitrate media (i.e. over 12,000 kbps) to your Chromecast without transcoding! You can verify this with any high bitrate media you have, or with the Jellyfish Bitrate Test videos. If you use the Jellyfish test videos, try out the 20 mbps or 25 mbps files-- files in the 40 mbps did not work for me.
Once this fix is applied, all you have to do is install the Chrome extension onto any computers you wish to cast from. And because the Chromecast streams directly from your Plex server, you don't even have to keep the PC on-- you can put it away after you start the stream.
Hopefully, this proves to Plex that there is demand to remove the single maxBitrate statement in their Chromecast application. It's obvious that the device is capable, and beyond me why they have stood their ground for so long. At least for now this limitation is just a slight inconvenience than a complete showstopper.
- Shared web hosting accounts, basic object storage, and any other publicly accessible web storage will be fine. Even GitHub Gists will work, which I will show you how to use. ↩
- You can always skip ahead to the next step and upload your Chromecast application and come back to the remaining part of this step later. ↩
- The Chromecast begins stuttering around 30,000 kbps. So yes, there is an upper limit, but it's over double what Plex has initially set. ↩
I am a big fan of Plex Media Server-- it has a great set of software, both server and client side, and is much easier to setup and use than alternatives such as XBMC. Attached to my ReadyNAS, my Plex server has access to 6 TB of storage.
I also have several Chromecast devices-- they're great little media streamer sticks that simply plug into your HDMI port on your TV. Using your phone as a remote, you can "cast" media from an app (such as Netflix, HBO, or Plex) and onto your TV. Chromecast also has a browser API, so Plex's website also allows you to cast media to your local TVs.
There's one major issue, however, in terms of compatibility between Plex and the Chromecast-- and it's not actually the Chromecast's fault. Plex, for whatever reason, has decided to limit the maximum bitrate of a video file to 12 mbps when casting to a Chromecast device. If you have a powerful PC running as your Plex server, this is fine-- the server software will transcode the higher bitrate videos on the fly to 12 mbps. But, I am using an old laptop that can barely transcode to 4 mbps, 720p video files, so the video playback stutters.
Plex claims this forced transcoding is due to "performance issues" with media over 12 mbps, but this is not true1. Not only have users casted media higher than 12 mbps from other apps, but I have successfully gotten around this hard coded limitation and streamed 20+ mbps video without a problem.
Note: This is a detailed post on how I figured out my workaround, and contains some technical material on advanced Javascript concepts. If you are an end user that just wants to perform the fix yourself, please see my separate how-to guide:
The Hard-Coded Problem
First, to understand the issue, you have to know how a Chromecast app and Plex work:
Essentially, when you hit play and stream to your Chromecast, Plex does a few things:
First, the media is checked against an XML based profile for your device that is located on your Plex server. This profile contains info about what device supports what features, and if the media is too high resolution or too high bitrate, Plex decides to transcode the video to a compatible format. The Chromecast file specifies a maximum bitrate of 12,000 kbps.
But, what if we change this XML profile to specify a maximum bitrate of 30,000 kbps? This would solve the problem for most devices, but this does not fix the issue for the Chromecast. Some people believe that they are fixing the issue by changing the XML, but this is not true. There is in fact a second place where this 12,000 kbps limitation is enforced, and it is not changeable by conventional means.
Chromecast apps are composed of two things-- a sender application, which can be a native mobile app or a web application for Chrome, and a receiver application that runs on the Chromecast. The Chromecast also has several types of receiver applications, including the default video player (which basically allows you to send a URL to it and it will use a default UI for playback) and a custom receiver. The custom receiver is essentially a web page and can run most code any web browser can, allowing you to style and program the application to do more than just play a simple video.
Plex has opted to use a custom receiver in order to display poster art on your screen, among other things. However, since custom applications can run arbitrary code, they have hard coded a 12,000 kbps limitation for videos, which overrides the XML profile on your server.
Don't believe me? Check for yourself-- the Plex Chromecast app is composed of several files: an HTML page, which serves as the view you see on your screen, and a Javascript file with logic for communicating with Plex2. These files are located at:
- https://plexapp.com/chromecast/qa/index.html
- https://plexapp.com/chromecast/qa/js/plex.js
In the plex.js file, search for the line containing maxBitrate: 12000. If you're a programmer, you can follow the code, but essentially this maximum bitrate overrides any other maximum bitrate sent to the Chromecast (such as the one that is sent to the Chromecast from the XML profile).
Notice the "qa" in the URL-- this is a "testing" version of the app which is not compressed, and therefore is readable to humans. This is also present in the production app, which is compressed.
- https://plexapp.com/chromecast/production/js/plex.js
You have to look for something a little bit different: "maxBitrate":12e3. In case you're curious why this is, it is because the compressor (really, it is called a "minifier") converts the number 12,000 into the shorter "12e3", which is simply exponential notation for the same value. This allows the file to be smaller, and reduce network overhead and the time to download the Javascript application to your Chromecast. Many websites use this technique, and because the Chromecast is web based, Chromecast applications should do this as well.
Removing the Maximum Bitrate through Reverse Engineering
Now that we know where the limitation is and how it is enforced, we can try and remove it. This post is dedicated to detailing how I came up with my solution-- if you are just a Plex user that wants to play back high bitrate content, see my how-to guide.
There were a couple different ideas that popped into mind:
- Man-in-the-middle the Chromecast, and dynamically replace the value
- Modify the Plex server application to ignore the 12,000 kbps limitation from the Chromecast
- Modify the Chromecast application to remove the limitation
Man-in-the-middle
Essentially, a man-in-the-middle (MITM) "attack" is the practice of inserting a computer between a client and server with the intention of reading or modifying the data that is sent over a network. You can use this for malicious purposes, such as stealing unencrypted passwords over insecure WiFi, or for legitimate purposes such as debugging (i.e. looking at the network requests your app sends so that you can find and fix bugs).
This is a relatively complex method of removing a simple number from a file, so I explored some alternatives.
Modifying the Plex binary
Another way to "fix" the issue would be to modify the server software itself. This poses a couple challenges, however-- the debugging process, for me, would take quite a bit of time to find the point at which the code needs to be modifier, it requires re-applying your modifications every time the server software is updated.
Modifying the Chromecast app
Finally, I decided the best chance of fixing the issue would be to modify the Chromecast app itself. This would be similar to the MITM attack in that I would modify the source code of the Chromecast receiver application, but it would be a one-time fix versus doing it on the fly as I would have to do with a MITM.
Chromecast applications are vetted through a process similar to a native app store-- in order to use them on any Chromecast, you must submit the application and have it approved. However, developers can run whatever applications they want, similar to how you can register as an Apple developer and run your own applications without publishing them in the app store.
So, now that we know that we can run custom applications, all it takes is downloading the original Plex assets, re-uploading them, and removing the hard coded limitation.
Even though the application has now been modified and fixed, we still can't use it. On the sender side, Chromecast applications pass an application ID number to the Chromecast API in order to launch the app. The senders for Plex are located in their native apps (iOS and Android), as well as their web app. Because web browsers are much more open, I decided to tackle the web application.
Unfortunately, the application ID value is embedded deep in the application's Javascript. Plex also uses RequireJS, meaning that there is no way to simply override a global configuration variable.
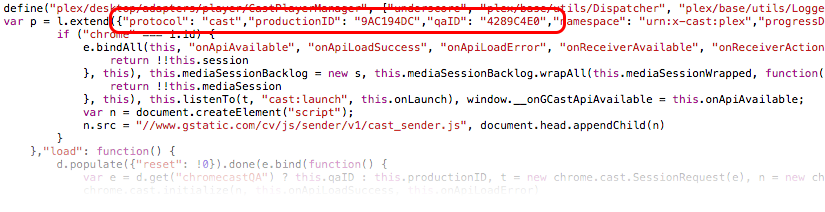
The application ID is passed into the Chromecast API through the chrome.cast.SessionRequest object, like so:
var sessionRequest = new chrome.cast.SessionRequest("ABC1234");
So, we now know the last point at which we can modify the application ID easily-- in the constructor for the session request.
Fortunately, this also gives us a vector through which we can inject a variable. Because the Chromecast API is located in the global namespace, any script can access and modify it.
We can obviously assign anything to the chrome.cast.SessionRequest variable, and since "classes" in Javascript are essentially defined with functions, we can do something like this:
window.chrome.cast.SessionRequest = function(id, c, d) {
    console.log(id);
};
Now, every time a new SessionRequest is created, the ID will simply be logged to the console. Of course, since we completely replaced the Chromecast API we actually just disabled the casting functionality entirely. To fix this, we can essentially try to subclass the SessionRequest to override the constructor. By doing so, our new object will retain all of the functionality of the old SessionRequest, but with the benefit of overriding the constructor to pass in our ID:
window.chrome.cast.SessionRequest = (function($parent) {
    var SessionRequest = function() {
        arguments[0] = "ABC1234";
    $parent.constructor.apply(this, arguments);
};

SessionRequest.prototype = $parent;

return SessionRequest;

})(window.chrome.cast.SessionRequest.prototype);
The above code is relatively simple, though it may be a little foreign to those not familiar with how Javascript works. We are doing a couple things here:
- Wrapping the new object definition in an anonymous function so that we don't leak objects
- Passing the old prototype into the anonymous function as
$parent - Creating a new object that will serve as our injection script
- Setting the prototype of our new injector to be the same as the old SessionRequest, which is similar to "inheriting" all of
$parent's methods - Calling the "parent" constructor in our new constructor, with the arguments modified
The net result of this is a new object that behaves almost exactly like the old SessionRequest, but that injects and overrides the passed in application ID. We also assign this new object in place of the old SessionRequest, which means that all existing Chromecast code will continue to work.
To test this, I simply ran the injection code and started casting Plex to my Chromecast. With the developer "unlocked" Chromecast device, the injection code worked successfully and my device appeared in the popup menu for the Chromecast extension. After I hit "Start Casting", the custom application name appeared3 and what appeared to be the Plex app showed up on my TV.
Of course, to this point, I was injecting this code manually. This involved opening the web console, pasting the injection code, hitting refresh, and then hitting "enter" in the web console the run the code as soon as I saw the page load. This was hit or miss, and relied on me timing the button press correctly. Instead, I decided to make a simple Chrome extension that would inject the code for me.
Building the Chrome Extension
The Chrome extension was quite simple, but because I'd never written one before, I ran into the sandboxing security feature several times.
Though a "content script" extension can modify a page, it cannot access the same set of variables. In other words, I could not simply run the injection code from my content script and expect it to work, since the code would try and modify a property of window that didn't exist in my sandbox.
To get around this, you can append a script tag to the page and execute the code in the context of the page itself:
var code = function() {
    console.log(window);
};
var script = document.createElement('script');

script.textContent = '(' + code + ')()';

(document.head || document.documentElement).appendChild(script);

script.parentNode.removeChild(script);
This only works because of weird behavior in Javascript. When a function is cast to a string, you actually are returned the code that represents the function itself.
var test = function() {
    console.log("Hello!");
}
console.log("" + test);
/*

"var test = function() {

console.log("Hello!");

}"

*/
With this behavior, we inject the function's code into the context of the actual Plex webpage, allowing access to the same window variable the application uses and therefore allowing access to the Chromecast API.
Overwriting the Chromecast API
But, this is unfortunately only half the battle. Because the script is now injected just after the DOM has loaded, our code is executed before the Chromecast API is actually available. This means, if we run the Chrome extension as is, we will end up trying to overwrite some undefined variable.
To fix this, we can use the Chromecast extension's "on load" callback-- __onGCastApiAvailable. This is a special function, that when defined, will be executed by the Chromecast API once it is loaded. This is normally where you write your own code to setup your Chromecast application, and it is also where Plex initializes their own code.
This, of course, poses a problem-- if we define the __onGCastApiAvailable function, when the Plex application loads our code will simply be overwritten. Enter, Object.defineProperty:
The Object.defineProperty method allows us to essentially add a hook that runs when a property on an object is get or set. In this case, we want to say, "when Plex tries to set the Chromecast callback __onGCastApiAvailable, then overwrite it with our own function". We can do this quite simply:
Object.defineProperty(window, '__onGCastApiAvailable', {
    get: function() {
        // Run our injection code here
    return window.____onGCastApiAvailable;
},

set: function(a) {
    window.____onGCastApiAvailable = a;
}

});
As you can see, we are defining a function to be run when the __onGCastApiAvailable property on the window object is set and when it is retrieved. All we do is actually store Plex's specified callback function in another variable, with four underscores instead of two, and execute some code when the function is retrieved again.
Put together, our injection extension now hooks into the __onGCastApiAvailable function to overwrite the Chromecast API.
In the actual Chrome extension, there's some additional code that creates a very basic options page and uses the message passing API to communicate between the different Chrome sandboxes. This allows us to remove the hard coded "new" Chromecast application ID, and allows the user to change it on the fly in the Chrome extensions page.
To view the actual Chrome extension's source, you can visit the GitHub page:
Putting it All Together
Once the Chrome extension was built, all that was left to do was to test it out. A good way to do so is to use the Jellyfish bitrate test files. The Jellyfish videos are a series of files with different bitrates.
You can try this test yourself-- download the 20 mbps Jellyfish video and add it to your Plex server. With the injection extension disabled, I couldn't even get the file to play-- Plex simply complained that there was an unspecified problem. With the extension enabled, however, Plex happily "Direct Play"s the file4 with absolutely no stuttering.
This was an interesting exercise in reverse engineering, and I definitely enjoyed the challenge. However, Plex needs to see the value in removing this hard coded limitation by default, and allow for users with different setups to tweak their servers for their specific needs.
Despite the limitation remaining in place, in the mean time, you can always perform the fix yourself and go back to enjoying your high bitrate media. Enjoy!
- If the Plex team is really running into performance problems, they need to re-evaluate their testing setup. Not only have I gotten high bitrate video working fantastically in Plex, as detailed in this writeup, but other users have used other applications to stream higher bitrate content to their Chromecast. ↩
- There are many people that don't realize that changing the XML is useless in the Chromecast's case. You can verify this on your own Plex server by enabling the debug logs, and watching them as you cast a 12 mbps+ video to your TV. You will see a message indicating that the bitrate was locked to 12,000 kbps. You can also watch the server's processes-- you'll see the transcoder spin up and working hard. ↩
- When casting to a Chromecast, the application's name is displayed on the sender computer in the extension popup. Normally, Plex is shown as "Plex". When the injection was working, this changed to "HighBitratePlex", which was what I named my application in the Cast Developer Console. ↩
- "Direct Play" is a feature in Plex that streams a file directly to a client if it is compatible, bypassing the transcoder entirely. In this case, that means that our extension worked since Plex thought that the 20 mbps file was "ok to play" on the Chromecast. ↩