#tutum
I've been experimenting with Docker for a while, but in the last year or so there has been an influx in the number of tools that help put Docker containers into production easily. Some of these are from third party companies, such as CoreOS, and some from Docker itself (such as the new Docker Swarm, Docker Machine, and Docker Compose. However, I've recently been testing a new Docker workflow that allows me to push code, have it tested, built, and deployed into a production server cluster running Docker.
My welcome bar service, ThreeBar1, is currently deployed using a continuous integration/continuous deployment (CI/CD) system onto Heroku. In general, new code is deployed with the following workflow:
- Create new feature locally
- Push code to a git repository on a feature/development branch
- Shippable, a CI service, detects this new commit, pulls the code, and runs tests
- If the tests pass and the code is ready to be deployed to production, the a merge request is created and merged
- Shippable detects the new commit on the master branch, runs tests, and pushes the code to the Heroku git repository
- Heroku builds the application slug and deploys the application
This is really convenient for shipping features quickly and ensures that all code on the production servers is tested and working.
However, this becomes an issue at scale-- Heroku is expensive. Though you receive a month's worth of Heroku Dyno hours2 for free each month, scaling beyond a single Dyno is a minimum of $35/month for half a gigabyte of RAM. To be fair, Heroku adds quite a bit of value beyond simply providing a virtual machine, but some applications might require more flexibility than Heroku's buildpacks provide or simply require more horsepower.
Docker, of course, can replace Heroku for the actual deployment of code, but the problem of scaling still remains. Manually starting and restarting the containers when you deploy new code is certainly not ideal, so let's take a look at different services we can use in our Docker CI/CD workflow.
Finding the Pieces
Docker doesn't have an end-to-end solution for this workflow, so we need to piece together several different technologies to get the desired result. The three primary services include: a CI/CD test runner, a server provider, and a container orchestrator.
CI/CD Server, Test Runner
When choosing a CI/CD service, you must ensure they support building Docker containers. Some services that support this include:
There are others as well (including a plugin for the well known Jenkins CI server), though you will have to do your own research. Many services run builds in a container, but this is completely separate from whether they can build a container. As you will see later, you can also run Docker-in-Docker, so you may potentially be able to use some other services that run inside of a Docker container to build your Docker container.
For my experiments, I chose the open source GitLab CI system to be used in tandem with the GitLab source control service. This way, I could see the build status of each commit in the GitLab interface. GitLab is also a good choice because they not only offer a free source code repository hosting service and hosted version of their CI software, but the software is open source so you can run it on your own servers as well.
If you do opt to use the free GitLab CI system, you will have to provide your own test runner. The hosted CI software they run only coordinates test runners-- it doesn't actually execute your test jobs. You can either launch the runners on a server provider, or you can actually run them locally on your machine (either bare metal, in a VM, or in a Docker container).
Server Hosting Provider
Of course, you also need a server hosting provider for the Docker daemon to reside on. Unfortunately, using Docker often entails running and managing your own servers. This means that you are responsible for uptime and maintenance. But, as I will show, you can run a multi-availability zone or multi-datacenter infrastructure with Docker, meaning that downtime for a single machine may not be as critical as you might think.
Common hosting provider choices include3:
- Amazon Web Services EC2
- Digital Ocean (get a free $10 credit with this link, enough for 2 months of server time)
- Vultr
- RunAbove
Orchestration
Even if you have a set of Docker containers built and a server running the Docker daemon, you still need to easily be able to launch the containers and redeploy them when a new container image is built. The orchestration service I've recently been using is called Tutum.
Right now, Tutum is a service that helps you manage your container deployment workflow. At the moment, you can add nodes dynamically from any cloud hosting provider, create new services, and deploy them from a private registry.
Additionally, Tutum creates a private network overlay for your containers, meaning that your Docker services have their own private IP addresses that magically route traffic between every other container in your Tutum account, whether the physical machines are in the same datacenter or across the world on a different provider. This allows you to create a multi-server, multi-cloud solution that is extremely resilient to failure. If you've ever seen Flannel by CoreOS before, the Tutum private network is similar.
I've been looking for this type of service for a while now. A while ago, I experimented with the tinc VPN to create a P2P mesh network between multiple Docker containers. This was long before Docker offered the level of network configuration that they do now, so it's refreshing to see Tutum do the overlay networking so that it just works.
Tutum also aims to eventually integrate native CI/CD features, as well as git-push support. When Tutum is finished with these features, it could potentially become the only other service you need besides a source code repository.
Tutum has a few key features we need for the CI/CD Docker workflow:
- A private Docker registry for container images
- Redeploy containers when a new image is pushed to the registry
- Easy container scaling (in the UI, you can scale a service from
NtoMcontainers with a single slider) - Add nodes as you need, then scale the containers in the Tutum UI
Other nice-to-have features include:
- DNS based automatic service discovery-- after scaling a web app container, for example, your haproxy router will automatically know about the new containers and route to them
- Private network overlay
- Bring-your-own-node-- you're not locked into a single, or specific, cloud vendor
You may be able to find another service that offers similar features (CoreOS + Fleet or Docker Swarm are potential candidates), but Tutum is a complete solution that's ready today.
Assembling Everything Together
I've chosen the following stack for my own personal experiments:
- Hosted GitLab for source code repository hosting
- Hosted GitLab CI for CI/CD
- RunAbove as a server provider for both CI/CD runners as well as container hosting4
- Tutum for orchestration and service management
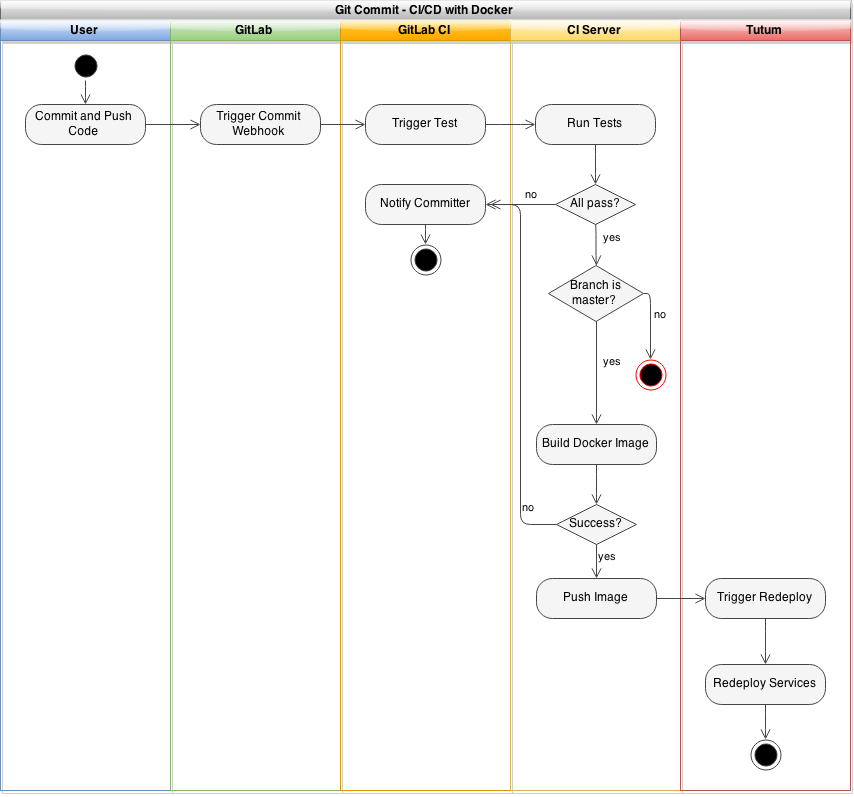
When everything is finished and assembled, a git commit should look like the following:
Deploying the Tutum Agent
Because you can actually use Tutum to deploy the GitLab CI runners, it's a good idea to setup the Tutum agents first. Launch all of the servers you wish to use, and then navigate to the Tutum dashboard where you'll find a "Bring your own node" button. Click this, and you'll receive a command similar to the following:
curl -Ls https://get.tutum.co/ | sudo -H sh -s XXXXXXXXXXXXXXXXXXX
Simply run this code on a node to add it to your Tutum account, and the process for each additional node you wish to add (each time, clicking the "Bring your own node" button to get a new token).
Once the agent has been installed on all of your nodes, you should see them in the dashboard. At this point, you might want to tag your nodes appropriately. This allows you to specify which nodes your services will run on. For example, you might have a set of nodes tagged as staging or production to specify an environment, or a node tagged as ci which only hosts your CI runners.
You can tag a node by clicking it's name and adding the tags in the left hand sidebar.
Deploying a GitLab CI Runner
Now, you can deploy a GitLab CI runner with Tutum. However, we're going to need a special type of CI runner-- we need to be able to run Docker within this container so that we can build our own Docker images.
You may be thinking, how is this possible? Since we will be running the GitLab CI runner with Tutum, it will be within a Docker container itself. So, how do you run Docker inside of a Docker container?
It turns out this is entirely possible to do. In fact, you can even run Docker-in-Docker-in-Docker or nest Docker as many levels deep as you wish. Our final architecture for the GitLab CI runner will look something like this:
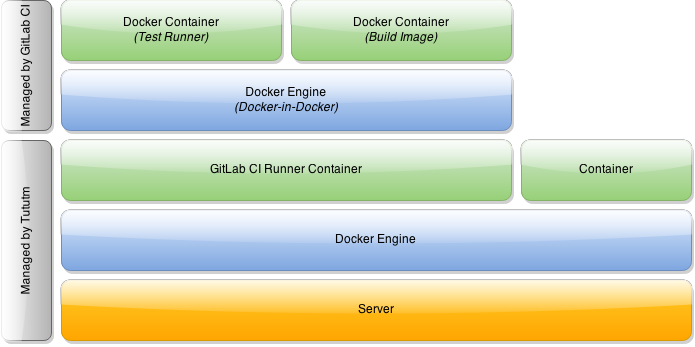
As you can see, Tutum launches the GitLab CI runner within a Docker container on our node. Additionally, the GitLab CI runner will actually use Docker to build images and run tests, meaning we have two nested levels.
I've built in DinD functionality into a forked version of the GitLab CI Runner, available on GitHub and the official Docker Registry.
Before you setup your GitLab CI runner, ensure that you already have a repository in a GitLab instance as well as a running GitLab CI coordinator. As mentioned previously, you can either host your own instances, or you can use GitLab's free hosted repository and CI service.
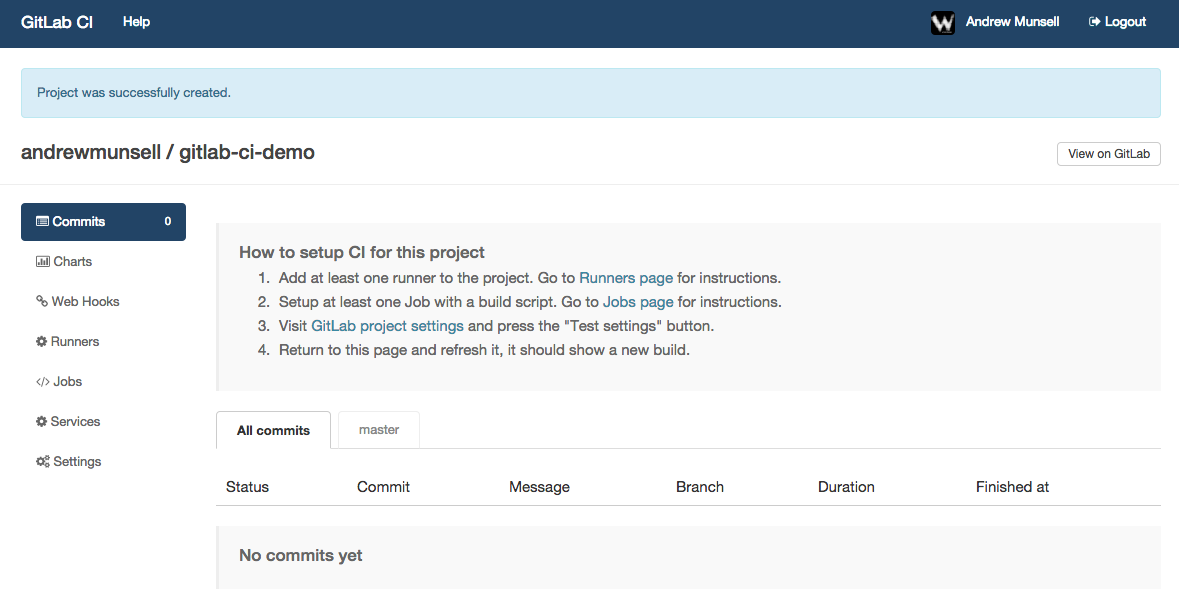
Once you have a repository in GitLab, you can link your GitLab CI account with a couple clicks. After you've linked your accounts together, you'll see a list of your repositories in the GitLab CI dashboard with "Add project to CI" buttons next to them. Simply click the button next to your project to add it to GitLab CI, and you'll see your new project CI dashboard.
If you poke around the GitLab CI interface, you'll notice a menu item titled "Runners". On this page is a registration token, as well instructions to start a new runner. In our case, we'll be using Tutum to deploy our runner with the DinD GitLab CI Runner image. Make sure you copy both the registration token, as well as the GitLab CI URL-- you'll need them both in a couple minutes.
In your Tutum interface, create a new service. A service in Tutum is a logical group of Docker containers all running the same software and using the same configuration. Each service can have zero or more containers running at one time, and Tutum will orchestrate scaling and scheduling your containers across all of your nodes.
On the first screen of the launch wizard, you'll see a few tabs that let you select where your Docker image comes from. Tutum has a built-in, complementary private registry, as well as support for "featured" images and searching through other public registries, including the Docker Hub. Switch to the "Public Images" tab and search for the "wizardapps/dind-gitlab-ci-runner" image, which is the aforementioned DinD modification I have performed on the official GitLab CI Runner repository.
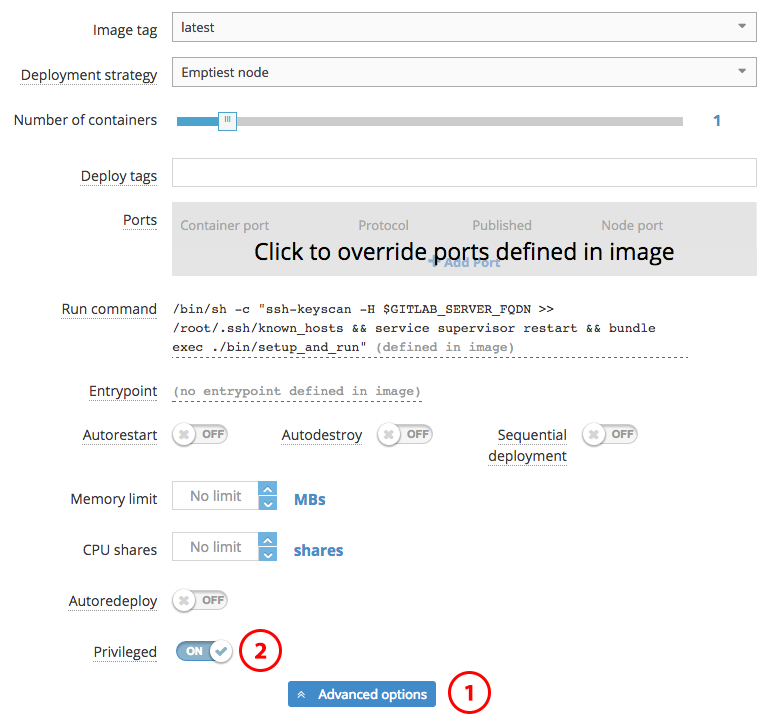
Once you've selected the correct image, you'll be faced with a couple new options regarding scheduling your service containers and basic configuration. For the deployment strategies, it is best to read Tutum's documentation on their behavior, though the default "Emptiest Node" will likely work for the purposes of the CI runner. You also will likely want to leave the number of containers at 1 unless you wish to do parallel builds. If you previously set tags on your Tutum nodes, ensure you enter the correct tags into the "Deploy Tags" field. Essentially, Tutum will try and find a node that satisfies all of the requested "Deploy Tags"-- they are ANDed together.
There is one important setting you must change on this first configuration screen, and it's buried in the "Advanced Options" section-- "Privileged Mode". Docker-in-Docker requires this setting to be enabled, and Tutum fortunately makes it easy to do so.
After configuring privileged mode, you can continue to the next screen-- environmental variable configuration.
Like with the Docker CLI, Tutum allows you to specify environmental variables to be inserted into your Docker containers. However, with Tutum, every deployed container will have the same environmental variables. Though we will not use the links feature for the GitLab CI runner, using Tutum's dynamic links, containers will have access to other containers' environmental variables as well.
There's three important variables that need to be configured:
REGISTRATION_TOKEN: The registration token that you copied earlier from the GitLab CI "Runners" pageCI_SERVER_URL: The CI server URL that was provided on the GitLab CI "Runners" page. If you're using the hosted version of GitLab CI, this is "https://ci.gitlab.com/"GITLAB_SERVER_FQDN: The fully qualified domain name for your GitLab CI instance. This is used to perform assh-keyscan. If you are using the hosted version of GitLab CI, this is "ci.gitlab.com"
After you've configured these variables, it's time to "Create and Deploy" your service.
Once the container finishes launching, you can go back to GitLab CI's "Runners" page and you should see a new entry. You're now ready to setup the GitLab CI job.
Creating a DinD GitLab CI Job
The final step to setup our CI/CD workflow is to add the actual job script to GitLab CI. Now, this will vary depending on your project, but one aspect will remain consistent: you'll end up using Docker to build a Docker container, which is then uploaded to your image repository. In this case, it would be Tutum's private Docker image repository.
GitLab CI jobs can be modified in the "Jobs" tab. Within this section, there are two different subsections-- "Test", and "Deploy". As their names might suggest, the test scripts are generally used to run unit or integration tests. The deploy scripts are only run for specific branches once the tests have completed successfully. This allows you to have a test script that runs for every commit, and a deploy script that runs only for the master branch and once all of the tests have completed successfully.
An example test script might look like the following:
docker login -u [USERNAME] -e [EMAIL] -p="[PASSWORD]" tutum.co
Build the Docker image and tag it for Tutum
docker build -t wizardapps/app .

docker tag -f wizardapps/app tutum.co/wizardapps/app:latest
The above test script doesn't actually run any tests, but it does build a Docker image for our application and tag it properly. If you use this as a starting point for your own test scripts, ensure you change the username, email, and password placeholders for the Tutum registry. Because Tutum provides a private Docker registry, you need to ensure your test runner is authenticated with your credentials.5
Then, we could also have a deploy script that actually pushes the image to Tutum's registry, therefore kicking off the build:
docker push tutum.co/wizardapps/app
Auto-Redeploy
At this point, your system should be up and running for builds, and new code should be built as a container and uploaded to the Tutum registry. All that's left is to create your service on Tutum, and ensure auto-redeploy is enabled.
This is done similarly to how we setup our CI services, though instead of making the service "privileged", we want to enable the "Auto Redeploy" switch. Configure all of your service's ports, environmental variables, links, and volumes, and then just hit deploy.
Congratulations, you now have your own Docker application that is automatically redeployed onto a fleet of servers, but only after the code has been tested!
Other Resources
GitLab CI Multi-Runner: https://github.com/ayufan/gitlab-ci-multi-runner
The setup we have requires one CI "service" on Tutum per project-- this can quickly get out of hand. As an alternative, you can experiment with the GitLab CI Multi-Runner, which takes a configuration file and allows for multiple projects to be built.
- I've got some really cool new stuff coming in ThreeBar-- far beyond just a welcome bar. Feel free to sign up to be notified when it's ready! Once it's live, you can see the power of a CI-deployed-Docker-application yourself. ↩
- Heroku runs on a pricing model where you pay by the hour for resources you use. Each "virtual machine" running your code is called a "Dyno", and can run a single command such as a web server or queue worker. You get ~750 hours of "Dyno" usage each month for free, which means you can run one web server per application on Heroku for free if you wish. ↩
- I have personally used all the following server providers, and I do earn affiliate revenue for some of the links in this blog post. However, any server provider that allows you to run Linux instances should work for setting up your Docker server. ↩
- RunAbove's Sandbox platform is great for these experiments because the servers have a high amount of RAM, SSD storage, and are extremely cheap-- around ~$3 USD per month for a server with 2 GB of RAM. However, they are not covered by an SLA at the moment, so for production traffic you may wish to choose another provider. ↩
- At the moment, you must put your Tutum username and password directly into the job script. Unfortunately Tutum does not provide separate passwords or API keys for the registry, so this solution leaves a potential security hole. ↩