Deploying the Right Way: Dokku on Digital Ocean
While I've previously gone over development environments using Vagrant and Puppet, recent advancements in LXC container management (see: Docker) and applications that have popped up using this technology have made deploying to staging or production environments easier-- and cheaper.
Heroku, a fantastic platform that allows developers to focus on code rather than server management, has spoiled many with its easy git push deployment mechanism. With a command in the terminal, your application is pushed to Heroku's platform, built into what is known as a "slug", and deployed onto a scalable infrastructure that can handle large spikes of web traffic.
The problem with Heroku is its cost-- while a single "Dyno" per application, which is equivalent to a virtual machine running your code-- is free, scaling past a single instance costs approximately $35 a month. Each Dyno only includes half a gigabyte of RAM as well, which is minuscule compared to the cost-equivalent virtual machine from a number of other providers. For example, Amazon EC2 has a "Micro" instance with 0.615 gigabytes of RAM for approximately $15 a month, while $40 a month on Digital Ocean would net you a virtual machine with 4 gigabytes of RAM. But, with Heroku, you pay for their fantastic platform and management tools, as well as their quick response time to platform related downtime-- certainly an amazing value for peace of mind.
But, if you're only deploying "hobby" applications or prefer to manage your own infrastructure, there's a couple of options to emulate a Heroku-like experience.
Docker, LXC, and Containers
If you've been following any sort of developer news site, such as Hacker News, you've likely seen "Docker" mentioned quite a few times. Docker is a management system for LXC containers, a feature of Linux kernels to separate processes and applications from one another in a lightweight manner.
Containers are very similar to virtual machines in that they provide security and isolation between different logical groups of processes or applications. Just as a hosting provider may separate different customers into different virtual machines, Docker allows system administrators and developers to create multiple applications on a single server (or virtual server) that cannot interfere with each other's files, memory, or processor usage. LXC containers and the Docker management tool provide methods to limit RAM and CPU usage per container.
Additionally, Docker allows for developers to export packages containing an application's code and dependencies in a single .tar file. This package can be imported into any system running Docker, allowing easy portability between physical machines and different environments.
Dokku and Deployment
Containers may be handy for separation of processes, but Docker alone does not allow for easy Heroku-like deployment. This is where platforms such as Dokku, Flynn, and others come in. Flynn aims to be a complete Heroku replacement, including scaling and router support, but is not currently available for use outside of a developer preview. Conversely, Dokku's goal is to create a simple "mini-Heroku" environment that only emulates the core features of Heroku's platform. But, for many, the recreation of Heroku's git push deployment and basic Buildpack support is enough. Additionally, Dokku implements a simple router that allows you to use custom domain names or subdomains for each of your applications.
Digital Ocean is a great cloud hosting provider that has recently gained significant traction. Their support is great and often responds within minutes, and their management interface is simple and powerful. Starting at $5 per month, you can rent a virtual machine with half a gigabyte of RAM and 20 gigabytes of solid state drive (SSD) space. For small, personal projects, Digital Ocean is a great provider to use. Larger virtual machines for production usage are also reasonably priced, with pricing based on the amount of RAM included in the virtual machine.
Another reason why Digital Ocean is great for Docker and Dokku is due to their provided pre-built virtual machine images. Both Dokku 0.2.0-rc3 and Docker 0.7.0 images are provided as of this publication, and in less than a minute, you can have a ready-to-go Dokku virtual machine running.
If you don't already have a Digital Ocean account, you can get $10 in free credit to try it out through this link. That's enough for two months of the 512 MB RAM droplet, or a single month with the 1 GB RAM droplet.
Setting Up the Server
After you've logged into Digital Ocean, create a new Droplet of any size you wish. The 512 MB instance is large enough for smaller projects and can even support multiple applications running at once, though you may need to enable swap space to prevent out-of-memory errors. The 1 GB Droplet is better for larger projects and runs only $10 per month. If you are simply experimenting, you only pay for the hours you use the instance (e.g. $0.007 an hour for the 512 MB Droplet), and Digital Ocean regularly provides promotional credit for new users on their Twitter account. If you follow this tutorial and shut down the instance immediately afterwards, it may cost you as little as two cents. You can choose any Droplet region you wish-- preferably one that is close to you or your visitors for the lowest latency. Digital Ocean currently has two New York, two Amsterdam, and one San Francisco datacenter, with Singapore coming online in the near future. Droplets cost the same in each region, unlike Amazon or other providers.
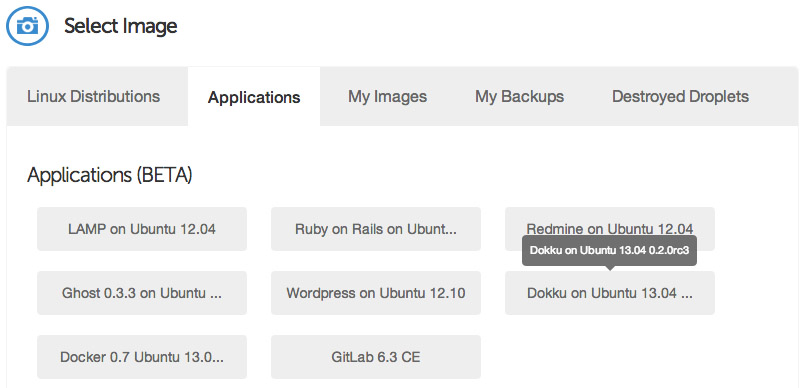
Under the "Select Image" header on the Droplet creation page, switch to the "Applications" tab and choose the Dokku image on Ubuntu 13.04. This image has Dokku already setup for you and only requires a single step to begin pushing applications to it.
Select your SSH key (if you haven't already set one up, you will need to do so before launching your Droplet), and then hit the big "Create Droplet" button at the bottom of the page. You should see a progress bar fill up, and in approximately one minute, you'll be taken to a new screen with your Droplet's information (such as IP address).
Take the IP address, and copy and paste it into a browser window. You'll see a screen popup with your SSH public key, as well as some information pertaining to the hostname of your Dokku instance. If you specified a fully qualified domain name (e.g. apps.example.com) as your Droplet's hostname when you created it, the domain will be automatically detected and pre-filled in the setup screen. If this is the case, you can just check the "use virtualhost naming" checkbox and hit "Finish" and continue to setup your DNS.
However, if you entered a hostname that is not a fully qualified domain name (e.g. apps-example), you'll just see your IP address in the Hostname text box. Enter the fully qualified domain name that you'll use for your server, select the "virtualhost naming" checkbox, and click "Finish Setup". For example, if you want your applications to be accessible under the domain apps.example.com, you would enter apps.example.com in the "Hostname" field. Then, when you push an app named "website", you will be able to navigate to website.apps.example.com to access it. You'll be able to setup custom domains per-app later (e.g. have www.andrewmunsell.com show the application from website.apps.example.com).
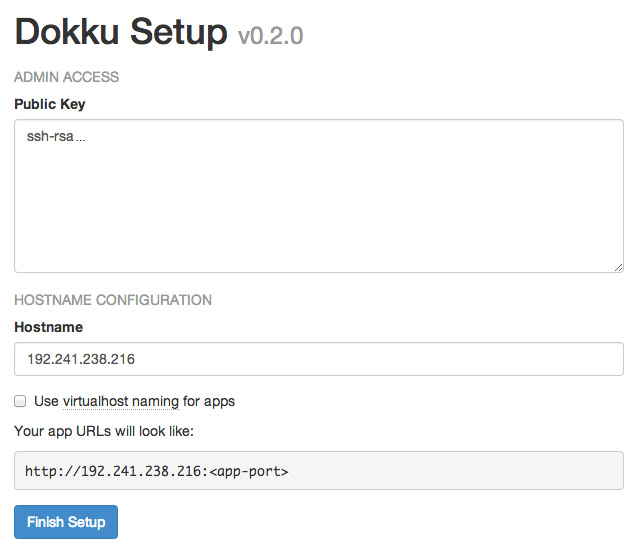
In any case, you'll be redirected to the Dokku Readme file on GitHub. You should take a minute to read through it, but otherwise you've finished the setup of Dokku.
DNS Setup
Once your Droplet is running, you must setup your DNS records to properly access Dokku and your applications. To use Dokku with hostname-based apps (i.e. not an IP address/port combination), your DNS provider must support wildcard DNS entires. Amazon Route 53 is a relatively cheap solution that supports wildcard DNS entires (approximate cost of $6 per year), while Cloudflare (free) is another.
To properly resolve hostnames to your Droplet running Dokku, two A DNS records must be set:
A       [Hostname]      [Droplet IP address]
A       *.[Hostname]    [Droplet IP address]
For example, if your Droplet is running with a hostname of apps.example.com and you wish to use apps under *.apps.example.com, you would use the following DNS records:
A       apps.example.com        [Droplet IP address]
A       *.apps.example.com      [Droplet IP address]
For more information on DNS, see various resources available to you on the Internet, including Cloudflare's documentation on the subject.
Deploying Code
Dokku allows for many of your existing apps, including those built for Heroku, to immediately run on your own Dokku instance. Dokku uses a package called a "Buildpack" to define how your application is packaged for deployment. For example, the PHP Buildpack defines behavior to pull down compiled versions of Apache, PHP, and other dependencies, and perform basic setup to run a PHP application. Similarly, the Node.js Buildpack retrieves dependencies by fetching the Node.js binary, NPM, and all of your application's dependencies as defined in package.json.
To illustrate how Dokku works, we'll create a simple Node.js application that defines dependencies and responds to HTTP requests with "Hello, World!"
Create a new directory on your computer with the following files and contents:
/package.json
{
    "name": "dokku-demo-application",
    "version": "1.0.0",
"private": true,

"engines": {
    "node": ">=0.10.0",
    "npm": ">=1.3"
},

"dependencies": {
    "express": "~3.0"
}

}
/server.js
var PORT = process.ENV.PORT || 8080;
var express = require("express");
var app = express();

app.use(app.router);

app.use(express.static(__dirname + "/public"));
app.get("/", function(req, res){

res.send("Hello, World!");

});
app.listen(PORT);
/Procfile
web: node server.js
This is a simple example Express application that creates a single HTTP GET route--the root directory /--and responds with a single phrase. As you can see, this Dokku application's structure mirrors Heroku's requirements. The Procfile defines a single "web" command to be started. All Dokku Buildpacks will normally ignore other process types defined in the Procfile.
After you've created the files, create a Git repository using a Git GUI such as Tower or SourceTree, or the command line, and commit the previously created files. You'll also need to define a remote repository-- your Dokku instance. For example, if your Dokku instance was hosted at apps.example.com, you would define an remote of [email protected]:app-name. You can modify the app-name as desired, as this will correspond to the subdomain that your application will be served from.
Once you've added the remote, push your local master branch to the remote's master. If everything is setup correctly, you'll see a log streaming in that indicates Dokku's current task. Behind the scenes, Dokku creates a new Docker container and runs the Buildpack's compilation steps to build a Docker image of your application. If the build succeeds, your application is deployed into a new container and you will are provided with a URL to access your application at. In this example, the application would be accessible at http://app-name.apps.example.com/ and will display "Hello, World!"
Using a Custom Domain
While your application is accessible at the subdomain provided to you after your application is deployed, you may also want to use a custom domain for your application (e.g. api.example.com). You can do this in two ways-- use the fully qualified domain name desired for your application's repository name, or edit the generated nginx.conf file on your Dokku server to include your domain name.
The first method is quite simple-- instead of pushing your repository to [email protected]:app-name, you simply name your app based on your domain. For example: [email protected]:api.example.com.
Alternatively, you can SSH into your Dokku instance using the IP address or hostname and the root user to modify the nginx.conf file for your application. Once you're SSH-ed into your instance, simply change directories to /home/dokku/[application name] and edit the nginx.conf file. For example, the application we pushed ("app-name") would be found at /home/dokku/app-name. To add your own domain, simply add your custom domain name to the end of the server_name line, with each domain separated by spaces. Changes to the domain in this file will not be overwritten on the next git push.
Going Further
As you can see, Dokku is an incredibly powerful platform that mimics Heroku very closely. It provides the basics needed for deploying an application easily, and allows for quick zero-downtime deployments. With a host like Digital Ocean, you can easily and cheaply host multiple applications. Careful developers can even deploy to a separate "staging" application before pushing to the production app, allowing for bugs to be caught before they're in the live environment.