#devops
I've been experimenting with Docker for a while, but in the last year or so there has been an influx in the number of tools that help put Docker containers into production easily. Some of these are from third party companies, such as CoreOS, and some from Docker itself (such as the new Docker Swarm, Docker Machine, and Docker Compose. However, I've recently been testing a new Docker workflow that allows me to push code, have it tested, built, and deployed into a production server cluster running Docker.
My welcome bar service, ThreeBar1, is currently deployed using a continuous integration/continuous deployment (CI/CD) system onto Heroku. In general, new code is deployed with the following workflow:
- Create new feature locally
- Push code to a git repository on a feature/development branch
- Shippable, a CI service, detects this new commit, pulls the code, and runs tests
- If the tests pass and the code is ready to be deployed to production, the a merge request is created and merged
- Shippable detects the new commit on the master branch, runs tests, and pushes the code to the Heroku git repository
- Heroku builds the application slug and deploys the application
This is really convenient for shipping features quickly and ensures that all code on the production servers is tested and working.
However, this becomes an issue at scale-- Heroku is expensive. Though you receive a month's worth of Heroku Dyno hours2 for free each month, scaling beyond a single Dyno is a minimum of $35/month for half a gigabyte of RAM. To be fair, Heroku adds quite a bit of value beyond simply providing a virtual machine, but some applications might require more flexibility than Heroku's buildpacks provide or simply require more horsepower.
Docker, of course, can replace Heroku for the actual deployment of code, but the problem of scaling still remains. Manually starting and restarting the containers when you deploy new code is certainly not ideal, so let's take a look at different services we can use in our Docker CI/CD workflow.
Finding the Pieces
Docker doesn't have an end-to-end solution for this workflow, so we need to piece together several different technologies to get the desired result. The three primary services include: a CI/CD test runner, a server provider, and a container orchestrator.
CI/CD Server, Test Runner
When choosing a CI/CD service, you must ensure they support building Docker containers. Some services that support this include:
There are others as well (including a plugin for the well known Jenkins CI server), though you will have to do your own research. Many services run builds in a container, but this is completely separate from whether they can build a container. As you will see later, you can also run Docker-in-Docker, so you may potentially be able to use some other services that run inside of a Docker container to build your Docker container.
For my experiments, I chose the open source GitLab CI system to be used in tandem with the GitLab source control service. This way, I could see the build status of each commit in the GitLab interface. GitLab is also a good choice because they not only offer a free source code repository hosting service and hosted version of their CI software, but the software is open source so you can run it on your own servers as well.
If you do opt to use the free GitLab CI system, you will have to provide your own test runner. The hosted CI software they run only coordinates test runners-- it doesn't actually execute your test jobs. You can either launch the runners on a server provider, or you can actually run them locally on your machine (either bare metal, in a VM, or in a Docker container).
Server Hosting Provider
Of course, you also need a server hosting provider for the Docker daemon to reside on. Unfortunately, using Docker often entails running and managing your own servers. This means that you are responsible for uptime and maintenance. But, as I will show, you can run a multi-availability zone or multi-datacenter infrastructure with Docker, meaning that downtime for a single machine may not be as critical as you might think.
Common hosting provider choices include3:
- Amazon Web Services EC2
- Digital Ocean (get a free $10 credit with this link, enough for 2 months of server time)
- Vultr
- RunAbove
Orchestration
Even if you have a set of Docker containers built and a server running the Docker daemon, you still need to easily be able to launch the containers and redeploy them when a new container image is built. The orchestration service I've recently been using is called Tutum.
Right now, Tutum is a service that helps you manage your container deployment workflow. At the moment, you can add nodes dynamically from any cloud hosting provider, create new services, and deploy them from a private registry.
Additionally, Tutum creates a private network overlay for your containers, meaning that your Docker services have their own private IP addresses that magically route traffic between every other container in your Tutum account, whether the physical machines are in the same datacenter or across the world on a different provider. This allows you to create a multi-server, multi-cloud solution that is extremely resilient to failure. If you've ever seen Flannel by CoreOS before, the Tutum private network is similar.
I've been looking for this type of service for a while now. A while ago, I experimented with the tinc VPN to create a P2P mesh network between multiple Docker containers. This was long before Docker offered the level of network configuration that they do now, so it's refreshing to see Tutum do the overlay networking so that it just works.
Tutum also aims to eventually integrate native CI/CD features, as well as git-push support. When Tutum is finished with these features, it could potentially become the only other service you need besides a source code repository.
Tutum has a few key features we need for the CI/CD Docker workflow:
- A private Docker registry for container images
- Redeploy containers when a new image is pushed to the registry
- Easy container scaling (in the UI, you can scale a service from
NtoMcontainers with a single slider) - Add nodes as you need, then scale the containers in the Tutum UI
Other nice-to-have features include:
- DNS based automatic service discovery-- after scaling a web app container, for example, your haproxy router will automatically know about the new containers and route to them
- Private network overlay
- Bring-your-own-node-- you're not locked into a single, or specific, cloud vendor
You may be able to find another service that offers similar features (CoreOS + Fleet or Docker Swarm are potential candidates), but Tutum is a complete solution that's ready today.
Assembling Everything Together
I've chosen the following stack for my own personal experiments:
- Hosted GitLab for source code repository hosting
- Hosted GitLab CI for CI/CD
- RunAbove as a server provider for both CI/CD runners as well as container hosting4
- Tutum for orchestration and service management
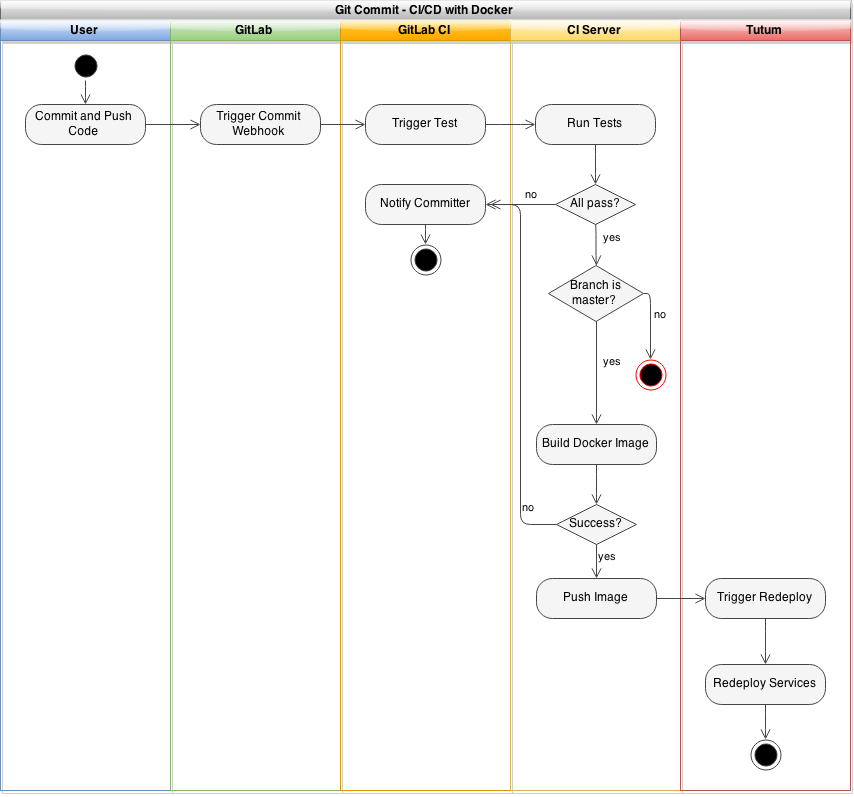
When everything is finished and assembled, a git commit should look like the following:
Deploying the Tutum Agent
Because you can actually use Tutum to deploy the GitLab CI runners, it's a good idea to setup the Tutum agents first. Launch all of the servers you wish to use, and then navigate to the Tutum dashboard where you'll find a "Bring your own node" button. Click this, and you'll receive a command similar to the following:
curl -Ls https://get.tutum.co/ | sudo -H sh -s XXXXXXXXXXXXXXXXXXX
Simply run this code on a node to add it to your Tutum account, and the process for each additional node you wish to add (each time, clicking the "Bring your own node" button to get a new token).
Once the agent has been installed on all of your nodes, you should see them in the dashboard. At this point, you might want to tag your nodes appropriately. This allows you to specify which nodes your services will run on. For example, you might have a set of nodes tagged as staging or production to specify an environment, or a node tagged as ci which only hosts your CI runners.
You can tag a node by clicking it's name and adding the tags in the left hand sidebar.
Deploying a GitLab CI Runner
Now, you can deploy a GitLab CI runner with Tutum. However, we're going to need a special type of CI runner-- we need to be able to run Docker within this container so that we can build our own Docker images.
You may be thinking, how is this possible? Since we will be running the GitLab CI runner with Tutum, it will be within a Docker container itself. So, how do you run Docker inside of a Docker container?
It turns out this is entirely possible to do. In fact, you can even run Docker-in-Docker-in-Docker or nest Docker as many levels deep as you wish. Our final architecture for the GitLab CI runner will look something like this:
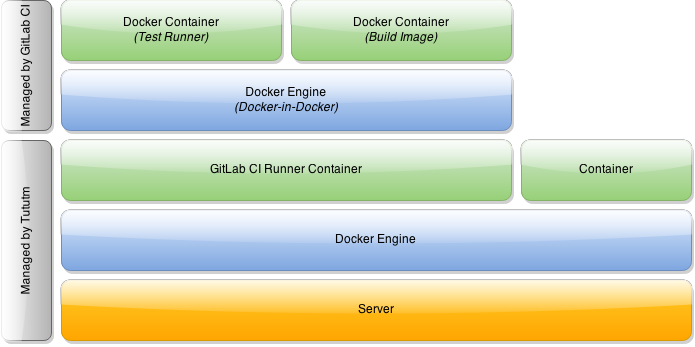
As you can see, Tutum launches the GitLab CI runner within a Docker container on our node. Additionally, the GitLab CI runner will actually use Docker to build images and run tests, meaning we have two nested levels.
I've built in DinD functionality into a forked version of the GitLab CI Runner, available on GitHub and the official Docker Registry.
Before you setup your GitLab CI runner, ensure that you already have a repository in a GitLab instance as well as a running GitLab CI coordinator. As mentioned previously, you can either host your own instances, or you can use GitLab's free hosted repository and CI service.
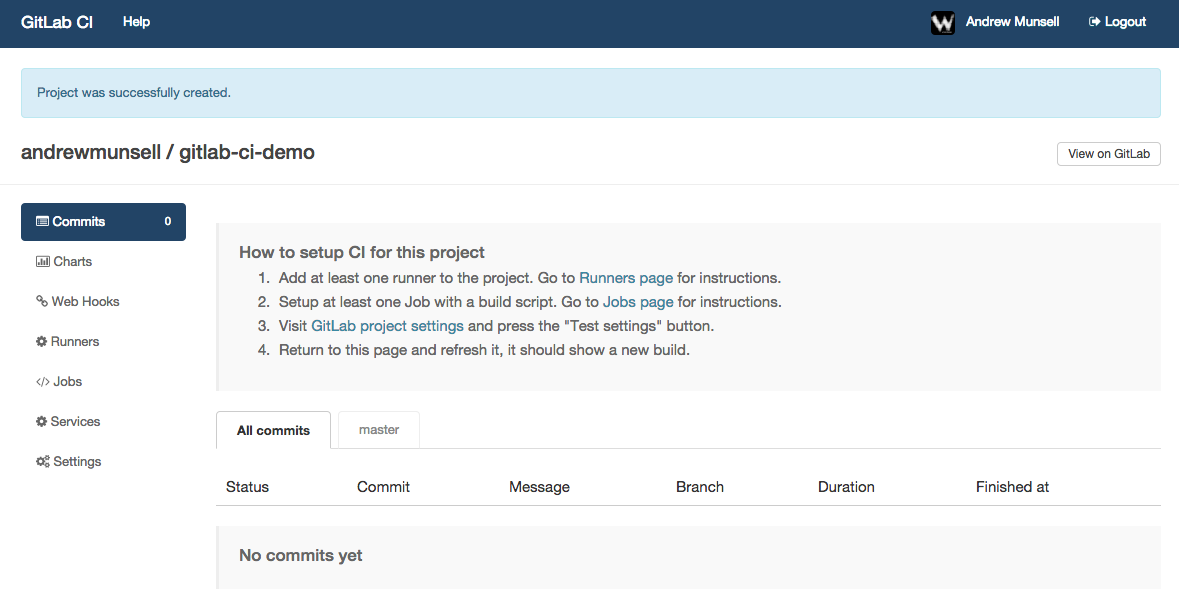
Once you have a repository in GitLab, you can link your GitLab CI account with a couple clicks. After you've linked your accounts together, you'll see a list of your repositories in the GitLab CI dashboard with "Add project to CI" buttons next to them. Simply click the button next to your project to add it to GitLab CI, and you'll see your new project CI dashboard.
If you poke around the GitLab CI interface, you'll notice a menu item titled "Runners". On this page is a registration token, as well instructions to start a new runner. In our case, we'll be using Tutum to deploy our runner with the DinD GitLab CI Runner image. Make sure you copy both the registration token, as well as the GitLab CI URL-- you'll need them both in a couple minutes.
In your Tutum interface, create a new service. A service in Tutum is a logical group of Docker containers all running the same software and using the same configuration. Each service can have zero or more containers running at one time, and Tutum will orchestrate scaling and scheduling your containers across all of your nodes.
On the first screen of the launch wizard, you'll see a few tabs that let you select where your Docker image comes from. Tutum has a built-in, complementary private registry, as well as support for "featured" images and searching through other public registries, including the Docker Hub. Switch to the "Public Images" tab and search for the "wizardapps/dind-gitlab-ci-runner" image, which is the aforementioned DinD modification I have performed on the official GitLab CI Runner repository.
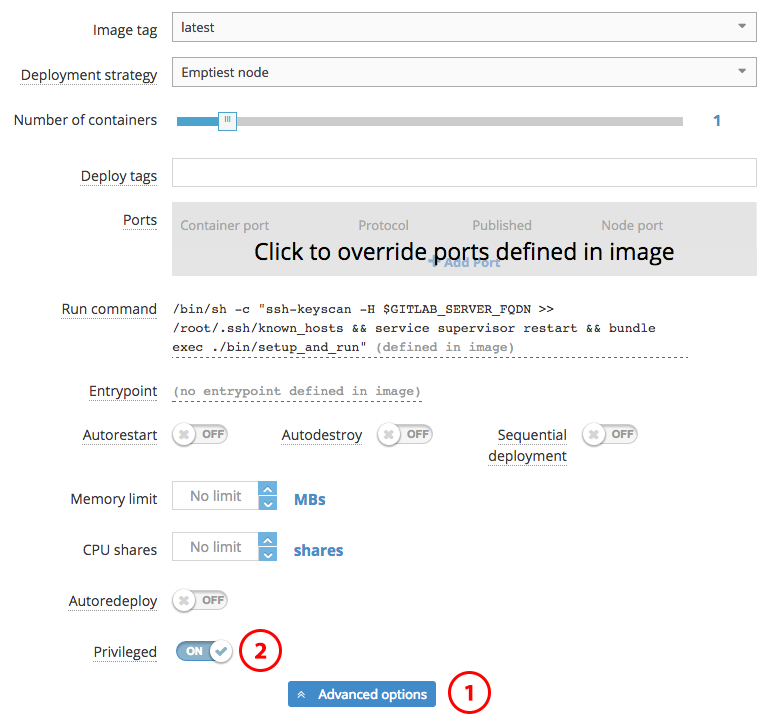
Once you've selected the correct image, you'll be faced with a couple new options regarding scheduling your service containers and basic configuration. For the deployment strategies, it is best to read Tutum's documentation on their behavior, though the default "Emptiest Node" will likely work for the purposes of the CI runner. You also will likely want to leave the number of containers at 1 unless you wish to do parallel builds. If you previously set tags on your Tutum nodes, ensure you enter the correct tags into the "Deploy Tags" field. Essentially, Tutum will try and find a node that satisfies all of the requested "Deploy Tags"-- they are ANDed together.
There is one important setting you must change on this first configuration screen, and it's buried in the "Advanced Options" section-- "Privileged Mode". Docker-in-Docker requires this setting to be enabled, and Tutum fortunately makes it easy to do so.
After configuring privileged mode, you can continue to the next screen-- environmental variable configuration.
Like with the Docker CLI, Tutum allows you to specify environmental variables to be inserted into your Docker containers. However, with Tutum, every deployed container will have the same environmental variables. Though we will not use the links feature for the GitLab CI runner, using Tutum's dynamic links, containers will have access to other containers' environmental variables as well.
There's three important variables that need to be configured:
REGISTRATION_TOKEN: The registration token that you copied earlier from the GitLab CI "Runners" pageCI_SERVER_URL: The CI server URL that was provided on the GitLab CI "Runners" page. If you're using the hosted version of GitLab CI, this is "https://ci.gitlab.com/"GITLAB_SERVER_FQDN: The fully qualified domain name for your GitLab CI instance. This is used to perform assh-keyscan. If you are using the hosted version of GitLab CI, this is "ci.gitlab.com"
After you've configured these variables, it's time to "Create and Deploy" your service.
Once the container finishes launching, you can go back to GitLab CI's "Runners" page and you should see a new entry. You're now ready to setup the GitLab CI job.
Creating a DinD GitLab CI Job
The final step to setup our CI/CD workflow is to add the actual job script to GitLab CI. Now, this will vary depending on your project, but one aspect will remain consistent: you'll end up using Docker to build a Docker container, which is then uploaded to your image repository. In this case, it would be Tutum's private Docker image repository.
GitLab CI jobs can be modified in the "Jobs" tab. Within this section, there are two different subsections-- "Test", and "Deploy". As their names might suggest, the test scripts are generally used to run unit or integration tests. The deploy scripts are only run for specific branches once the tests have completed successfully. This allows you to have a test script that runs for every commit, and a deploy script that runs only for the master branch and once all of the tests have completed successfully.
An example test script might look like the following:
docker login -u [USERNAME] -e [EMAIL] -p="[PASSWORD]" tutum.co
Build the Docker image and tag it for Tutum
docker build -t wizardapps/app .

docker tag -f wizardapps/app tutum.co/wizardapps/app:latest
The above test script doesn't actually run any tests, but it does build a Docker image for our application and tag it properly. If you use this as a starting point for your own test scripts, ensure you change the username, email, and password placeholders for the Tutum registry. Because Tutum provides a private Docker registry, you need to ensure your test runner is authenticated with your credentials.5
Then, we could also have a deploy script that actually pushes the image to Tutum's registry, therefore kicking off the build:
docker push tutum.co/wizardapps/app
Auto-Redeploy
At this point, your system should be up and running for builds, and new code should be built as a container and uploaded to the Tutum registry. All that's left is to create your service on Tutum, and ensure auto-redeploy is enabled.
This is done similarly to how we setup our CI services, though instead of making the service "privileged", we want to enable the "Auto Redeploy" switch. Configure all of your service's ports, environmental variables, links, and volumes, and then just hit deploy.
Congratulations, you now have your own Docker application that is automatically redeployed onto a fleet of servers, but only after the code has been tested!
Other Resources
GitLab CI Multi-Runner: https://github.com/ayufan/gitlab-ci-multi-runner
The setup we have requires one CI "service" on Tutum per project-- this can quickly get out of hand. As an alternative, you can experiment with the GitLab CI Multi-Runner, which takes a configuration file and allows for multiple projects to be built.
- I've got some really cool new stuff coming in ThreeBar-- far beyond just a welcome bar. Feel free to sign up to be notified when it's ready! Once it's live, you can see the power of a CI-deployed-Docker-application yourself. ↩
- Heroku runs on a pricing model where you pay by the hour for resources you use. Each "virtual machine" running your code is called a "Dyno", and can run a single command such as a web server or queue worker. You get ~750 hours of "Dyno" usage each month for free, which means you can run one web server per application on Heroku for free if you wish. ↩
- I have personally used all the following server providers, and I do earn affiliate revenue for some of the links in this blog post. However, any server provider that allows you to run Linux instances should work for setting up your Docker server. ↩
- RunAbove's Sandbox platform is great for these experiments because the servers have a high amount of RAM, SSD storage, and are extremely cheap-- around ~$3 USD per month for a server with 2 GB of RAM. However, they are not covered by an SLA at the moment, so for production traffic you may wish to choose another provider. ↩
- At the moment, you must put your Tutum username and password directly into the job script. Unfortunately Tutum does not provide separate passwords or API keys for the registry, so this solution leaves a potential security hole. ↩
The world of Docker has had some very exciting releases lately. From the self-hosted PaaS Flynn having their first beta release, to the 1.0-and-beyond release of Docker itself, to the new Docker web UI from CenturyLink called Panamax and based on CoreOS, Docker has become easier to use for newcomers.
Today, I'll briefly go over how to setup and use one of these tools--Panamax--and create your own application template to produce a fully internet-accessible web application that requires zero configuration.
Docker? CoreOS? Panamax?
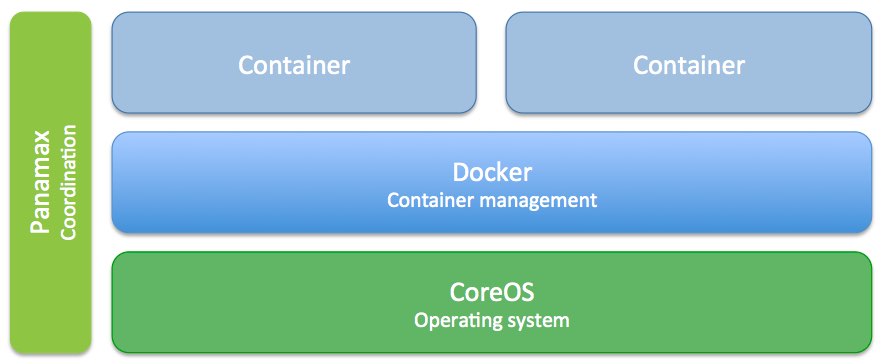
For those that are new to the world of Docker and friends, it may be beneficial to get an overview of how Panamax fits it--
CoreOS, a minimal operating system, is designed to work hand-in-hand with Docker-- a container management system. A container is in concept very similar to a virtual machine, since it allows for isolation of processes. Though, unlike a full blown virtual machine, a Docker container is extremely lightweight and can launch in seconds.
Docker is an extremely powerful tool, but at the same time, it is not accessible to all developers due to its command line interface, necessity for knowledge of how containers behave, and requiring for the developer to know how to edit the manifests called "Dockerfiles". This is where Panamax fits it-- Panamax provides a friendly web interface for coordinating the launch of different types of containers, such as a database and web server, and focuses on easy of use.
Panamax includes the ability to create application templates, or a manifest defining a set of containers to launch, as well as a repository to host this information. Historically, you've had to use the command line to use Docker with commands such as docker pull wizardapps/ngrok. After you had pulled all of the containers, you could then manually link and run them.
Now, with Panamax, this same sequence of commands is abstracted away with a single "Run Template" button. These templates are both CenturyLink and community provided, and are based on the same Docker container templates that are available in the registry. However, with Panamax, all of the linking and launching is automated with CoreOS and Fleet.
Currently, Panamax is single-host only, but CenturyLink plans on implementing multi-host support.
Installing Panamax
Due to being based on CoreOS, Panamax is currently only available as a virtual machine in Vagrant for local development. In production, you can install Panamax on various cloud providers, though it is not currently recommend due to Panamax being a new release.
No matter which platform you intend to install Panamax on, you must have two things already installed on your computer-- Vagrant and VirtualBox.
As of this article the required versions of the above software are:
- VirtualBox 4.2 or higher
- Vagrant 1.6 or higher
For an up-to-date list of required software, you can check the Panamax wiki.
Mac OS X
Mac OS X users can quickly get up and running with Panamax with a single command1:
brew install http://download.panamax.io/installer/brew/panamax.rb
After Panamax is downloaded and installed, it only takes a panamax init to bring up the CoreOS VM with Panamax preinstalled. Once the initialization command is finished, you'll see the UI pop up in your browser on port 8888.
Linux
Similar to Mac OS X, Ubuntu desktop users (12.04 and up) can run a single command:
curl http://download.panamax.io/installer/ubuntu.sh | bash
Panamax for Ubuntu will automatically open a new browser window when it is finished installing-- no need for panamax init
Basic Usage
Panamax has a couple basic commands that are important to know, though you can view all of the available commands simply by running panamax.
panamax up
The panamax up command brings the Vagrant machine running Panamax up. You can use it after rebooting your computer, for example.
panamax stop
As the name states, panamax stop will stop the Vagrant VM.
panamax restart
In reality, this is the same as a panamax stop; panamax up.
panamax reinstall
The reinstall subcommand will delete your applications and CoreOS Vagrant VM and then reinstall it. This command is useful when you need to start fresh.
You can also run panamax reinstall --memory=3072 or similar if you'd like to create a VM with more than 1 GB of memory. Personally I found the default 1 GB RAM virtual machine to be sluggish and hard to work with-- after increasing the RAM to 3 GB, the problems went away.
Launching an Application
After you have Panamax running, a good next step is to launch a pre-built application.
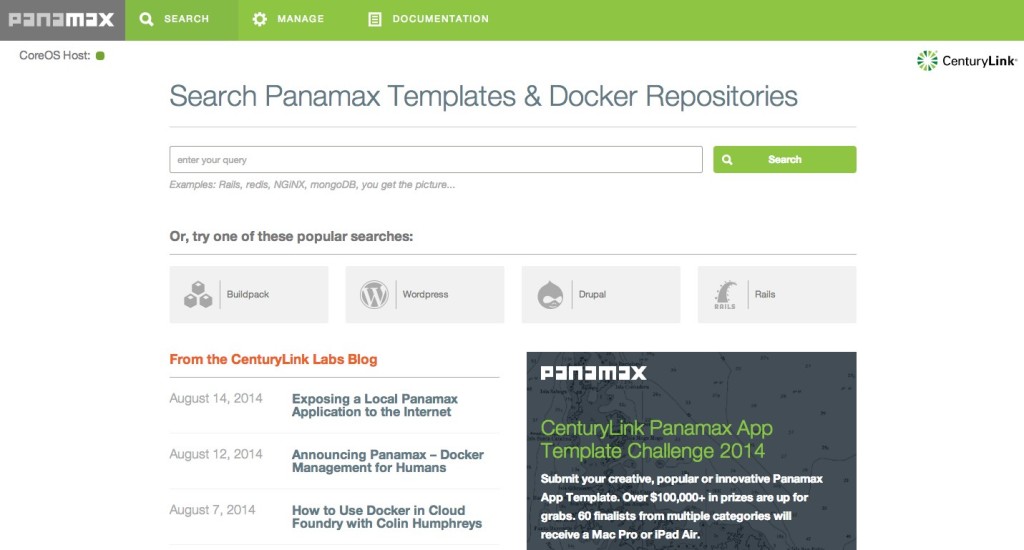
The dashboard, shown above, has several options. Most prominently you can see a search bar, which is your gateway to the Panamax template repository. The repository currently contains several applications such as Wordpress, GitLab, and others-- all pre-configured and ready to go.
Go ahead and start a search for "Ngrok + Wordpress"-- this is an application template I've created that expands on the basic Wordpress template available2.
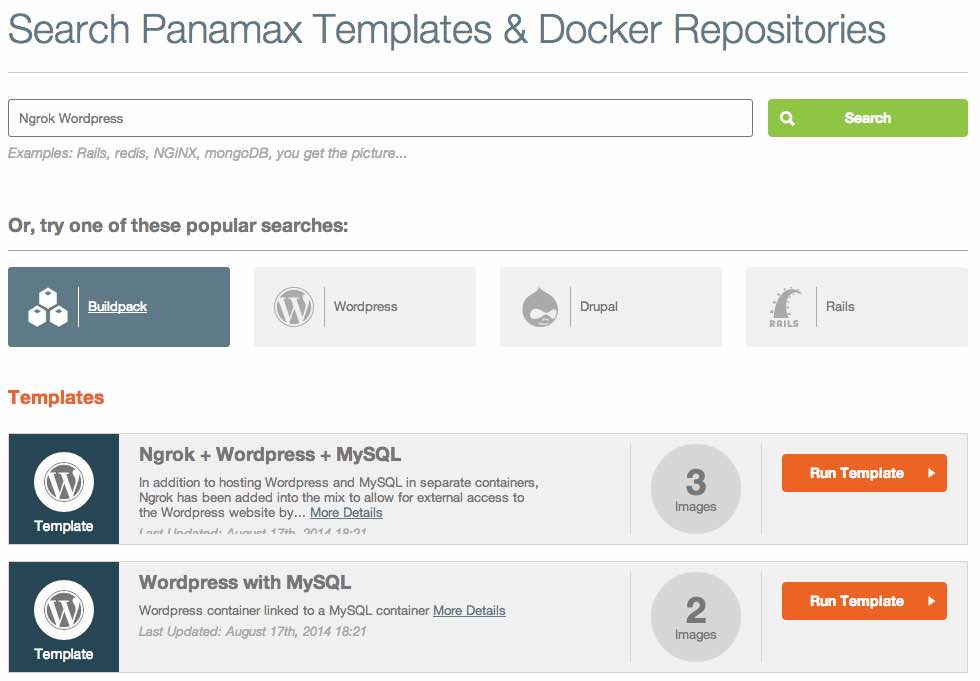
If you simply click on "Run Template" next to the "Ngrok + Wordpress + MySQL" template, you'll be brought to a new page with information on your application launch.
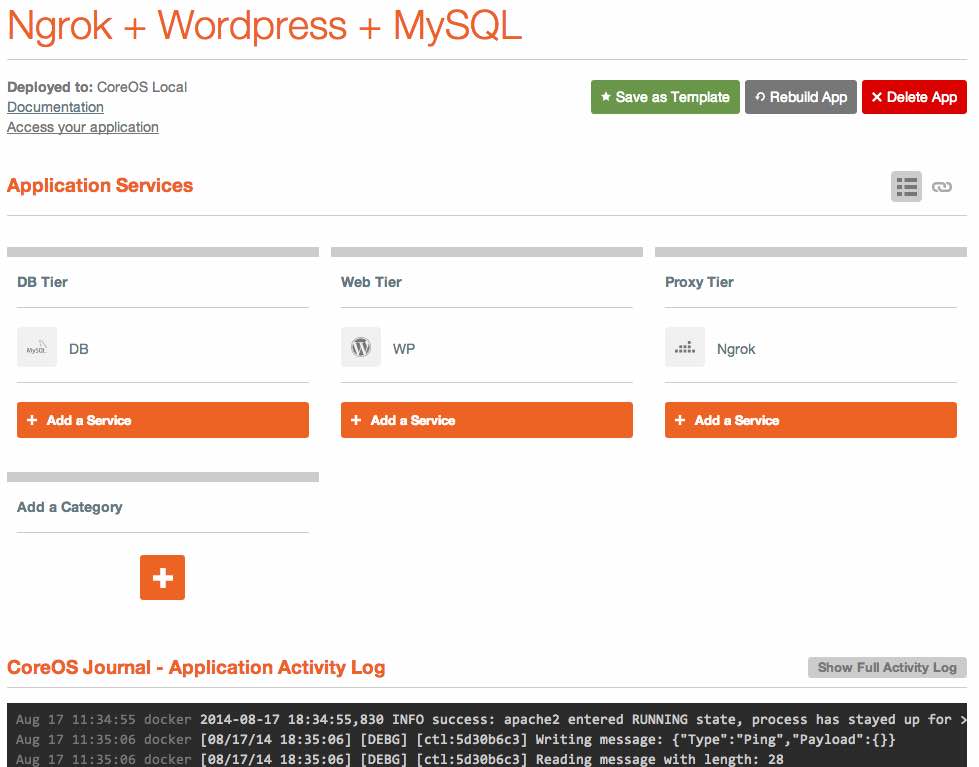
After a few seconds, you should see a message in the "CoreOS Journal" at the bottom of the page that says INFO success: apache2 entered RUNNING state, process has stayed up for > than 1 seconds (startsecs). If you see this, it means that everything is now up and running.
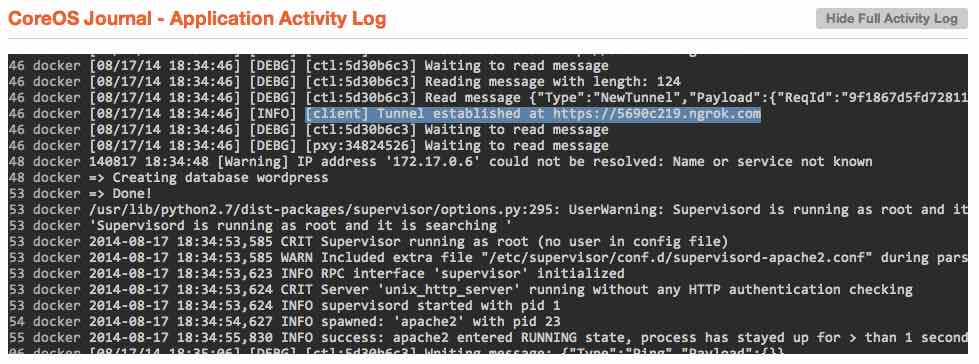
To find the publicly accessible URL, you only have to hit the "Show Full Activity Log" button above the application logs, and scroll up until you see a message that states something similar to [client] Tunnel established at https://5690c219.ngrok.com.
If you copy and paste the URL into any browser-- it doesn't have to just be on your local machine-- you'll see the Wordpress installation page pop up.
How does the Ngrok container work?
Though you may already be familiar with Wordpress, Apache, and MySQL, Ngrok may be a new concept.
Ngrok is essentially a service that creates a local tunnel from your machine, or in this case your Panamax VM inside of VirtualBox and Vagrant, are makes it accessible from the outside internet over a random subdomain. Ngrok is quite useful in scenarios where you must show a co-worker or client something that is running on your local machine, but it also makes it possible to create a publicly accessible URL through a strict firewall (or a virtual machine) without any port forwarding.
You may be asking, why would you use this complicated tunnel over simply running an app directly in Panamax? As it stands, since you must use VirtualBox to try out Panamax locally, you must perform some no-so-complicated-but-tedious steps to actually see your application in a local browser. Sure, you could follow the port forwarding instructions provided, but why do this when you can have a zero-configuration internet-accessible address you can visit from any of your devices?
In context of Panamax and your newly running Wordpress installation, Ngrok is actually running in a separate container and automatically configured through Docker links.
If you look at your application's page in Panamax, you'll see three tiers-- a "DB Tier", "Web Tier", and "Proxy Tier". Each "Tier" is simply a logically grouped set of containers. I've chosen to separate out each type of container based on its purpose, but this was completely arbitrary. If you create your own application template, you could put everything under a "Foobar Tier" if you wish-- there is no functional difference.
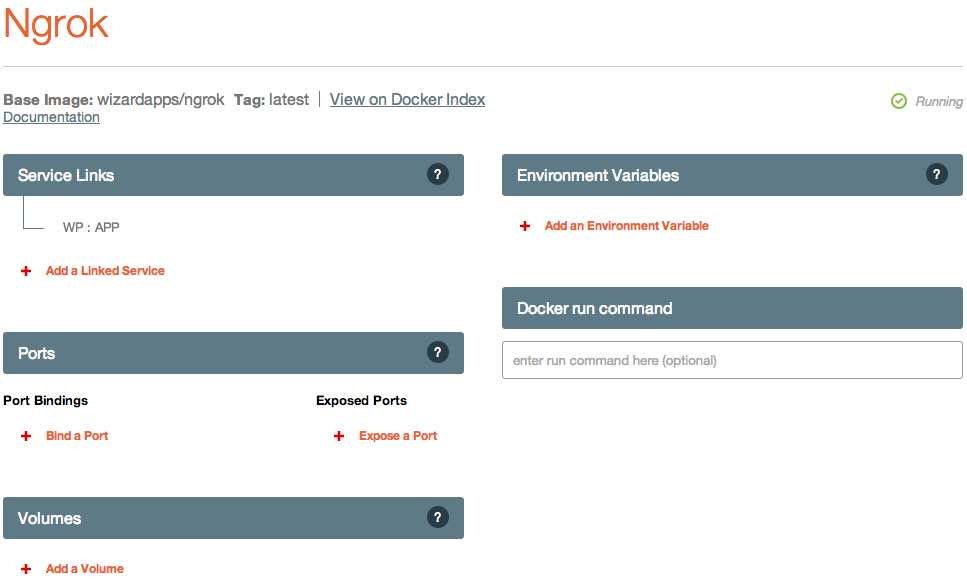
Clicking on the "Ngrok" container filed under the "Proxy Tier" category, you can see some of the inner workings of Panamax, including options for service links, ports, volumes, and environmental variables.
Ports
The ports category contains configuration on which ports are exposed or bound to the CoreOS host. This section corresponds to the Docker concept of exposing a port or binding it to a specific port on the host OS.
Volumes
The volumes section allows for you to attach volumes to the Docker container. For example, if you are creating a database container, you may wish to persist the data by mounting a volume from the host to the container.
Environmental Variables
The environmental variables section is one of the most important-- it allows you to configure your container through, you guessed it, environmental variables. For example, as I will show later on, my Ngrok container can be configured with a custom subdomain using these environmental variables.
Service Links
The final section available for configuration, and perhaps the most important for the Ngrok container, is the Service Links section. You can see a single entry containing the text "WP:APP". This single line is the magic that makes your Wordpress application accessible from outside the local VM and available to the public internet.
You may notice that other than this single link, there are no options specified to configure the Ngrok container-- no ports, IP addresses, or anything else. Like I said, by using the Docker links feature (which, is also available over the CLI3), we can make the Ngrok tunnel auto-magically configure itself.
The line "WP : APP" indicates two things:
- The Ngrok container should be linked to the "WP" container
- The "WP" container should use the alias name "APP"
The first point is not quite that exciting. However, point number two allows for the automatic configuration to "just work."
You see, the Ngrok container looks for three different environmental variables to configure itself from. In the order that the container looks for them:
- HTTPS_PORT
- HTTP_PORT
- APP_PORT
But, we never actually configure any of these environmental variables, so how can it be that Ngrok auto-configures itself? The secret is that Docker creates these variables automatically due to us linking the containers together.
If you read the Docker documentation on the links feature, you can see that several different environmental variables are created based on the link alias name:
APP_NAMEAPP_PORTAPP_PORT_[PORT]_TCPAPP_PORT_[PORT]_TCP_PROTOAPP_PORT_[PORT]_TCP_PORTAPP_PORT_[PORT]_TCP_ADDR
This is where the "APP" alias comes into play-- had the Ngrok container linked with Wordpress under a different alias (say, "WP"), the environmental variables would change to reflect this (WP_NAME, WP_PORT, etc.).
As for the variable contents, the APP_NAME is self-explanatory and not quite relevant for our use case. The APP_PORT variable, however, contains the important information for the Ngrok container to auto-configure. As you can see, it contains a protocol, IP address, and port of the linked container.
The APP_PORT_[PORT]_TCP variables contain specific configuration for multi-port-exposed containers. For example, RethinkDB uses several ports-- 8080 for the web UI, 28015 for client connections, and 29105 for intra-cluster connections. If we were to create a RethinkDB container and expose all of the previously listed ports, containers linked to the RethinkDB one would then have variables like RETHINKDB_PORT_8080_TCP_PORT, RETHINKDB_PORT_28015_PORT, etc.
In our case, Wordpress (rather, the Apache server that is serving Wordpress) only uses a single HTTP port, which is automatically placed into the APP_PORT variable.
In the startup script for the Ngrok container, you can see that we take the APP_PORT (or HTTP_PORT or HTTPS_PORT) variables and strip the protocol off.
if [ -n "$HTTPS_PORT" ]; then
  FWD="`echo $HTTPS_PORT | sed 's|^tcp://||'`"
elif [ -n "$HTTP_PORT" ]; then
  FWD="`echo $HTTP_PORT | sed 's|^tcp://||'`"
elif [ -n "$APP_PORT" ]; then
  FWD="`echo $APP_PORT | sed 's|^tcp://||'`"
fi
This is then passed to the Ngrok program, which creates a tunnel to the Ngrok service and forwards traffic to the specified $FWD address.
If we were to use the alias name "HTTP" for the link, Ngrok would actually still configure itself properly.
So, given what we've learned, we now know how the Ngrok container auto-configures itself. In the application template I created I specified that three containers are to be launched-- one Wordpress, one MySQL, and one Ngrok. I also specified that the Wordpress container be linked to Ngrok under the alias "APP" so that the proper environmental variables are in place, and the MySQL container linked to the Wordpress one (for similar database-auto-configure functionality).
All of this happens as soon as you click the "Run Template" button, without you ever having to think about it. Quite cool, huh?
Now that you know how the Ngrok container links and configures itself, you can create your own Panamax application template based on this same principal.
Creating a Panamax Template
We'll go ahead and create a Panamax template to run PageKit, a simple CMS that runs on MySQL or SQLite, and make it accessible from the internet with Ngrok.
Creating the Application
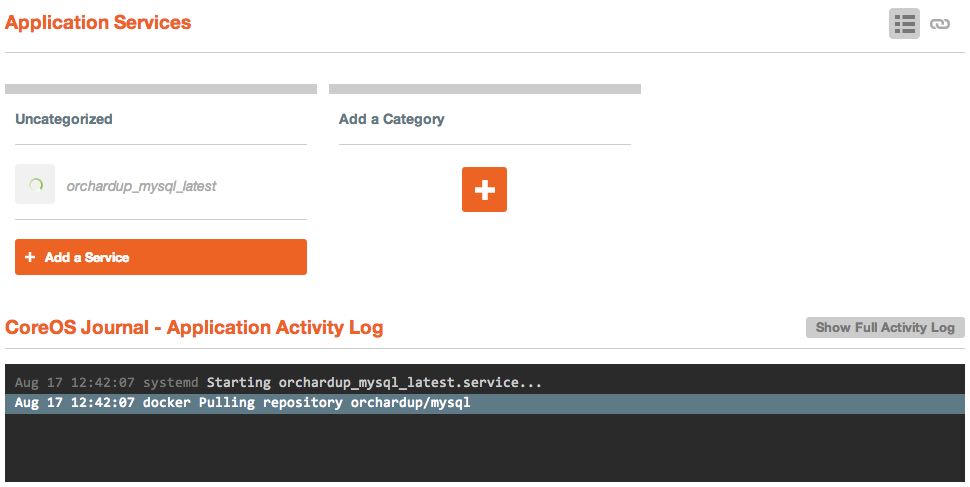
To create the application, you simply have to search for a base Docker container to create the app from. On the home page, enter orchardup/mysql into the search bar.
Though you will see "No templates found", you will notice that there is an "Images" category. Yes, Panamax not only gives you one click access to their library of application templates, but you can actually pull in any Docker image from the public registry.
Go ahead and run the orchardup/mysql image with the "Run Image" button and let it launch. You'll see a little spinner next to the container name in the "Uncategorized" category, as well as a message in the application log indicating that the Docker image is being pulled down.
Once the image has finished pulling and launching, you should see a message indicating /usr/sbin/mysqld: ready for connections.
Though the MySQL container is running, we need to configure a couple environmental variables that will create the necessary MySQL user and database.
Under the environmental variables section, click the "Create Environmental Variable" button and enter the following variable names and values:
MYSQL_ROOT_PASSWORD: Choose a password here for your MySQL root user.MYSQL_DATABASE:pagekit
If you wish to persist the database, you can always mount a volume under the "Volumes" section. To do this, enter a path on the CoreOS host to save the data in and /var/lib/mysql as the container path. This will result in all of the data in /var/lib/mysql in the MySQL container being saved to the directory you specify on the host VM.
After you've made the appropriate changes, simply hit "Save All Changes" at the bottom of the screen to relaunch the new configuration.
Notice that we didn't expose a port for MySQL-- this is because the orchardup/mysql container specifies for port 3306, the port for MySQL, to be exposed automatically. We also are not going to specify which port to map 3306 since we will make use of the Docker links.
Launching the PageKit container
Now that we have our database up and running, we can launch the PageKit container. To do so, go back to your application's dashboard4 and add a new category titled "Web Tier" if you wish. Then, add a new service and search for the Docker image marksteve/pagekit and add it to your app.
You will see that same spinning circle next to the PageKit container as it is pulled down-- you can click on the PageKit container's name and watch the activity log to determine when it has finished initializing.
Link MySQL and PageKit
Once the PageKit container has downloaded and launched, you can add a couple of configuration variables to link the MySQL and PageKit containers together, as well as expose port 80.
To create the service link, click the "Add a Linked Service" button and select the MySQL container's name from the dropdown. In the alias text box, you must use the alias name "mysql" (without quotation marks, obviously).
To expose port 80, click "Expose a Port" and enter "80" into the text box. We don't need to actually "Bind" a port because we don't need to know which host port our container's port 80 will map to-- the automatic configuration through Ngrok will just figure it out.
Once you save the configuration, the PageKit container will relaunch and link itself to MySQL. At this point, you could figure out which port was mapped to the container's port 80 and perform the VirtualBox port forwarding steps to access the application, but we'll just go ahead and launch the Ngrok tunnel.
Creating the Ngrok tunnel
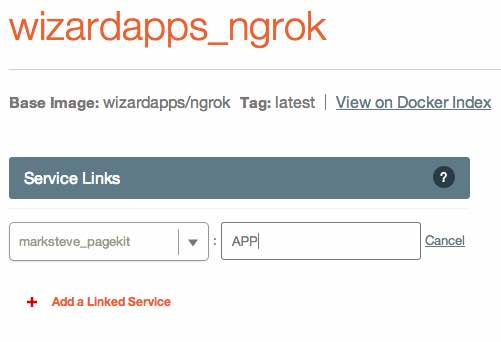
Creating the Ngrok tunnel is quite easy-- as before, you can create a new category from the application's dashboard (and name is something like "Tunnel", "Proxy Tier", etc) and add a new service. We'll use the Ngrok container I've created, which was based off the CenturyLink Ngrok container5, wizardapps/ngrok.
All you have to do to configure the Ngrok tunnel is link it to the PageKit container with the alias "APP". Once the container relaunches, find the Ngrok URL in the logs and open it in your browser.
Once you open up PageKit in your web browser, you should see the installation interface. Use the following details to configure your PageKit installation:
- Driver:
MySql - Hostname:
mysql - User:
root - Password: The password you configured in the MySQL container
- Database Name:
pagekit - Table Prefix:
pk_
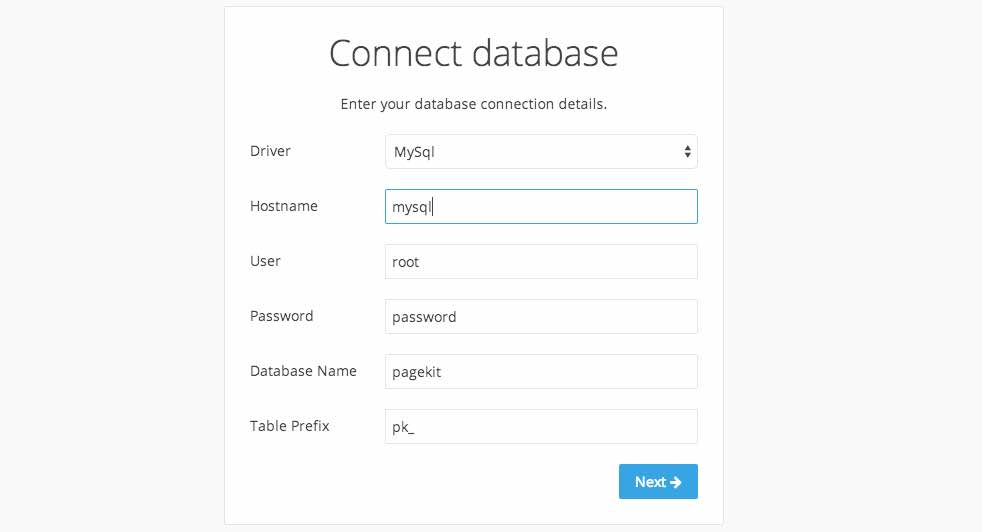
PageKit should connect to the database with these credentials. Simply finish the PageKit installation, and you're finished!
Saving the Template
Once you've created the application and played with it a bit, you can save it as an application template. Also, make sure you have a Github account (since this is where you will save the application template to).
From your application dashboard, click the "Save as Template" button. If you've never created a Panamax template before, you will need to create a Github access token and paste it into the field provided.
After you've linked your Github account, you will need to choose a repository to save the application template to. For example, you can fork the official Panamax public templates repository on Github and select your personal fork from the dropdown menu. Alternatively, you can create a new repository, though your templates will not be visible by others if you do so (unless they add your repository to their sources list).
Once you've filled out the remaining fields, you can preview the template file YAML at the bottom to see how the file is constructed, or publish your template directly to Github.
I've published the completed "Ngrok + PageKit" template on my Github repository for your reference. The only difference between the version I've published and the tutorial here is that I've manually edited some of the names of the containers for clarity.
Hopefully you've learned a thing or two about Panamax and Docker. CenturyLink has produced a fairly intuitive UI that makes Docker accessible to more people, and I'm exciting for several new features such as multi-host support. The tools popping up around Docker are exciting for the entire community, and I'm proud to be a part of it.
Ngrok Container Additional Configuration
The Ngrok container can be configured through environmental variables to support other features such as custom subdomains (or domains, if you are a paying Ngrok customer), HTTP authentication, and raw TCP protocol support.
For reference on these configuration items, you can visit the "wizardapps/ngrok" page on the Docker registry.
To use these configuration items with the PageKit template above, simply add the appropriate environmental variables to the Ngrok container. Once it is relaunched, you should be able to use the new features that you configured.
- If you don't have Homebrew for Mac, you can install it with by following the instructions on the Homebrew wiki ↩
-
Don't see the "Ngrok + Wordpress + MySQL" template? You may have to add the proper repository to Panamax. Click "Manage" at the top in the menu bar, click "Manage Sources" in the middle column, and add my Github repository:
https://github.com/andrewmunsell/panamax-contest-templates. ↩ - An important thing to notice is that all of the options on this page are simply user-friendly and web-exposed versions of the command line switches available to the Docker CLI. As I'm sure you've realized, Panamax doesn't necessarily extend Docker-- it just makes it significantly easier to manage. Also important to note-- none of the configuration categories on the page are specific to the Ngrok container. All of these same categories will be available to any container you launch. ↩
- The application dashboard is not the one with the sections such as "Environmental Variables", etc. The app dashboard has a list of all the running containers in your application, and will list the "orchardup_mysql_latest" container under "Uncategorized". ↩
- I've exposed some additional options, such custom subdomains and HTTP authentication over what was originally included in the CenturyLink Docker image ↩