#node-js
Recently, there was a flurry of tweets that appeared on my Twitter timeline talking about Derby.js. I’ve never used a framework that did so much for you– realtime synchronization of the client and server. Essentially, this enables one to write an application in which two users edit the same text field–live–without writing too much code yourself. Derby handles all of the synchronization of the models and views. Think Google Docs collaborative editing.
That’s great, but after further investigation, it seems like Derby.js isn’t quite as mature as I’d like– it’s not 1.0 yet. To be fair, neither is Node.js (the platform behind Derby) or Meteor, but there seems to be quite a bit missing from Derby. For example, as far as I can tell, there’s no easy way to handle sessions. This may be a result of a lack of documentation, but it appears that the developers behind Derby are working on authentication at this moment. If anyone has writeup on how to handle sessions in Derby, I’d live to hear about it.
The one framework I always see compared to Derby.js is called Meteor. Similar to Derby, it handles things such as updating views live across multiple clients, though Meteor does it somewhat differently. While Derby is designed to be easier to use with different types of database systems, Meteor works closely with MongoDB. In fact, the client API for accessing the database is almost exactly like what you’d expect on the server-side with something like Mongoose.
While there are some drawbacks and controversies surrounding the framework (see Fibers vs Callbacks), Meteor looks like a pretty interesting option when creating an app that requires realtime feedback. Personally, I’m more attracted to the traditional callback style of programming of Derby, but the lack of robust documentation and a large developer community behind it is a huge blow to Derby’s usefulness. This will change over time, but at a much slower rate than Meteor, which recently received $11M+ in funding. This financial backing ensures that Meteor will remain around and supported, and for developers who need a financially and developmentally stable framework, the funding will only make Meteor more appealing.
Today, I want to go over how to create a really simple Meteor app. Essentially, this is a writeup for Tom's Vimeo screencast. One major difference between my writeup and Tom's video tutorial is the way we handle events in Meteor. Rather than copying and pasting code from one of Meteor's examples, I take you step by step through a custom implementation of handling the enter key press to submit a message. Let's begin!
Creating a Meteor App
One big plus of both Derby and Meteor is their respective command line tools. Unlike Derby, which uses Node’s native NPM tool, Meteor comes with its own installer.
From the terminal (on Mac OS X and Linux), run the following command. Ensure you already have Node installed.
$ curl https://install.meteor.com | /bin/sh
Meteor will do its thing, and install the command line tools.
To create a project, navigate to a directory and run the following command. This will create a subfolder and populate it with Meteor and a basic template for a realtime app.
$ meteor create chat
Now, you can run the app from the terminal. Simple navigate to the proper directory and run meteor.
$ cd chat
$ meteor
Running on: http://localhost:3000/
To see the template app, open any modern web browser and navigate to http://localhost:3000/.
If you want, you can even deploy it to Meteor’s own servers using the built in meteor deploy command.
$ meteor deploy my-app-name.meteor.com
You can leave the app running, since all browsers connected to it will update live once you save your code.
Developing the Chat App
In the folder generated by the meteor create command, you can see several different files. Depending on whether you have the ability to view hidden files, you may also see a .meteor folder. This folder contains Meteor itself, along with the MongoDB database file.
In the root folder for your app, you should see chat.html, chat.css, and chat.js. These three files should be self explanatory. The HTML file contains the templates and views for the app, both styled by chat.css. The Javascript file contains the scripts run on both the client and the server. This is important– do not put anything, such as configuration data and passwords, in this script since anyone can see it by viewing the source of your application.
Open the chat.js file in your favorite text editor. Personally, I use Sublime Text 2 for its simplicity and multi-cursor features.
You can see the following code in the chat.js file.
if (Meteor.is_client) {
  Template.hello.greeting = function () {
    return "Welcome to chat.";
  };
Template.hello.events = {

'click input' : function () {

// template data, if any, is available in 'this'

if (typeof console !== 'undefined')

console.log("You pressed the button");

}

};

}
if (Meteor.is_server) {

Meteor.startup(function () {

// code to run on server at startup

});

}
Notice the Meteor.is_client and Meteor.is_server portions of the code inside of the if statements. Code inside of these blocks will only be run if the executing computer is a client or server, respectively. This demonstrates the code sharing abilities of Meteor in action.
Delete all of the code inside of the if(Meteor.is_client) statement and the entire Meteor.is_server if statement so you are left with the following.
if (Meteor.is_client) {
}
Notice, once you save the script file, your browser will immediately refresh and load the new script.
Creating the View
Before we modify the script file, the view that will show the chat log needs to be created.
Open the chat.html file in your text editor and delete the code in the body tag, as well as the template with the name of “hello”. Your code should look like the following.
<head>
  <title>chat</title>
</head>
<body>
</body>
Inside of the body tag, add the following.
{{> entryfield}}
Meteor uses a template system very similar to Mustache. The curly braces (mustaches– get it?) denote an action for the template system to perform. By simply typing a word in between two sets of mustaches ({{hello}}), the template system will replace that code with the variable hello. More on that later.
See how there is a greater than symbol (>) before the word “entryfield”? That designates for Meteor to render a template.
To create the template named “entryfield”, add the following below the body tag.
<template name="entryfield">
    <input type="text" id="name" placeholder="Name" /> <input type="text" id="message" placeholder="Your Message" />
</template>
The template tag has a single attribute in this case– the name of the template. This is what we use when rendering the template. Notice how the name of the template is the same as the code we inserted into the body ({{> entryfield}}).
If you look at your web browser, you can now see that it has refreshed and the inputs are being displayed.
Next, add in another mustache tag into the body to render the list of messages.
{{> messages}}
Finally, we need to create the template named “messages”. Copy and paste the following below the “entryfield” template.
<template name="messages">
    <p>
        {{#each messages}}
            <strong>{{name}}</strong>- {{message}}
        {{/each}}
    </p>
</template>
Notice the each clause. In Meteor, you can loop over an array in a template using the following syntax.
{{#each [name of array]}}
{{/each}}
Inside of this each loop, the context changes. Now, when referencing variables, you are referencing properties of each array element.
For example, in our chat app, we are looping over “each” of the elements in the array named “messages”. This array will look like the following.
[
    {
        "name": "Andrew",
        "message": "Hello world!"
    },
    {
        "name": "Bob",
        "message": "Hey, Andrew!""
    }
]
Inside of the each loop, you can see {{message}} and {{name}} being referenced. These will be replaced with the properties of each of the elements of the messages array (Andrew and Bob for the name, and the respective Hello messages).
Back in your web browser, you should see no change. This is because the messages array has not been passed to the template yet, so Meteor is looping over and displaying nothing.
Your final chat.html file should look like the following.
<head>
  <title>chat</title>
</head>
<body>

{{> entryfield}}
{{> messages}}

</body>
<template name="entryfield">

<input type="text" id="name" placeholder="Name" /> <input type="text" id="message" placeholder="Your Message" />

</template>
<template name="messages">

<p>

{{#each messages}}

<strong>{{name}}</strong>- {{message}}<br/>

{{/each}}

</p>

</template>
The Javascript
For now, most of what we will deal with is client-side code, so all code provided below goes within the Meteor.is_client if code block unless stated otherwise.
Before we actually write the code that displays the messages, we have to create a “Collection”. Essentially, this is a group of Models. In other words, in context of the chat app, the Messages collection will hold the entire chat log, and each individual message is a Model.
Before the if statement, add the following code to initialize the Collection.
Messages = new Meteor.Collection('messages');
This goes outside of the client-only code block because we want this Collection to be created for both the client and server.
Displaying the chat log is very easy since Meteor does most of the work for us. Simply add the following code inside of the if statement.
Template.messages.messages = function(){
    return Messages.find({}, { sort: { time: -1 }});
}
Let’s break it down–
Template.messages.messages = function(){ … }
The first section (Template) indicates that we are modifying the behavior of a template.
Template.messages.messages = function(){ … }
This second part indicates the name of the template. For example if we wanted to do something to the “entryfields” template, we would change the code to Template.entryfields.variable = function(){ … }. (Don’t do this now.)
Template.messages.messages = function(){ … }
Finally, the third section represents a variable in the template. Remember how we included an each loop that iterated over the messages variable? This is how we specify what messages really is.
If you go to your web browser, you will see that nothing has changed. This is still expected because while you are now fetching the messages, there are no messages to actually display.
Your chat.js file should look like this. It’s amazing that this is all of the code we need to display a real time log of chat messages on the server.
Messages = new Meteor.Collection('messages');
if (Meteor.is_client) {

Template.messages.messages = function(){

return Messages.find({}, { sort: { time: -1 }});

}

}
Adding a Message through the Console
This part is optional, though it can be helpful for debugging. If you just want to skip it and learn how to make the entry form react to key presses and such, continue below.
If you want to test your message display code, you can manually insert a record into the database. Open up your web console in your browser and type the following.
Messages.insert({ name: 'Andrew', message: 'Hello world!', time: 0 })
This creates a record in the database. If you did everything correctly, the message should also show up on the page.
The Message Entry Form
Back in the chat.js file, we are going to link the input form to the database to allow users to submit chat messages.
Add the following code at the bottom, but within, the if statement.
Template.entryfield.events = {
  "keydown #message": function(event){
    if(event.which == 13){
      // Submit the form
      var name = document.getElementById('name');
      var message = document.getElementById('message');
  if(name.value != '' && message.value != ''){
    Messages.insert({
      name: name.value,
      message: message.value,
      time: Date.now()
    });

    name.value = '';
    message.value = '';
  }
}

}

}
This is a lot, so let’s go through it. As you might recall, the second property after the word Template defines which template we are modifying. Unlike before, where we were setting up code binding the database to the “messages” template, we are modifying the “entryfield” template.
The events property of the template contains an object with its keys in the following format.
"[eventname] [selector]"
For example, if we wanted to bind a function to the click event of a button with the ID of hello, we would add the following to the events object.
"click #hello": function(event){ … }
In our case, we are binding a function to the keydown event of the field with the ID of message. If you remember, this was set up earlier in the tutorial when we created our template in the chat.html file.
In the events object, each key has a function as its value. This function is executed with the event object passed as the first parameter when the event is called. In our chat app, every time any key is pressed (keydown) in the input field with the ID of “message”, the function is called.
The code within the function is fairly simple. First, we detect if the enter key was pressed (enter has a key code of 13). Second, we get the DOM elements of the two input fields by their IDs. Third, we check and ensure that the input values are not blank to prevent users from submitting a blank name or message.
It’s important to notice the following code. This is what inserts the message into the database.
Messages.insert({
  name: name.value,
  message: message.value,
  time: Date.now()
});
As you can see, this is similar to the code we inserted into the console, but instead of hard coding the values, we use the DOM elements' values. Additionally, we are adding the current time to ensure that the chat log is properly ordered by time.
Finally, we simply set the value of the two inputs to ‘’ to blank out the fields.
Now, if you go into your browser, you can try and input a name and message into the two input fields. After pressing enter, the input fields should be cleared and a new message should appear right under your input fields. Open up another browser window and navigate to the same URL (http://localhost:3000/). Try typing in another message, and
As you can see, Meteor is pretty powerful. Without writing a single line of code to explicitly update the message log, new messages appear and are synced across multiple browsers and clients.
Conclusion
While Meteor is pretty cool to work with and there are some pretty useful applications for it, like Derby.js, it is immature. For examples of this, just browse through the documentation and look for the red quotations. For example, the documentation states the following about MongoDB collections:
Currently the client is given full write access to the collection. They can execute arbitrary Mongo update commands. Once we build authentication, you will be able to limit the client’s direct access to insert, update, and remove. We are also considering validators and other ORM-like functionality.
Any user having full write access is a pretty big problem for any production app– if a user has write access to your entire database, this is a pretty big security issue.
It’s exciting to see where Meteor (and Derby.js!) is/are headed, but until it matures a little bit, it may not be the best choice for a production application. Hopefully the $11M in funding will go to good use.
To keep up with me, my articles and tutorials, you can follow me on Twitter.
Recently I read a Node.JS framework roundup on OCDevel comparing Derby.JS, Meteor, SocketStream, TowerJS, and Express. The author expressed preference for Derby.JS, but I’m not 100% convinced that is really the best choice.
Don’t get me wrong– I think Derby.js is a fantastic (start) of a framework, and I would love to be able to use it, but I can’t for one simple, but big, reason. It’s no where near production ready.
Sadly, that seems to be the story of Node.JS and the frameworks that use it. Derby, Meteor, SocketStream– they all are relatively new and immature, and in some cases, lack critical functionality of a web framework or have serious issues with security. That sort of puts me, as a developer, in an odd position. I’ve determined Node.JS is a good platform for a project, but without reinventing the wheel, what framework do I use to speed up development?
Node.JS itself is still not even 1.0 yet and definitely isn’t API stable, but it does have a sort of maturity that some of the frameworks do not, which is why I have taken the risk to use Node.JS in production.
While I haven’t used TowerJS or SocketStream, I can get into more detail with the other three frameworks–
Derby.js
I want to use Derby so badly. It looks amazing and the demos are impressive. Imagine writing tens of lines of code or less and being able to publish an app that synchronizes a text box, or even an entire chat log, across multiple clients and in real time. With Derby, you can do that.
So, why don’t I use it? Simply because it lacks so many features and documentation. Every time I do a Google search, I get results about the Derby database (unfortunate naming coincidence) unless I remember to search for “Derby.js” instead. StackOverflow tells the same story– you get minimal help and very few questions pertain to Derby.
Anyways, one really cool feature of Derby is its ability to render your page before it serves it to the browser, so there is no “flash” of a blank page before Javascript on the client side kicks in. Oh, and it works with Javascript disabled and for web crawlers and indexers.
But Derby lacks sessions and authentication. Or maybe it does have them. Who knows? I can’t find any documentation on either. (Yes, I know authentication’s coming in Racer, but I’m not exactly sure about the sessions, and no one seems to have documented it well outside of Racer’s GitHub repository). On the up side, Derby.js is by the same guy who wrote Everyauth. If that’s the case, why it hasn’t already been implemented is beyond me.
Anyways, that brings me to a Pro-Con list:
Pros
- Real time, syncs models across client and server
- Code sharing for client and server
Cons
- Slow progress due to small number of followers and contributors
- No authentication or sessions, as far as I can tell
- Unstable, not usable for production
Recommendation
Do not use it for anything other than experiments, demos, and messing around. It’s not quite mature enough to use in production web apps. I’m looking forward to seeing where it goes, but it seems to have been at version 0.3.12 for a while now…
Meteor
Meteor is very much like Derby.JS. It handles the realtime synchronization of models across the client and server and allows for code sharing. The demos are equally impressive, and show off exactly how you can build real time games with Meteor.
But the same issues as Derby apply, and there are some pretty weird hacks that they used for workarounds (v0.3.9). Like Derby, there’s no authentication.
In bright red in their documentation is this:
Currently the client is given full write access to the collection. They can execute arbitrary Mongo update commands. Once we build authentication, you will be able to limit the client’s direct access to insert, update, and remove. We are also considering validators and other ORM-like functionality.
Since you are basically exposing your server side database to the client, I can come along and run Users.remove({}) and your entire users catalog has been erased. This will be addressed in the future– they are already working on an implementation.
That alone should scare you off from using Meteor in production, which is too bad, because like Derby, Meteor looks promising.
Depending on your preferences, you may also want to shy away from Meteor due to it’s use of Fibers instead of Node’s traditional callback-style programming, which Derby does use.
Also unlike Derby, Meteor does not render your content server side. This means search engines cannot index your content (which may not be an issue if your app’s a chatroom or app) and Javascript must be enabled. Meteor claims to have a fix in v0.3.9, but it’s such a bad workaround it’s not worth using. Essentially, they spawn an entire headless browser any time a web spider crawls your page. Let me say that again– Meteor’s workaround to prerender the page is to launch an entire web browser on your server, render the page, then pass that to the search engine. It’s extremely ineffecient and makes you prone to a DDOS attack.
Pros
- Real time synchronization of models
- Session support
Cons
- Direct Mongo access
- Uses a proprietary package manager (i.e. not NPM)
- Terrible implementation of server side rendering
But hey, they have $11M in funding, so it can only get better. I hope. At least for Andreessen Horowitz’s sake.
Recommendation
As with Derby, do not use it for production. It’s still maturing and lacks authentication support as well. Plus, even worse, anyone can come along and erase your entire database in one command from their web inspector. But the demos are cool, and it looks like progress is being made more rapidly than Derby.
Express
This is the only framework I’ve ever used in a production Node.JS app. They’re on version 3.0 and the framework is quite mature. But unlike Derby or Meteor, it isn’t real time. If you ran a website on Express, your visitor wouldn’t be able to tell the difference between a PHP app and Express– which might not be a bad thing, depending on what you’re making.
It’s pretty simple to use in that you define a path for Express to handle and then assign a function to it. It works with the Jade templating engine out of the box, but you can use other stuff too.
One big thing to note is that Express is not an MV* framework. In fact, there’s no models anywhere in Express. You have to build those yourself with something like Mongoose or whatever.
As the OCDevel post mentioned, Express is more of a DIY framework. It handles the important stuff like URL routing and even templating, but data and user management is up to you. Want authentication? Drop in a package like everyauth and set it up using Express’s middleware. The framework is so popular, most packages I’ve seen have support for it. So while there’s no built in support for a lot of things, you can usually find a package built to work with Express that handles what you need.
Pros
- Easy to use and setup
- Handles the important stuff, leaves the rest to you
- RESTful– no real time stuff
- Not MV*
Cons
- Handles the important stuff, leaves the rest to you
- RESTful
- Not MV*
Recommendation
Unlike the other two frameworks, Express is a little more ambiguous in its pros and cons. What I may consider a pro (not MV), someone else may hate. But if Express looks like something you could use and deal with, you can* use it in production. It’s pretty stable and popular, so you’ll get a fair amount of support.
The Future
I’m looking forward to seeing Derby.js and Meteor mature, but for now, they just aren’t stable. I’d definitely be curious to see how TowerJS works, but there’s just so much CoffeeScript (which I hate, personally). I have used Express in production, it works beautifully, and I’ll continue to do so in the future (I have another two projects using it in development) because it’s mature, so of course I’m biased.
You’re probably wondering why I’m plugging for maturity and using Node.JS, which is still on version 0.8.x and not exactly stable. So I have a double standard, but Node.JS is relatively stable and feature complete compared to the frameworks that run on top of it. And I do still use a traditional PHP/MySQL approach for applications that don’t necessarily need Node.JS, but PHP is a terrible language for certain tasks.
In any case, only time and active development will help these frameworks along. Like I said, I have some projects that I want to use Derby.js for– but its immaturity and inability to do simple things such as authenticate a user (and the difficulty of building/integrating it yourself) makes it a bad choice.
The state of frameworks and Node.JS is kind of odd, but hopefully it’ll improve over time.
Update: The experiment has been taken down due to Nodejitsu shutting down their free plans. I'll look into reuploading it at some point.
I've been working pretty hard on one of my projects and decided to take a small break and do a little experiment. A while ago (years?), I saw a website that allowed anyone to type anywhere on the screen. I decided to take a couple of hours tonight and recreate it using Node.JS.
My version of the Wall of Text app is available here.
It's built with Node.JS, Socket.IO, and Express (which really was unnecessary, but I was lazy and didn't want to work with the vanilla Node.JS HTTP server). Nodejitsu is providing the hosting.
I'm looking into making it into an infinite canvas, but for now, it extends as far as your screen goes. I suppose if you had a really big screen it would go infinitely... Those with 1080p+ monitors will be able to see beyond those with smaller resolutions. It's sort of an exclusive club if you can see the text on the outskirts of the wall ;)
The wall resets every six hours and shows the number of users connected in the bottom right hand corner of the screen.
tl;dr
See it here.
In the past, I've done a lot of work with PHP and the Laravel framework. One of the coolest features about Laravel is its Inversion of Control system, which dynamically injects dependencies into your application at runtime.
This is beneficial for many reasons, including modularity, readability, and testability. With a dependency injected system, you can simply request that your application receives an instance of an object, and the DI container will do all of the work to initialize the object and all of its dependencies.
Dependency injection is a relatively advanced topic, but the benefits outweigh the cost. For example, consider the following scenario:
class Config {
    public function __construct() {
}

/**
 * Get the configuration item with the specified key
 */
public function get($key) {
    // Get the configuration value with the specified key
    return $value;
}

}
class Database {

/**

* Construct a new database instance using the specified configuration.

*/

public function __construct(Config $config) {

$this->config = $config;

}
public function connect() {
    $host = $this->config->get("db.host");
    $name = $this->config->get("db.name");

    // ... perform the rest of the database initialization
}

}
This is an extremely trivial example, but as you can see, our database object depends on the configuration. If we simply create a single instance of the database, this isn't a problem-- we can simply create a new configuration object and pass it in the constructor. But, what if our application is composed of multiple controllers, utilities, and snippets of code that all need a database instance? Suddenly, we either have to create a large number of database objects (and consequently, a large number of configuration objects), or pass a single instance around somehow.
This is the premise of dependency injection: DI takes the premise of passing instances around, and manages this behavior for you. If we apply our example above to a dependency injected system, we actually don't ever have to explicitly create a configuration object-- our DI system does this for us.
Laravel's IoC system is great-- it's wired up throughout the framework so that most method calls end up having dependencies injected automatically, and it even uses the type hints in the method signature to determine what dependencies the method has.
For example, Laravel's IoC system would use the following method signature to pass in the current HTTP request object and a database instance, automatically:
public function getUsersController(Request $request, Database $db)The DI pattern doesn't just apply to PHP and Laravel-- Javascript frameworks such as Angular and Aurelia have their own dependency injection systems, with the latter even using ES7-style decorators. Unfortunately, these systems are tightly coupled with the frameworks, meaning that they aren't very useful for developers that want to use them with Node.JS.
Needlepoint: Dependency Injection for Modern Javascript
Needlepoint is a new DI framework for Javascript environments that supports the latest ES6 and ES7 features. Everything works with ES6 classes, and the dependency injection parameters are defined using the decorators ES7 proposal.
Need to learn how to use the new ES6 and ES7 features? Check out my in-development course on Modern JavaScript.
Declaring Dependencies of a Class
There's two key decorators that indicate how a class should be dependency injected. First is the @dependencies decorator:
@dependencies(DependencyOne, DependencyTwo)
export default class ClassWithDependencies {
Simple pass in the classes to the decorator, and the dependencies will be injected into the constructor:
constructor(instanceOfDependencyOne, instanceOfDependencyTwo)Declaring a Singleton
The second decorator is used to declare a class a singleton:
@singleton
export default class SingletonClass {
The singleton decorator indicates that no more than one instance of the class should be created in the application. If two classes declare a singleton as a dependency, only a single instance will be created which will be injected into the relevant classes that declared the singleton as a dependency.
The best way to introduce the library is to simply illustrate how it works:
/* config.js */
import {singleton} from 'needlepoint';
@singleton

export default class Config {

constructor() {
}

/**
 * Get a configuration value for the specified key
 */
get(key) {
    return this._data[key];
}

}
/* database.js */
import {dependencies, singleton} from 'needlepoint';
@dependencies(Config)

@singleton

export default class Database {

constructor(config) {

this.config = config;
    this.configureDatabase();
}

configureDatabase() {
    // ... configure the database with the current configuration instance
}

query(q) {
    // ... Perform the specified query
}

}
/* index.js */
import {container} from 'needlepoint';
import Database from './database';
var db = container.resolve(Database);

db.query("SELECT * FROM users");
This example is very similar to the PHP example we previously had-- a database needs a configuration object to configure itself. As you can see, in our index.js file we have a single call to container.resolve(Database) which does all of the magic: the database instance is created and passed in an instance of the configuration, with both being singletons. If we were to call container.resolve(Database) again, we would receive the exact same instance that was created the first time.
The same is true for the configuration object-- only a single instance is created for the entire application, so we might add a new "queue" class that uses the same configuration instance:
import {dependencies, singleton} from 'needlepoint';
@dependencies(Config)

@singleton

export default class Queue {

constructor(config) {

this.config = config;
    this.configureQueue();
}

configureQueue() {
    // ... connect to the queue and configure it with the currently
    // initialized configuration instance.
}

next() {
    // ... get the next item from the queue
}

}
Now, we can run container.resolve(Queue) in our index file and get an instance of the queue class. Of course, since this is the first time that the queue is resolved (either explicitly or as a dependency of another object), it is actually instantiated. However, the constructor is passed in the previously created configuration object-- the same exact instance that was passed to the database.
Of course, this also works with more complex dependency graphs. Image having an application with a dependency graph that looks something like this:
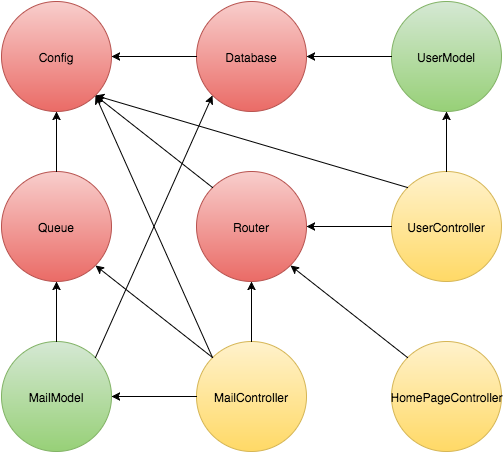
Wiring that up manually and keeping track of everything would be a nightmare (and this isn't even close the complexity of a real application), but with Needlepoint you can simply define each class's dependencies with the decorator.
To find out more about to use Needlepoint and dependency injection in your Javascript applications, you can visit the GitHub repository for the project. The entire thing is open source and written using the latest ES6 features, meaning Babel is required for most Javascript environments.
You can use Needlepoint in your Node.JS applications fairly easily. Simply install it with NPM and ensure you have Babel installed and configured:
npm install --save babel needlepointAnd, in your Javascript:
require('babel/register')({
    optional: ['es7.decorators'],
// A lot of NPM modules are precompiled so Babel ignores node_modules/*
// by default, but Needlepoint is NOT pre-compiled so we change the ignore
// rules to ignore everything *except* Needlepoint.
ignore: /node_modules\/(?!needlepoint)/

});
require('app.js');
/* app.js */
import {container} from 'needlepoint';
// Use Needlepoint here
There's still a ton of things left to do, but you can always help out by submitting a pull request or even just filing an issue.