#raspberry-pi
Wondering how to install the Raspbian operating system on your Raspberry Pi? I've created a guide for that as well.
After receiving my Raspberry Pi, I began to look for a place to plug it into. I've always assumed that at least one of my two monitors sitting on my desk had an HDMI port, but I've always used DVI. I happened to be wrong-- neither of them had HDMI, meaning I had to commandeer a television somewhere else in my house.
I plugged the device into a 55" TV in my living room and booted it up with a 2GB SD card I had prepared earlier and began installing some things that would allow me to run the device headless. This is important, because I do not want to be forced to sit on the floor in front of the TV every time I want to use the Raspberry.
Setting Up TightVNCServer
Because I don't currently have a real monitor to hook up the computer to, I had to find a way to use it without being physically attached to a screen. Naturally, VNC is the perfect tool for the job.
I simply installed TightVNCServer using APT and configured it quickly:
root@raspberrypi: ~# apt-get install tightvncserver
root@raspberrypi: ~# tightvncserver :1
After initializing for the first time, I killed the server to do some configuration:
root@raspberrypi: ~# tightvncserver -kill :1
I added the VNC start command to the /etc/rc.local file to run the VNC server at boot:
echo "Starting VNC server on port 5901"
sudo -u pi tightvncserver :1
This simply starts a VNC server on screen one, which is port 5901. If you were to use screen two, the port would be 5902, and so on and so forth.
The issue was, now that I had the VNC server running, how would I connect to it? There wasn't an easy way to get the IP address of the Raspberry without using ifconfig, but that required a monitor connected to the device to see the output.
An easy way to always know the IP address of the device is to simply set a static IP instead of DHCP allocating one for me. Because my router assigns IP addresses from 192.168.1.100 to 192.168.1.149, I assigned the Raspberry an IP address of 192.168.1.222.
You can do this in Debian Squeeze on the Raspberry by modifying the /etc/network/interfaces file.
I removed the original iface eth0 line and replaced it with the following:
iface eth0 inet static
address 192.168.1.222
netmask 255.255.255.0
gateway 192.168.1.1
I shut down the Raspberry, disconnected it from my TV, and moved it to a more permanent home-- my desk in my room, which happens to be right next to my wireless router (for Ethernet).
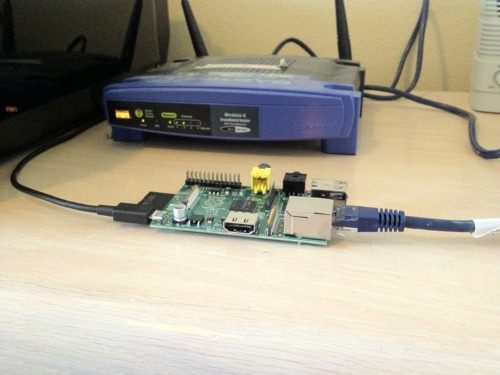
Yes, it is an old wireless router.
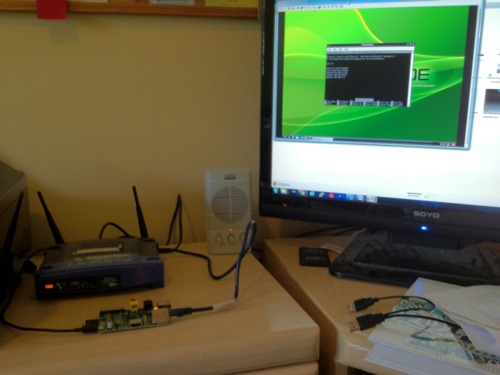
After waiting for it to boot, I VNC-ed into it, and it works perfectly! I just ordered a HDMI to DVI cable on Amazon for $0.83 so I can do more graphically intense things with the Raspberry without it lagging over the network-- we'll see how that works...
On my PC, I just use TightVNCViewer. On my Macbook Pro, the default screen sharing app works great.
After getting this setup, I compiled Node.js and let it sit overnight-- it took over an hour.
The next step is to find or build a case...
I've been running my Raspberry Pi on a really old 2GB SanDisk Ultra SD card. It worked fine, but it wasn't fast, and there certainly wasn't that much free space to do anything on. After installing a bunch of packages, compiling Node.js, and cloning a couple of Git repositories, I ran out of space.
I had a Transcend 4GB SD card lying around, and wanted to transfer the entire contents of the older SD card to the larger one.
Cloning the Old Card
I used the same tool that I originally used to write the Debian image to the SD card: Win32DiskImager.
For whatever reason, after inserting the old 2GB card into my computer, typing in a file name for the image, and hitting "read," I got an error that said that the image didn't exist. Well, duh. I was trying to create a new image.
Copying and pasting the Debian .img and selecting it seemed to work. It just got overwritten, as expected.
I popped out the old card, inserted the new 4GB SD, and wrote the image to the card. It worked without any issues.
After plugging the new 4GB SD into the Raspberry and turning it on, I waited for it to boot and tried to SSH and VNC into it-- both actively refused connection. Weird.
Thinking something went wrong during the write, I plugged the Raspberry into the TV again to see if it was outputting errors. Nothing.
After plugging the Raspberry back into the Ethernet and power in my room (it's headless, so no monitor), I could SSH and VNC into it with no problem. Whatever the issue was seemed to solve itself...
Repartitioning the Card
Obviously, because the new 4GB card was an exact clone of the old one, the partitions were still sized for the 2GB card. This meant I gained no free space.
After going to this page and following the directions, I managed to resize the partitions to the full 4GB card-- I now have a little over 2GB of free space, which is expected, since Debian Squeeze uses a little under 2GB.
One reason I wanted to have a Raspberry Pi was to be able to cheaply run periodic scripts and monitoring apps. I could have easily left on a full PC and hid it in my closet, or I could have rented out another Amazon EC2 server, but in both cases, it’s quite expensive. With the dedicated PC, there is a significant up front cost, and depending on the power efficiency of the computer, it could cost me monthly as well in the form of an electricity bill. Amazon EC2, on the other hand, costs anywhere from $20 up to hundreds of dollars a month, which is fine if you need the full power of a server to run a website, but not ok for hacking together some stuff.
With the Raspberry Pi, I have a low cost ($35) and low power device that I can always leave on, without worrying about heat building up in a case or a large power bill— after all, the entire thing runs on a Micro USB port.
Node.js
I’ve been a big fan of Node.js since fall of last year. The first project I really used Node in was a ticketing website for a business competition. There were, however, a few downfalls to using an experimental platform:
- New versions often broke my application, which happened to use Express.js
- Express.js was upgraded from 2.0 to 3.0 in the time I was working on the app— which broke more stuff
- Keeping the app running properly. Unlike PHP and Apache, I had to worry about keeping the script running at all times
However, Node.js is extremely easy to use, and with a helper like Express.js, you can do a lot of things that would normally require significant work in Apache and PHP (.htaccess files and mod_rewrite, for whatever reason, never seem to agree with me). It’s also really fast for me to write— Javascript is my primary development language.
To get Node.js running on the Pi, I had to compile it— it’s only available officially in x86 binaries, as far as I know. These instructions are what got me started. Of course, since I wasn’t using ARM Arch, so I couldn’t simply cheat and use the pre-built version:
$ pacman -S nodejsAfter modifying the files in the V8 engine and setting it to build for Arm, make took over an hour— I left it overnight so I wouldn’t have to watch it build. And because it’s a fan-less machine, it didn’t even disturb my sleep.
Zombie.js
Until recently, to do any parsing of web pages, I’ve used JQuery or regular expressions.
The benefit of using JQuery and the Sizzle CSS selector engine built into JQuery is that I can do the following to get the title of the page:
var doc = $([some html]);
var title = $(doc).find('title').text();
Regular expressions are a little tougher to write and require a bit of testing, but they also let you extract a small part of an HTML element without an issue, and they don’t require the use of a DOM, since all you ever deal with is plain text.
Zombie.js is generally used for virtual browser automation and testing— you can tell it to go to a link, click buttons, and fill out forms. You can also extract values from elements using the same Sizzle engine JQuery uses, making Zombie a great choice for extracting values from HTML as well. And of course, all of this is done from Node.js in a virtual web browser.
Weather Zombie
To test Zombie and Node.js out on the Raspberry, I created a simple script that fetches the forecast for the day at 6 AM on weekdays and 9 AM on weekends, as well as the next day’s weather at 8 PM every night. This data is pushed to my phone using Boxcar, so by the time I wake up, I have the forecast and chance of rain sitting right there. Yes, my iPhone is jailbroken and I could have a weather widget or Intelliscreen X on my lock screen, but this solution will work throughout iOS 6 as well, and it’s a great introduction to using Boxcar’s API.
Rather than starting from scratch, I tried to use an existing Node.js module, but for whatever reason, I could not get it to work. Sending a notification from the API just didn’t seem to get through.
Boxcar’s API is simple enough, so I coded the notification myself. Instead of dealing with Node’s HTTP API, I instead use a module called Restler. With a simple POST request to Boxcar, a push notification is sent to my phone.
However, it is important to remember, if you get a 401 error from the API, you need to subscribe a user to your Boxcar service.
Because I am running into a bug with Zombie.js, I can’t actually parse Weather.com or AccuWeather with it. My local news station works fine, however, and the weather is more accurate anyways. I simply fetch an element that holds the temperature or forecast on the page, and put it in a message to be sent using Boxcar.
All of this is deployed to the Raspberry using Git.
Future Projects
With college coming up in the fall, I’ve been registering for classes and housing. The college dashboard has a ton of information on it, including tuition balances, meal card information, and more, but who wants to log in and look? The next step is to create a script using Zombie.js on the Raspberry to monitor the account balances, and send me a push notification when anything is running low or if there are any significant changes in the notices section. This was actually the idea that allowed me to find Zombie— there is no API, and I have to log into the dashboard somehow.
Now that you have a Raspberry Pi and want to set it up with an operating system (need to buy a Raspberry Pi? Get one on Amazon), you have several choices. If you're primarily using the Raspberry Pi as a media center, you may want to consider installing RaspBMC, a custom distribution of XBMC. This will allow your Raspberry Pi to boot directly into a media center interface.
But if you're looking to use your Raspberry Pi as a general computer, you may want to consider the Raspbian distribution. Raspbian is a version of Debian Linux specifically configured to run on the Raspberry Pi and is recommended by the Raspberry Pi Foundation as the operating system to install.
You may also want to learn about NOOBS, an even easier way to install operating systems on your Raspberry Pi.
Downloading Raspbian
Raspbian is available for free from the Raspberry Pi website. Under the header "Raspbian 'wheezy'", download either the torrent or direct download. The torrent has the potential to be faster, but some firewalls may block the required ports and you may have to use the direct download instead.
Once you have the ZIP file downloaded to your computer, unarchive it. There will be a single .img file inside. This is the disk image you will flash to the Raspberry Pi's SD card. To install Raspbian, you will need an SD card that has 2 GB of space or more-- this cheap 16 GB Class 10 SD card works great on the Raspberry Pi, and gives you plenty of room to add media and other programs once Raspbian is installed.
Mac OS X
On Mac OS X, we will use a utility called dd. This is a Unix tool for flashing disk images, among other things.
Once you've plugged in the SD card to your Mac, Open the "Disk Utility" application from the Utilities folder in Applications. You'll see a screen similar to the one below, listing your Mac's hard drive, any external hard drives plugged in, and your SD card. You can see my Raspberry Pi SD card is a 4GB SD card.

Format the SD Card
If you haven't already, format the drive to FAT-32. This can be done from Disk Utility by clicking the "4.01 GB APPLE SD Card Reader Media" item in the list on the left. On your computer, it may be called something different if your SD card model or capacity is different than mine. Make sure you select the SD card and not your hard drive.
Once you've highlighted the SD card in the list, click the "Erase" tab that appeared on the right hand pane. You'll see a "Format" option and a "Name" field. Choose "MS-DOS (FAT)" as the format and enter a name. For the FAT-32 format, the name must be uppercase and you will not be able to enter lowercase letters. I chose "RASPBIAN."

After you've verified the selected item is actually your SD card and you have entered a name and selected "MS-DOS (FAT)," click the erase button to begin the format process. This should be fairly quick as long as you do not use a Secure Erase.
At this point, make sure you have a little bit of time to keep your computer on or awake. This process will likely take ten to twenty minutes or more.
Find the Disk Image
Open the Terminal application from the Utilities folder in Applications, and navigate to the directory where you extracted the .img file earlier. For those that used Safari, it will likely be the ~/Downloads folder. If you are unfamiliar with the Terminal and used Safari or another web browser that placed the file in your Downloads folder, you can use the following command: cd ~/Downloads.
Now, type ls in the Terminal and hit enter to list all of the files in the directory, If you see the Raspbian image file (not the .zip file-- this one will end in .img), you're in the right place. If not, try the step above again and make sure you cd into the right directory. Remember or write down the exact file name of the .img file.
We're going to list all of the attached disks to find the SD card's mount point. We do this with the command df -h. You'll see a list like the one below. Notice how I have a ton of different disks, but only one has a cell with the value /Volumes/RASPBIAN. If you named your drive something else, look for that instead.
The item I am looking for is the bottom row. Make a note of the first column value, which is /dev/disk1s4 for me. Now, because we want to write to the raw disk, we need to change the value we're going to use. Essentially, you want to add an "r" before "disk" and remove the "s4" at the end. So, while we see the value /dev/disk1s4, we'll need to remember the value /dev/rdisk1.
Once you've made a note of this value, we can now unmount the partition so that dd can flash the disk image.
Unmount the Volume
Open Disk Utility again and you'll see the SD card in the list to the left with the name you chose earlier. Right click the name of the SD card this time. In my case, it is "RASPBIAN." Do not click the "4.01 GB APPLE SD Card Reader Media" list item, because we are selecting the partition in this case. In the menu that pops up, click "Unmount."
Flash the Disk Image
Go back to the Terminal and type the following command, ensuring you replace the "[FILESYSTEM]" value with the one you noted earlier and the "[DISK IMAGE NAME]" with the proper file name obtained above.
sudo dd bs=1m if=[DISK IMAGE NAME] of=[FILESYSTEM]
For me, the command would look something like this:
sudo dd bs=1m if=2012-12-16-wheezy-raspbian.img of=/dev/rdisk4
Hit enter, and wait until the command completes. Once dd flashes the disk image, you can remove it from your Mac and plug it into your Raspberry Pi. The default username is pi and the default password is raspberry.
Troubleshooting
Q: I receive the error "dd: bs: illegal numeric value"
A: Ensure the value of the bs parameter in the command above is 1m (e.g. lowercase "m"). For those curious, the bs value is the "block size" of the partition.
Q: I receive the error "dd: /dev/disk4s1: Resource busy"
A: Make sure you unmounted the SD card's partition through Disk Utility.
Windows
The recommended method for flashing an SD for use in a Raspberry Pi is a program called Win32DiskImager. The latest version can be found on the official website. Personally I recommend version 0.5, since the latest version (0.6) has a bug that may cause your entire hard drive to be flashed instead of the SD card.
Once you've downloaded the Win32DiskImager application and extracted the ZIP file, download the Raspbian distribution. This can be found on the Raspberry Pi website under the heading "Raspbian 'wheezy'". Once the ZIP file downloads, extract the .img from the .zip.
In Win32DiskImager, ensure you select the correct drive letter for your SD card. In my case, the SD card was drive F:/. Yours may be different, so check in Windows Explorer to make sure you have the correct letter. Do not choose C:\, since that is your main hard drive.
Also, select the .img file you extracted from the Raspbian distribution above using the file picker. Once you have made sure you have the correct .img file and drive letter for your SD card, click "Write" (not read) to flash the SD card. This will take less than five minutes on average and you can see the current progress in the Win32DiskImager window. Once the flash completes, you can exit the program.

Setting Up Raspberry Pi
Once you've flashed the disk image using the methods above, place the SD card into your Raspberry Pi, plug in the HDMI monitor, any keyboards and mice, and then the power cable. Your Raspberry Pi should begin to boot and you should be able to see Raspbian on your screen.
Complete the Raspbian setup, and your Raspberry Pi is now ready to be used!
In my room, my bed is lofted above my desk. While I like the setup, it becomes a little difficult to see and study because the only source of light in the room is obscured slightly. Unfortunately, because I'm in Seattle and we have rain and overcast weather from September to July, sunlight isn't an option.
I could always buy a lamp, but why do that when I can have a little fun tinkering with technology? I also had a Raspberry Pi sitting on my desk, so I decided I would put it to use. The completed project, which I call PiFX, can be recreated with the steps below.
Obviously, if I was going to use an entire Linux computer to power a light, it might as well be the most controllable light source available: a strand of digitally addressable RGB LEDs. Another goal of the project was to make sure I could control the lights remotely-- there's no buttons on the Raspberry Pi I can use, plus an external interface is much more customizable.
Ultimately, the project came down to this: string a set of digitally addressable multi-color LEDs above my desk and hook it up to an internet connected Raspberry Pi. Using Hamachi, I could then connect to a custom web interface on the Raspberry Pi to control the LEDs themselves. All of this would be done on Adafruit's Occidentalis Linux distribution with the server built in Node.js.
Installing Occidentalis
Installing Occidentalis is almost exactly the same as installing Raspbian. You can follow my other tutorial to do so, but simply use the Occidentalis image file rather than the Raspbian distribution. Otherwise, the steps are the same.
Setting Up Node.js
I used Socket.io and Node.js to display the web interface. Socket.io allows for multiple clients connected simultaneously to the interface to see, in real time, what any other client is changing. Essentially, if I have the UI open on my laptop and desktop and change a slider on one, it will also change on the other. You can see the interface below.

To install Node.js, I simply used the pre-built binary (v0.8.16) on this page to avoid waiting 2 hours for the package to compile.
Simply download and unpack the ZIP file, and then run sudo make install from the directory to copy the binaries into the appropriate locations.
Programming the PiFX Console
The PiFX web interface is completely custom done and built on Twitter Bootstrap and the Cyborg theme from Bootswatch (when I use the console in the dark, it's better to use a dark interface). The source code is available on GitHub, but the basic premise of the entire app is that it takes a Buffer integers with a length of [Number of Pixels] * 3, and then writes it to the strand of pixels using node-spi.
I may consider writing a separate tutorial on how to write custom animations for PiFX, but you can look at the built in animations for an example. It's pretty simple-- each animation has a function that takes in a PixelBuffer, modifies it according to the current frame number, and then returns it again.
An important part of the PiFX console is the code that drives the LEDs themselves. I use a modified version of node-spi, courtesy of Alex from Tinkerlog. The default node-spi package on NPM doesn't work, and I don't have the lower level hardware experience to bother fixing it, but the modified version included in the PiFX repository works fine.
I also have a separate RaspberryPixels NPM module that is designed to manage a buffer of LED pixels. It has some convenience functions to set the RGB or HSL color of individual pixels, fill the entire strand with a color, etc. There's no standalone documentation at the moment, but the code is very simple and easy to read. All of the parameters are documented within the code itself.
Anyhow, to setup your Raspberry Pi like mine, simply create a new directory somewhere on your Raspberry Pi with mkdir. Inside of this, do a git clone git://github.com/andrewmunsell/PiFX.git or download the contents of the repository.
After you have the repository cloned, use npm rebuild node_modules/spi to rebuild the SPI module and download the remaining dependencies with npm install.
Afterwards, you should be able to run sudo node server.js to start the server. Visit your Raspberry Pi's IP address at port 8888 to view the web console. Obviously, it's not connected to anything, so nothing will happen if you try and add animations. Note-- you must use sudo because you're accessing the GPIO hardware. Also, the server should work with any WS2801 based pixel strands or tape of any length (just change the Javascript or environmental variable corresponding to the number of pixels), not just those from Adafruit.
Wiring the LEDs
I am not a hardware expert, and simply used the female-to-male jumper wires on Adafruit to connect to the Raspberry Pi. The female end connects to the actual pins on the Raspberry Pi, while I taped the exposed wires from the JST SM Plug + Receptacle set to the male pin on the same cable. This isn't the most secure, but it does work. Considering my setup won't be moving, it's fine for me.
On the LED strand, there's two sets of power wires-- one spliced from the red and blue wires before the connector, and one in the connector itself. Using the exposed wire on the JST SM Plug/Receptacle connecting to the power on the LED strand and the jumper cables, I connected to the GND and 5v pins on the Raspberry Pi to provide power. The spliced wire along the LED Pixel strand is connected to the female DC jack, which then connects to the wall.
The clock and data wires connect to the Raspberry Pi in the same fashion as the power-- electrical taped to the jumper pins, which are hooked up to the GPIO on the Pi. You can refer to the diagram here to verify you have the right pins.
Wiring this together literally took four tries. First, I got the power hooked up but no control over the LEDs. This was due to me hooking up the Raspberry Pi to the output end of the strip. You can figure out which one is the input end by looking on your pixel-- the Adafruit site says there's an embossed arrow on the side of the LED's housing, but the arrow for me was printed directly onto the LED's PCB on the bottom of the pixel. The second and third times were just problems with my electrical tape job and not actually having the clock and data wires connected to the male side of the jumper cable properly.
Finally, if you did everything right, you should be able to restart the Node.js server and control your LEDs.

Mounting the Raspberry Pi
I simply mounted the Raspberry Pi on the bed frame using some velcro strips I found at a drug store nearby. It's plugged into ethernet and power from behind my desk. It's also plugged into a power strip/surge protector that has a timer feature, so I can turn the outlet on or off based on the time of day or manually if I'm away for the weekend (to reduce any potential fire hazards).
I do admit, the whole setup looks extremely suspicious and possibly malicious with the wires protruding from the PCB...
The photo below shows the setup, with the Raspberry Pi in the clear case on the bed frame. The ethernet goes against the wall behind the back board, as does the power.

PiFX
Now, I have a fully controllable set of LEDs above my desk. Of course, I claim it's because I need light to study and see my homework, but we all know that's not strictly true. The strobe effect combined with the color wheel is great for an instant party.
I'm looking at using a program on my PC to remotely control the LEDs in time with music, but I'll have to connect the Raspberry Pi some other way than over ethernet and Hamachi because the latency is too high thanks to the IT department at the University of Washington (the Hamachi VPN is connected over an external relay and isn't strictly over LAN due to the locked down network).
A couple days ago, the Raspberry Pi foundation released the Raspberry Pi 2. The Raspberry Pi 2 comes with some fantastic new features that I'm looking forward to utilizing, including an upgraded processor and RAM. Even better, the hardware comes in at the same $35 as the original model B.
Where Can You Buy a Raspberry Pi 2?
Unfortunately, the Raspberry Pi 2 sold out pretty quickly from a lot of distributors. However, you can still backorder a Raspberry Pi 2 and you'll receive it as soon as it comes in to your distributor.
- United States
- Newark/Element 14
- Allied Electronics
- Canada
- Newark/Element 14
- UK
- RS
The Things That Haven't Changed
The Raspberry Pi 2 is physically similar to the current model B+, meaning that your existing cases and accessories will likely work on the new device without much (or any) modification. Cases especially will work with your new Raspberry Pi 2 without any modification. The pins are also in the same place, meaning you can continue to use any of your existing projects that connect to those.
Additionally, the micro SD card you use with your current model B+ will physically fit just fine in your new Raspberry Pi 2 (though, you will have to reformat it and reinstall the OS, as noted below). However, remember if you have an original model A/B, you will need to purchase a micro SD card as the original model used a full sized SD card.
The Things That Are Different
One thing to note, if you are upgrading from an original Raspberry Pi (model A, A+, B, or B+)-- the updated processor means that you will not be able to just move your SD card from your old Raspberry Pi to the new one. However, many of the popular operating systems have been updated for the Raspberry Pi 2, including:
- Raspbian
- OpenELEC
- OSMC
- Snappy Ubuntu Core
- Debian Jessie
As usual, these operating systems can be installed manually with their respective OS images (available on the Raspberry Pi website) and using the image flashing method, or with NOOBS.
In the future, you'll also be able to run a version of Windows 10 through the Windows IoT program.
Once my Raspberry Pi 2 arrives, I'll have more information on cool things you can do with the increased power. If you'd like to know when I write a new article, feel free to subscribe to my mailing list.
NOOBS is a system designed by the Raspberry Pi foundation for installing operating systems onto your Raspberry Pi's SD card. Not only are you able to install an operating system with a single click, but you can install it over a network or even install multiple operating systems on multiple partitions.
For example, if you ever wished you could install both Raspbian and OpenELEC, NOOBS not only makes this possible, but easy to switch back and forth between the two.

Requirements
NOOBS requires a couple of things, most of which you probably already have:
- A Raspberry Pi (any model from the original to the newest Raspberry Pi 2)
- An SD card (or a Micro SD for the newer models) that is 4 GB or larger
- A computer with an SD card slot
One thing you must take note of is the 4 GB SD card requirement. If you have a smaller SD card or you simply need a new one, there are several cheap models that you can purchase:
- Full Sized SD Card (for the original Raspberry Pi)
- Sony 16GB SDHC/SDXC Class 10 (~$10)
- SanDisk Ultra 16GB Class 10 SDHC (~$12)
- Micro SD Card (for the Model A+/B+ or newer)
- SanDisk Ultra 16GB UHS-I/Class 10 Micro SDHC (~$8)
- Samsung 16GB EVO Class 10 Micro SDHC with Adapter (~$11)
All of the above micro SD cards come with adapters, so if you want to purchase the micro SD you can use it in your original Raspberry Pi and later move it to a model A+/B+ or newer at a later time.
Preinstalled NOOBS SD Cards
You can also purchase an SD/micro SD card with NOOBS preinstalled. This is more expensive than just loading NOOBS onto an SD card yourself, but is an option for convenience:
Installing NOOBS
First, you must download the NOOBS image from the Raspberry Pi website. There are a couple different options for download:
- NOOBS (offline installer)
- Torrent
- Compressed ZIP
- NOOBS LITE (online installer)
- Torrent
- Compressed ZIP
The offline installer is significantly larger than the "LITE" version, but comes with the ability to reinstall the Raspbian operating system without a network connection. This is because the actual OS image is saved onto the SD card when you install NOOBS for the first time. However, over time the OS image that is included in the NOOBS installation may become outdated unless you have a network connection, in which case the newer OS version will be downloaded and installed.
NOOBS LITE is significantly smaller in size, but requires a network connection to install the OS images. Both the regular NOOBS and NOOBS LITE installers allow for installing from a network.
Once you've downloaded the version of NOOBS you prefer (either the regular version or LITE), then you can simply extract the ZIP file.
Formatting Your SD Card
Before you can actually place NOOBS onto your SD card, you must format it. Note, formatting the card erases all data on it1.
Mac (the easy way)
On the Mac, you can use the built in "Disk Utility" application. Launch "Disk Utility" and insert your SD card into your Mac. You'll see it in the sidebar of the application, along with some items that are indented underneath it (what these items are and the number of them will vary based on how you previously used your SD card).

Ensure you select the root SD card (that is, the top most item), and switch to the "Erase" tab on the right hand pane. Leave the format as "FAT" and choose a name for it, which will be all uppercase letters. Then, simply hit the "Erase..." button in the bottom right to format the card.
Windows or Mac
Because we want to format the entire card and not just a single partition, you may want to use the SD Card Formatter by the SD Association. Once you've downloaded the formatter from their website, insert your SD card and run the formatter tool.
When you open the formatter tool, you'll have a few options-- the SD device to format, the type of format operation, and the new name of the SD card. Make sure you select the right SD card if you have multiple SD cards plugged into your computer. You can choose either format type, though the quick format is usually sufficient if you are not trying to erase sensitive data. Finally, for the name, choose whatever you wish and fit the "format" button.
Copying NOOBS
Once you have a formatted FAT SD card, you can simply copy the files for NOOBS that you extracted earlier. A simple copy and paste is all that is needed. It might take a while to copy the regular version of NOOBS due to the slow speed of SD cards, but once it's done you can eject the card from your computer and insert it into your Raspberry Pi.
Using NOOBS
Installing an OS
Before you plug your Raspberry Pi into the power cable, attach a USB keyboard and mouse so that you can navigate the NOOBS interface. Once you have the keyboard and mouse plugged in, you can turn on the power to your Raspberry Pi and you should be greeted with a screen similar to the following:
This is the operating system installation screen, and allows you to choose one or more OS images to install onto your SD card. Notice the icons on the right hand side-- those OS images with a picture of an SD card are already included with your NOOBS installation, while those with an Ethernet symbol can be downloaded over a network.
Simply check the boxes next to the OS images you wish to install, and hit the install button in the toolbar at the top of the window.
Boot Selection
Once you've installed one or more operating systems with NOOBS, rebooting your Raspberry Pi will result in one of two things happening automatically:
- If you have a single OS installed, it will boot automatically
- If you have more than one OS installed, a boot selector will be displayed

To get back to the OS installation screen, simply hold the "shift" key on your keyboard as you turn on your Raspberry Pi.
Other Resources
If you wish to just install a single operating system, you might find my tutorial on installing the Raspbian OS directly onto your SD card. With this method, the Raspberry Pi will automatically boot into Raspbian, though you do not get any sort of interface for reinstalling the operating system.
Advanced information on the NOOBS system can be found in the GitHub repository. This includes info on silent installation, as well as configuring advanced parameters such as choosing your auto-boot partition or forcing a display mode.
- Technically, if you do not overwrite the data (e.g. use a quick format) then you can recover the data, but I wouldn't count on it... ↩