Text Posts
There have been numerous high profile hacking attempts (and successes) in recent months and years. In 2012 alone, millions of accounts' hashed passwords and other sensitive information was stolen across tens of different websites:
- Zappos: 24 million accounts' passwords and email addresses exposed
- Global Payments: 1.5 million credit card numbers exposed
- LinkedIn: 6.5 million hashed passwords stolen-- many of which weren't salted
- eHarmony: 1.5 million hashed passwords exposed
- Last.fm: Passwords compromised
- Yahoo: 450,000 passwords leaked-- in plain text
By now, I'm sure you get the point-- your information is never safe. When you input your credit card number or password into to a website, you're trusting they've taken the necessary precautions to safeguard this data. The reality is, there's a lot of business that do not implement decent security practices.
In fact, the worst offenders not only store your password insecurely, but they prevent you from protecting yourself properly. In the event of a leak in which password hashes are made public, having an extremely secure password is the only way to keep yourself protected. A secure password can be composed of random letters, numbers, symbols, or even a long sentence that you remember. The issue is, not all sites let you use these kinds of secure passwords.
Consider this gem:
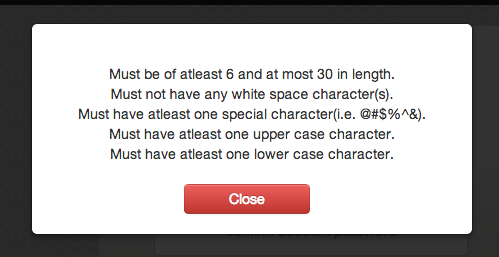
I appreciate the suggestion, but I don't think you're qualified to give me advice on how to use a secure password when you're not allowing me to use a password over 30 characters or have spaces.
There's a notorious XKCD comic that advises a user to come up with a string of random, memorable words and produce a short sentence to use as a password. On this site, your "correct horse battery staple" may be allowed, but you're bumping up against the limit. What if you wanted to use a slightly longer combination of words?
Fine, 30 characters is long enough for some social network or some non-critical service, but what if I'm selling goods on Ribbon?

Great. Another password length limitation. It's slightly more critical to have a secure password in this case-- after all, we're dealing with money. I wouldn't want someone to gain access to my account and redirect sales to their own PayPal account.
Speaking of PayPal, let's check out their password policies.
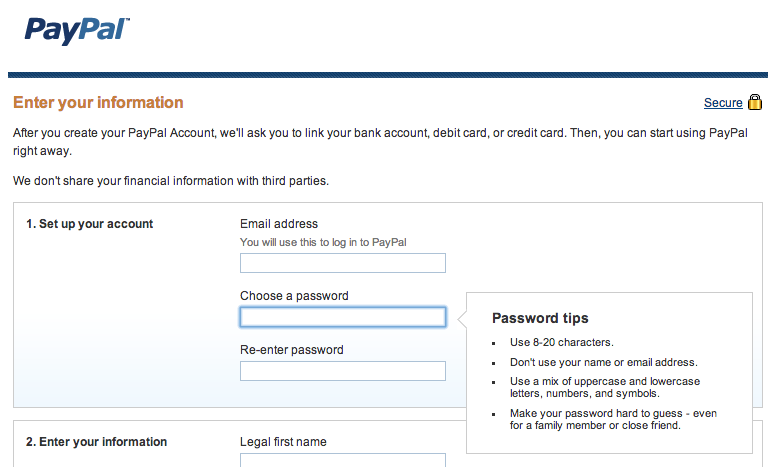
Wonderful. So, a service that is specifically built to handle money, is connected to bank accounts, credit cards, my address, and other personal information, has a maximum password length of 20 characters. At least they advise to use symbols.
Even banks aren't immune to enforcing ridiculous rules.
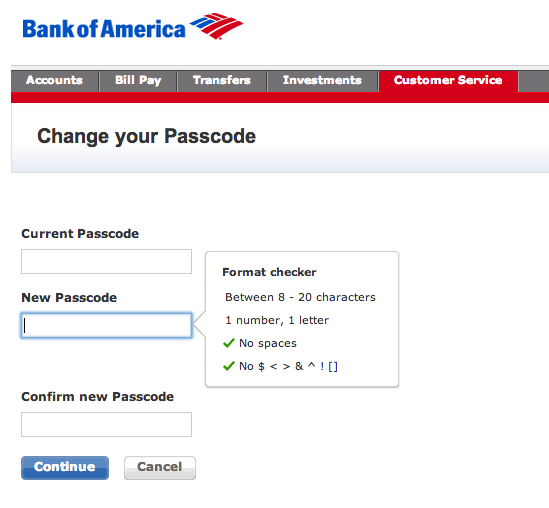
In fact, Bank of America is one of the worst offenders. They have a maximum password length of 20 characters, and require your password to be devoid of spaces and most special characters. It's like they want my password to be easily guessable in the event of a data breach.
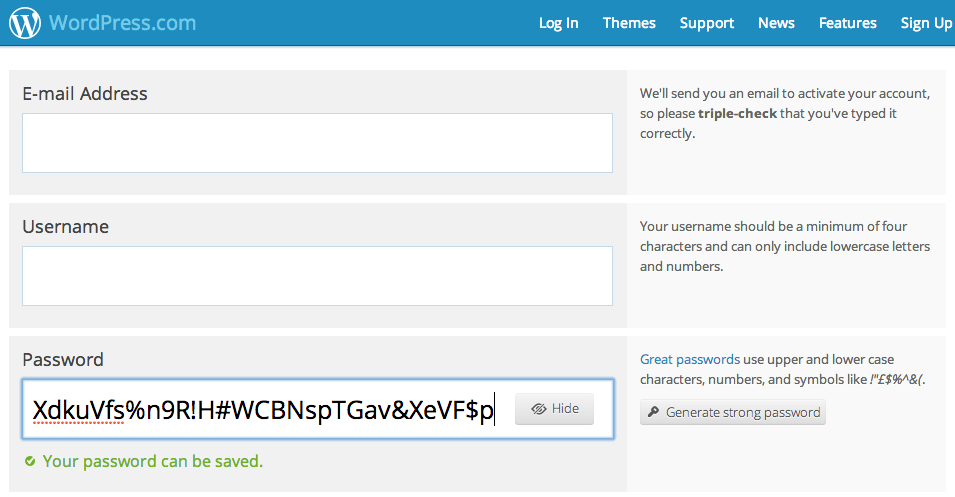
The Good
Fortunately, there are a couple of services out there that are actually helping in the area of security.
Wordpress.com is a great example of this. They not only accept long passwords of 50 characters or more with symbols, numbers, and mixed case letters, but they actually provide a 1-click password generator that incorporates all of these.
There are also plenty of apps that generate random passwords (and secure them as well). 1Password, LastPass (though there was an attempted hack against LastPass in 2011), and others are great examples of this. Personally, I use 1Password on both my Mac and iPhone, and it works great. Not only are my passwords random, but they are different for every website. If one website is compromised, there's no chance of the hacker being able to use that same password to gain access to other services.
What Needs to be Done
Developers need to educated in security. It's like a disease and public health-- if everyone were educated in the dangers of improper security, there would be fewer problems in the area. While data breaches will still occur, especially due to social engineering and other tactics that take advantage of human nature, a combination of proper salting and hashing, secure passwords, and two factor authentication will make large scale data breaches less dangerous.
Methods of security like two factor authentication may take some effort to implement, but there is one easy thing every developer can do:
Remove that stupid, arbitrary limition on your registration form and let me use whatever password I want. After all, you aren't storing my password in it's raw form, so length shouldn't matter for your VARCHAR(30) database field, right?
Email is something most working people deal with every day, and have been dealing with for a long time. It's never fun to open your email inbox at the beginning of a work day and see a mix of help requests, advertisements, and the truly important stuff all mixed into a big list of words and colors.
Mailbox for iPhone was recently opened up to the public, and I can honestly say that it is my new favorite mail client-- on the web, computer, or mobile. In the past, I've left everything in my Gmail inbox. I never bothered to archive things, and treated the archive as more of a trash can: a place where spam goes.
To my disappointment, I discovered Mailbox will only show a numerical badge on the app icon in three ways:
- The number of items in your inbox
- "1" if you have one or more unread items
- No badge at all
I was baffled that there was no way to simply show the number of unread items in my inbox. I appreciated the advice to "send the rest [of my email] to Archive or Later", but honestly, I don't like being told how to organize my stuff.
After a day or so staring at the badge on my dock, which uselessly read "2500", I relented and used the convenient "archive all messages" feature of Mailbox. After a couple of seconds, my inbox was completely empty-- a sight I haven't seen in years. In the app, a simple picture of a dock and lake (it appears to change every day to a new Instagram picture, kind of like Bing) was hidden behind a cutout of the Mailbox logo. Below were the words, "You're all done."
It's strangely relaxing to see absolutely nothing in my email inbox.

Remind Me Later
Of course, this momentary zen-like state was inturrupted by a new email from a client asking for help, but this was a Sunday morning and I was out on the top of a mountain-- not a great place to discuss analytics. With a simple swipe, I marked the message as needing attention later in the evening. Sure enough, I was later reminded of the email by Mailbox.
This "remind me later" feature is the primary selling point of Mailbox, and it works wonderfully. With simple right-to-left swipe on an email thread, you get a popup that asks whether you want to save the email for "later today", "this evening", "tomorrow", or a number of other time periods.
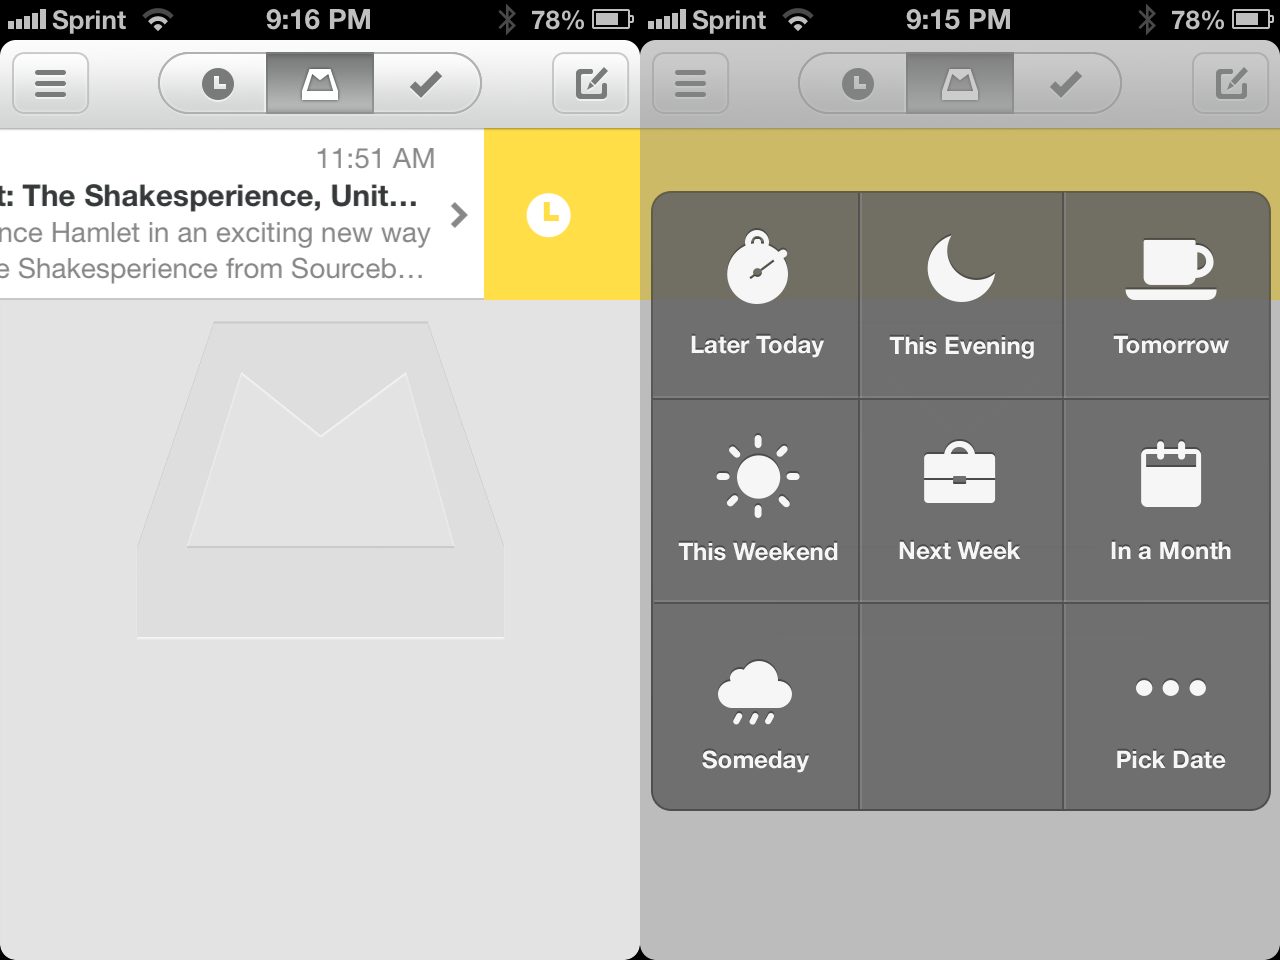
You can configure several different options, including when you day (or weekend) starts, your workday ends, and what your definition of "later" is. For example, I have my workdays set to start at 9 AM and weekends at 10 AM. Workdays end at 6 PM, and messages set for "later" are snoozed for 4 hours. Someday is defined as 3 months in the future, though I don't see myself using that "distance" very much.
Push Notifications
While I used to use Sparrow (before it was acqui-killed by Google), I was always disappointed by the lack of push notifications. Sure, I didn't need to know that Jamba Juice was on Groupon at the moment it happened, but there are critical emails that do need to be answered right away. Because of this, I eventually switched to the official Gmail application, which does support push.
But upon receiving my invitation to Mailbox, I immediately turned Gmail's notifications off. Mailbox has push notifications that work great, like any first class mail client should.
Other Features
Other than the "read later" feature and the extremely strong suggestion to archive all of your messages in order to reach inbox-zero, there aren't too many stand-out features in Mailbox. That's ok though, because Mailbox is still a phenomenal mail client and doesn't need a ton of flashy features to be great.
Threaded conversations, search, message composition, and other features worked fine. I did have a few issues finding a specific message, which I easily found with the official Gmail client with the same search term. It'd help to know exactly what Mailbox is searching through (subject, sender, message body, etc) to find out why that message couldn't be found.
Conclusion
Mailbox is now my go-to mail client for iOS and has replaced Gmail on my dock. It's great to see a new player in the email space, and it'll be interesting to see where they end up in a year.
Would I pay for Mailbox as a subscription? Possibly, given that the price was right. I'd certainly paid for the app itself, but for me to subscribe to a recurring service is rare-- Mailbox may be one of those apps that could get me to open my wallet each month.
Fortunately, Mailbox is free, and while I don't know their plans for the future, if they can keep up the great service I'd even be happy to pay.
Email is something most working people deal with every day, and have been dealing with for a long time. It's never fun to open your email inbox at the beginning of a work day and see a mix of help requests, advertisements, and the truly important stuff all mixed into a big list of words and colors.
In my room, my bed is lofted above my desk. While I like the setup, it becomes a little difficult to see and study because the only source of light in the room is obscured slightly. Unfortunately, because I'm in Seattle and we have rain and overcast weather from September to July, sunlight isn't an option.
I could always buy a lamp, but why do that when I can have a little fun tinkering with technology? I also had a Raspberry Pi sitting on my desk, so I decided I would put it to use. The completed project, which I call PiFX, can be recreated with the steps below.
Obviously, if I was going to use an entire Linux computer to power a light, it might as well be the most controllable light source available: a strand of digitally addressable RGB LEDs. Another goal of the project was to make sure I could control the lights remotely-- there's no buttons on the Raspberry Pi I can use, plus an external interface is much more customizable.
Ultimately, the project came down to this: string a set of digitally addressable multi-color LEDs above my desk and hook it up to an internet connected Raspberry Pi. Using Hamachi, I could then connect to a custom web interface on the Raspberry Pi to control the LEDs themselves. All of this would be done on Adafruit's Occidentalis Linux distribution with the server built in Node.js.
Installing Occidentalis
Installing Occidentalis is almost exactly the same as installing Raspbian. You can follow my other tutorial to do so, but simply use the Occidentalis image file rather than the Raspbian distribution. Otherwise, the steps are the same.
Setting Up Node.js
I used Socket.io and Node.js to display the web interface. Socket.io allows for multiple clients connected simultaneously to the interface to see, in real time, what any other client is changing. Essentially, if I have the UI open on my laptop and desktop and change a slider on one, it will also change on the other. You can see the interface below.

To install Node.js, I simply used the pre-built binary (v0.8.16) on this page to avoid waiting 2 hours for the package to compile.
Simply download and unpack the ZIP file, and then run sudo make install from the directory to copy the binaries into the appropriate locations.
Programming the PiFX Console
The PiFX web interface is completely custom done and built on Twitter Bootstrap and the Cyborg theme from Bootswatch (when I use the console in the dark, it's better to use a dark interface). The source code is available on GitHub, but the basic premise of the entire app is that it takes a Buffer integers with a length of [Number of Pixels] * 3, and then writes it to the strand of pixels using node-spi.
I may consider writing a separate tutorial on how to write custom animations for PiFX, but you can look at the built in animations for an example. It's pretty simple-- each animation has a function that takes in a PixelBuffer, modifies it according to the current frame number, and then returns it again.
An important part of the PiFX console is the code that drives the LEDs themselves. I use a modified version of node-spi, courtesy of Alex from Tinkerlog. The default node-spi package on NPM doesn't work, and I don't have the lower level hardware experience to bother fixing it, but the modified version included in the PiFX repository works fine.
I also have a separate RaspberryPixels NPM module that is designed to manage a buffer of LED pixels. It has some convenience functions to set the RGB or HSL color of individual pixels, fill the entire strand with a color, etc. There's no standalone documentation at the moment, but the code is very simple and easy to read. All of the parameters are documented within the code itself.
Anyhow, to setup your Raspberry Pi like mine, simply create a new directory somewhere on your Raspberry Pi with mkdir. Inside of this, do a git clone git://github.com/andrewmunsell/PiFX.git or download the contents of the repository.
After you have the repository cloned, use npm rebuild node_modules/spi to rebuild the SPI module and download the remaining dependencies with npm install.
Afterwards, you should be able to run sudo node server.js to start the server. Visit your Raspberry Pi's IP address at port 8888 to view the web console. Obviously, it's not connected to anything, so nothing will happen if you try and add animations. Note-- you must use sudo because you're accessing the GPIO hardware. Also, the server should work with any WS2801 based pixel strands or tape of any length (just change the Javascript or environmental variable corresponding to the number of pixels), not just those from Adafruit.
Wiring the LEDs
I am not a hardware expert, and simply used the female-to-male jumper wires on Adafruit to connect to the Raspberry Pi. The female end connects to the actual pins on the Raspberry Pi, while I taped the exposed wires from the JST SM Plug + Receptacle set to the male pin on the same cable. This isn't the most secure, but it does work. Considering my setup won't be moving, it's fine for me.
On the LED strand, there's two sets of power wires-- one spliced from the red and blue wires before the connector, and one in the connector itself. Using the exposed wire on the JST SM Plug/Receptacle connecting to the power on the LED strand and the jumper cables, I connected to the GND and 5v pins on the Raspberry Pi to provide power. The spliced wire along the LED Pixel strand is connected to the female DC jack, which then connects to the wall.
The clock and data wires connect to the Raspberry Pi in the same fashion as the power-- electrical taped to the jumper pins, which are hooked up to the GPIO on the Pi. You can refer to the diagram here to verify you have the right pins.
Wiring this together literally took four tries. First, I got the power hooked up but no control over the LEDs. This was due to me hooking up the Raspberry Pi to the output end of the strip. You can figure out which one is the input end by looking on your pixel-- the Adafruit site says there's an embossed arrow on the side of the LED's housing, but the arrow for me was printed directly onto the LED's PCB on the bottom of the pixel. The second and third times were just problems with my electrical tape job and not actually having the clock and data wires connected to the male side of the jumper cable properly.
Finally, if you did everything right, you should be able to restart the Node.js server and control your LEDs.

Mounting the Raspberry Pi
I simply mounted the Raspberry Pi on the bed frame using some velcro strips I found at a drug store nearby. It's plugged into ethernet and power from behind my desk. It's also plugged into a power strip/surge protector that has a timer feature, so I can turn the outlet on or off based on the time of day or manually if I'm away for the weekend (to reduce any potential fire hazards).
I do admit, the whole setup looks extremely suspicious and possibly malicious with the wires protruding from the PCB...
The photo below shows the setup, with the Raspberry Pi in the clear case on the bed frame. The ethernet goes against the wall behind the back board, as does the power.

PiFX
Now, I have a fully controllable set of LEDs above my desk. Of course, I claim it's because I need light to study and see my homework, but we all know that's not strictly true. The strobe effect combined with the color wheel is great for an instant party.
I'm looking at using a program on my PC to remotely control the LEDs in time with music, but I'll have to connect the Raspberry Pi some other way than over ethernet and Hamachi because the latency is too high thanks to the IT department at the University of Washington (the Hamachi VPN is connected over an external relay and isn't strictly over LAN due to the locked down network).
I've been working on this tutorial for the last few months, and it's finally ready. You can read the tutorial for free or purchase the E-Book version to support me and future tutorials.
Jekyll is a static website generator that takes Markdown, Textile, HTML, or other formats and transforms them into a complete static website. The platform is extremely customizable and extensible.
While building a Jekyll website isn't for everyone, it is a powerful platform that allows your website to perform great and be extremely secure. In fact, I run my own blog off of Jekyll, Amazon S3, and CloudFront. "Learning Jekyll By Example" walks you through this entire process, so if you'd like to learn how to setup your blog in the same fashion, this tutorial is for you.
Many years ago, I received a Timex Internet Messenger watch. Back then, my parents used it to send me a message when it was time to come inside after a day of playing with my friends in the neighborhood (like I said, this was a long time ago). I loved the thing, and I'm not entirely sure why-- it was just a watch.
But my obsession with the Timex was an indicator of a budding obsession for the latest technology. At this point, I didn't have a cell phone or laptop, and I barely had my own desktop computer for the little homework I had. Yet I was still fascinated with the ability to receive a message on my wrist, and always be connected-- even it was just to my parents.
Fast forward around eight years, and it's the year 2013. We have desktop computers powerful enough to render 3D worlds, and computers almost as powerful in our pockets. The smartphone sitting on your desk or in your pocket didn't even exist eight years ago outside the mind of forward thinking individuals. As I sit here on my laptop, my watch chirps. Like the Timex that seemed as if it were from the future, which has long since been lost in my drawers, it dinged because someone had sent me a message.
The watch I'm currently wearing is the Cookoo, which was crowd funded on the Kickstarter platform this last Summer. I recently attended CES and had the priviledge of meeting with several individuals from companies funded by Kickstarter backers. By random chance, walking one of the several massive halls in the Las Vegas Convention Center, I ran into Peter Hauser-- the man behind Cookoo.
Stacked behind him was a literal mountain of watches-- products of the world we now live in. Eight years ago, a product like Cookoo that began in the mind of an individual, would probably not have existed-- at least not in the form we have today. Instead, it may have been a product of a large corporation, or it may have not existed at all. Thanks to Kickstarter, a futuristic idea, the ability to be always connected, was able to take shape in the physical world.
Cookoo
Like the Timex I used to wear, the Cookoo is designed to keep you connected with the outside world-- even when you do not have your phone in your hand. While the device doesn't connect to a pager or cell phone network to receive messages, it does connect to the device most individuals carry-- a smart phone. The Cookoo displays Facebook notifications, alarms, reminders, and missed call notifications. In addition, you can drop pins on a map, check in to locations on Facebook, take a photo remotely by pressing a button on the watch, and control music playback on your phone.
The Watch
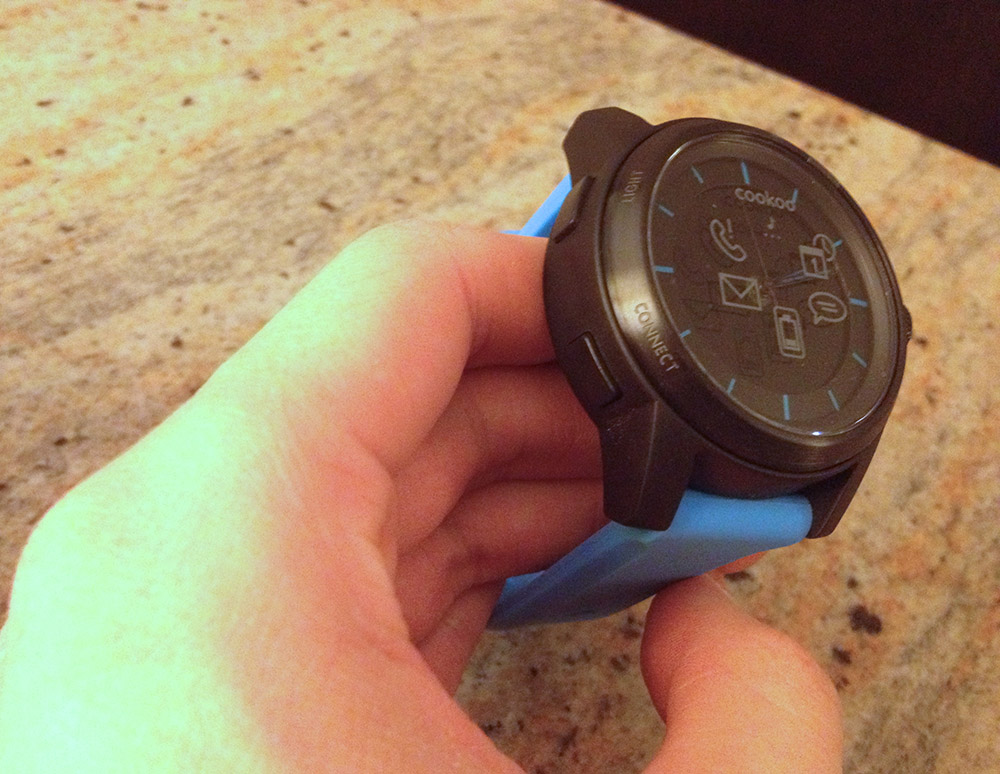
First and foremost, the Cookoo is a watch. This isn't the Pebble or Sony Smartwatch watch, and the Cookoo isn't remotely like any of the variations of digital smartwatches that have LCD or E-Ink screens. To a passerby, you're just wearing another analog watch. Depending on what type of person you are the Cookoo may be perfectly discreet.
Physically, the watch is large. It is certainly thicker than your normal watch, but it is smaller than some of the expensive mechanical dive watches you may find in a jewler or specialty watch store. While the purpose of a dive watch's thickness is to withstand the immense pressure of deep water, Cookoo's size is largely attributed to the fact it houses two removable batteries, Bluetooth electronics, and the time keeping piece itself.
However, despite its size, it isn't unbearable. I have extremely small wrists and often have issues with watch bands being too large, but the Cookoo, while it takes some getting used to, fits fine. Just for reference, I normally have the little stick that goes through the band in the fourth-smallest hole. The band itself isn't anything special, but it'll keep the Cookoo on your wrist without any problems.
The buttons--all four of them--are placed in the standard corners, and they feel solid and give decent tactile feedback. I'm not worried about them breaking or getting stuck. The button in the top left is for turning on the backlight, while the top right changes the watch from beep and vibrate to vibrate to just beeping to silent. The bottom left button is for pairing the watch to your phone, while the bottom right is the programmable "command" button. A short, medium, or long press of the command button performs a task you configure from the app on your phone.
The Watchface
Arguably, the watch face itself is the most important piece of the device. If you can't read the time on a watch, it's useless. The Cookoo has a standard, black watch face with no numerical markings. I have the black-and-blue watch, so the little notches indicating the hours and minutes are all blue. The Cookoo's face works fine for its purpose-- telling the time. It's simplistic, clean, and relatively easy to read in daylight.
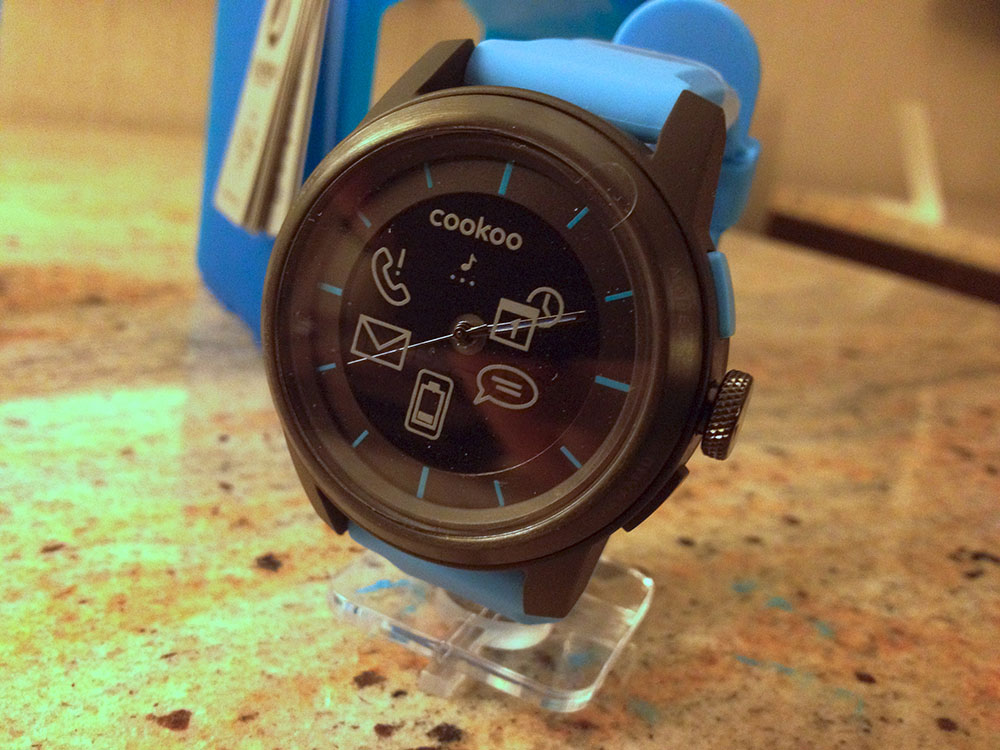
The hands themselves are your standard watch hands, with the hour and minute hands having blue highlights on them. The seconds hand is a standard, black stick.
My one gripe with the face of the watch is that the hands and hour markings do not light up or glow. This is a small issue in the dark, because while there's a blue backlight that allows me to see the silhouette of the hands, it can be difficult to distinguish between the hour and minute hands. It'd have been nice to be able to have the blue highlights glow, mainly so you can distinguish between hours and minutes a little bit faster when you're just glancing at your watch.
Other than the lack of glowing markings, the face is relatively nice looking. It's plain, and when the Bluetooth component of the watch is off, there's actually nothing on the face but the black background and blue watch hands.
When you receive a notification, an icon on the watch face will blink. The icon itself does not light up-- you still need to use the backlight to see it on the watch face in the dark, but this works great and the backlight makes it extremely easy to see the icons.
Bluetooth Connectivity
This is why you'd buy the Cookoo over any other analog watch-- it can connect to your phone over Bluetooth. It is worth noting that Cookoo only supports Bluetooth 4.0 because of its low power usage, so for now, only iOS devices are supported. There is a beta app for Android that seems to be coming soon, but support for devices is pretty minimal due to complications with Android's Bluetooth stack.
When I originally began using the watch, Bluetooth connectivity was relatively poor. The watch would drop the signal and not pick it back up at least once a day. The update to the iPhone app has seemed to mostly resolve the issue. I did have one occasion recently where the connection dropped, but after reopening the app the watch began to function correctly again and reconnected. When I walk out of range of my phone, the watch beeps once and disconnects, but has no problem reconnecting when I come back in range.
Because Bluetooth 4.0 doesn't have support for the MAP protocol, which is often used in car systems to send and receive text messages, and iOS doesn't expose SMS data, there is currently no way to have the watch vibrate when you receive a text. For heavy texters, this may be a deal breaker. However, Facebook notifications and calendar reminders work great, and the watch beeps as soon as you receieve either one of these.
The one issue with the Facebook notifications is the fact that they are lumped together and displayed using the message bubble icon on the watch. You'd expect that particular icon to show up for texts and Facebook messages, but pokes and Likes also will trigger the message bubble alert. Obviously, this isn't really solvable due to the limited number of icons that can light up, but Cookoo is about letting you know something happened-- not exactly what happened. I couldn't get the low battery notifications to work-- when my phone hits 20%, the phone will alert me, but the watch doesn't seem to do anything.
Bluetooth 4.0 uses very little power, so the watch is supposed to last up to a year of being connected to your phone. I can't really test this, but it is nice to not have to worry about charging. The mechanical watch movement and time keeping uses a separate battery and runs for up to three years.
Packaging
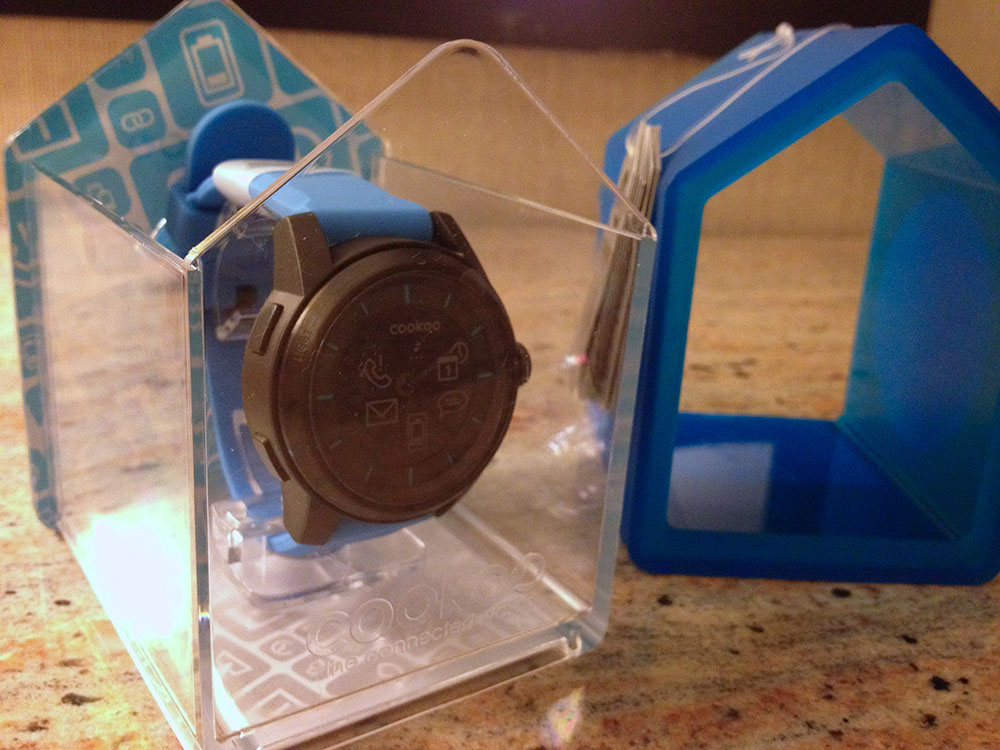
The packaging of Cookoo, in my opinion, is brilliant. It not only fits in well with the entire theme of the watch, but it can be recycled and used as a bird house. Considering the packaging is one of the first things you see when a product is sitting at a booth at CES or on a store shelf, it's extremely important to get right. Cookoo nailed it, in my opinion. Opening the packaging wasn't difficult and the housing itself is extremely sturdy. Call me selfish, but I haven't used it as a bird house because I actually want to keep the packaging for myself.
Always Connected
Cookoo hasn't changed my life, but it has changed my dependence on my phone-- a little bit. I've finally grown out of the habit of using my phone to check the time (there was a point where I had the Cookoo on and still used my phone), and the tiny chirps are discreet and aren't distracting to others. The one problem is, because Cookoo tells you something has happened, you may be slightly more tempted to check your phone to see what it is.
But because I can now tell the difference between a calendar reminder and a message, I can see the calendar icon blink and say, "oh yeah, it's 8'clock, so that must be my appointment alarm" instead of checking my phone to make sure it's not an important message. Normally I have my phone on silent, so I don't have the luxury of distinguishing between audio tones.
In the end, Cookoo is a device to augment your phone-- not replace it. The watch performs admirably at its task of telling the time, and for those that don't like the "all digital" look of other smart watches and yet want to be always connected, the Cookoo may be for you.
Just a note: all of the photos show the Cookoo watch with icons. To be clear, that is the sticker covering the watch face-- not the icons lit up on the device. The icons themselves are on the black background, not directly on the glass face.
If you've recently noticed a little bar appearing at the top of your screen on this website asking you to follow me on Twitter, then you've already experienced ThreeBar, a new service I've been working on.
In summary, ThreeBar is a welcome bar service that allows you to promote content to your visitors. Whether you're looking to draw visitors to your book's home page, get people to follow you on Twitter, or simply say hello, ThreeBar is designed for you.
ThreeBar also keeps detailed analytics for your bar, including the number of times it is viewed, closed, and clicked. This allows you to determine whether your ThreeBar is performing to your standards.
A/B tests can also be run by creating multiple bars in a group. Each bar is then rotated evenly and a random bar is shown to each visitor. Analytics are tracked per-bar, so you can then compare the click through rate for each.
If you're interested, you can register for ThreeBar completely free with the free plan or a 7 day trial with any one of the paid plans.
Let me know what you think of the service and if you have any feedback or questions!
Now that you have a Raspberry Pi and want to set it up with an operating system (need to buy a Raspberry Pi? Get one on Amazon), you have several choices. If you're primarily using the Raspberry Pi as a media center, you may want to consider installing RaspBMC, a custom distribution of XBMC. This will allow your Raspberry Pi to boot directly into a media center interface.
But if you're looking to use your Raspberry Pi as a general computer, you may want to consider the Raspbian distribution. Raspbian is a version of Debian Linux specifically configured to run on the Raspberry Pi and is recommended by the Raspberry Pi Foundation as the operating system to install.
You may also want to learn about NOOBS, an even easier way to install operating systems on your Raspberry Pi.
Downloading Raspbian
Raspbian is available for free from the Raspberry Pi website. Under the header "Raspbian 'wheezy'", download either the torrent or direct download. The torrent has the potential to be faster, but some firewalls may block the required ports and you may have to use the direct download instead.
Once you have the ZIP file downloaded to your computer, unarchive it. There will be a single .img file inside. This is the disk image you will flash to the Raspberry Pi's SD card. To install Raspbian, you will need an SD card that has 2 GB of space or more-- this cheap 16 GB Class 10 SD card works great on the Raspberry Pi, and gives you plenty of room to add media and other programs once Raspbian is installed.
Mac OS X
On Mac OS X, we will use a utility called dd. This is a Unix tool for flashing disk images, among other things.
Once you've plugged in the SD card to your Mac, Open the "Disk Utility" application from the Utilities folder in Applications. You'll see a screen similar to the one below, listing your Mac's hard drive, any external hard drives plugged in, and your SD card. You can see my Raspberry Pi SD card is a 4GB SD card.

Format the SD Card
If you haven't already, format the drive to FAT-32. This can be done from Disk Utility by clicking the "4.01 GB APPLE SD Card Reader Media" item in the list on the left. On your computer, it may be called something different if your SD card model or capacity is different than mine. Make sure you select the SD card and not your hard drive.
Once you've highlighted the SD card in the list, click the "Erase" tab that appeared on the right hand pane. You'll see a "Format" option and a "Name" field. Choose "MS-DOS (FAT)" as the format and enter a name. For the FAT-32 format, the name must be uppercase and you will not be able to enter lowercase letters. I chose "RASPBIAN."

After you've verified the selected item is actually your SD card and you have entered a name and selected "MS-DOS (FAT)," click the erase button to begin the format process. This should be fairly quick as long as you do not use a Secure Erase.
At this point, make sure you have a little bit of time to keep your computer on or awake. This process will likely take ten to twenty minutes or more.
Find the Disk Image
Open the Terminal application from the Utilities folder in Applications, and navigate to the directory where you extracted the .img file earlier. For those that used Safari, it will likely be the ~/Downloads folder. If you are unfamiliar with the Terminal and used Safari or another web browser that placed the file in your Downloads folder, you can use the following command: cd ~/Downloads.
Now, type ls in the Terminal and hit enter to list all of the files in the directory, If you see the Raspbian image file (not the .zip file-- this one will end in .img), you're in the right place. If not, try the step above again and make sure you cd into the right directory. Remember or write down the exact file name of the .img file.
We're going to list all of the attached disks to find the SD card's mount point. We do this with the command df -h. You'll see a list like the one below. Notice how I have a ton of different disks, but only one has a cell with the value /Volumes/RASPBIAN. If you named your drive something else, look for that instead.
The item I am looking for is the bottom row. Make a note of the first column value, which is /dev/disk1s4 for me. Now, because we want to write to the raw disk, we need to change the value we're going to use. Essentially, you want to add an "r" before "disk" and remove the "s4" at the end. So, while we see the value /dev/disk1s4, we'll need to remember the value /dev/rdisk1.
Once you've made a note of this value, we can now unmount the partition so that dd can flash the disk image.
Unmount the Volume
Open Disk Utility again and you'll see the SD card in the list to the left with the name you chose earlier. Right click the name of the SD card this time. In my case, it is "RASPBIAN." Do not click the "4.01 GB APPLE SD Card Reader Media" list item, because we are selecting the partition in this case. In the menu that pops up, click "Unmount."
Flash the Disk Image
Go back to the Terminal and type the following command, ensuring you replace the "[FILESYSTEM]" value with the one you noted earlier and the "[DISK IMAGE NAME]" with the proper file name obtained above.
sudo dd bs=1m if=[DISK IMAGE NAME] of=[FILESYSTEM]
For me, the command would look something like this:
sudo dd bs=1m if=2012-12-16-wheezy-raspbian.img of=/dev/rdisk4
Hit enter, and wait until the command completes. Once dd flashes the disk image, you can remove it from your Mac and plug it into your Raspberry Pi. The default username is pi and the default password is raspberry.
Troubleshooting
Q: I receive the error "dd: bs: illegal numeric value"
A: Ensure the value of the bs parameter in the command above is 1m (e.g. lowercase "m"). For those curious, the bs value is the "block size" of the partition.
Q: I receive the error "dd: /dev/disk4s1: Resource busy"
A: Make sure you unmounted the SD card's partition through Disk Utility.
Windows
The recommended method for flashing an SD for use in a Raspberry Pi is a program called Win32DiskImager. The latest version can be found on the official website. Personally I recommend version 0.5, since the latest version (0.6) has a bug that may cause your entire hard drive to be flashed instead of the SD card.
Once you've downloaded the Win32DiskImager application and extracted the ZIP file, download the Raspbian distribution. This can be found on the Raspberry Pi website under the heading "Raspbian 'wheezy'". Once the ZIP file downloads, extract the .img from the .zip.
In Win32DiskImager, ensure you select the correct drive letter for your SD card. In my case, the SD card was drive F:/. Yours may be different, so check in Windows Explorer to make sure you have the correct letter. Do not choose C:\, since that is your main hard drive.
Also, select the .img file you extracted from the Raspbian distribution above using the file picker. Once you have made sure you have the correct .img file and drive letter for your SD card, click "Write" (not read) to flash the SD card. This will take less than five minutes on average and you can see the current progress in the Win32DiskImager window. Once the flash completes, you can exit the program.

Setting Up Raspberry Pi
Once you've flashed the disk image using the methods above, place the SD card into your Raspberry Pi, plug in the HDMI monitor, any keyboards and mice, and then the power cable. Your Raspberry Pi should begin to boot and you should be able to see Raspbian on your screen.
Complete the Raspbian setup, and your Raspberry Pi is now ready to be used!
In 2010, Pixi Dust made a splash in the WebOS App Market, garnering over 100,000 downloads on the Palm Pre alone. I'm happy to announce that Pixi Dust is now available for Windows 8 tablets and desktops, from the Microsoft Surface RT to the most powerful multi-core x86 gaming desktops.
CES 2013 ended on Friday, and I just arrived back in Seattle this morning. This year's CES was the first I've attended, and there are a few products and companies that surprised or impressed me.
The Good
LG's Booth
The first booth I walked through was LG's with their 3D TV wall. This was an extremely impressive (and large) wall of 3D TVs looping some decent 3D footage. It was extremely smart for LG to have setup their booth this way-- it was essentially a gateway to one of the halls, and it definitely drew you in. Their 4k TVs weren't bad, either.
4k OLED TVs
The 4k televisions from various manufacturers (LG, Sony, etc) were also extremely impressive. I was slightly disappointed on my first look at some of these TVs because I was expecting a better level of black or brighter colors, but it may have been the content itself, because upon seeing another video clip it was slightly more impressive.
Th curved OLED TV seemed useless though. At a distance, the curved screen is useless and seems like it'd actually be annoying to watch. This seems like a case of "we did it because we could."
Project Shield
NVidia's Project Shield was hidden away from eager hands inside of a glass box, but from the outside, the device was certainly impressive. If you've never heard of Shield before, imagine an Xbox controller with your phone taped to a hinge on the top of the controller.
I will be curious to see what the battery life on it is-- after all, it is not a small device. I'm expecting a monster battery in the thing, and will definitely be disappointed if this thing gets any less than 8 hours of battery life. There's definitely physical room inside of the controller's body for a large battery, and Tegra 4 should help lower power consumption.
Razer Edge
The Razer is pretty heavy and bulky for a tablet, and with the controls, it's pushing being portable. But even so, the amount of power the tablet packs is impressive. When tablets eventually gain powerful dedicated video cards, as the Edge does, and a decent (4+ hours) battery life, I'll consider replacing my desktop with a monitor/dock and the tablet. But until a tablet beats my GTX 580, I'll stick with a tower.
Cookoo
Along with a couple of other Kickstarter projects, I stopped by Cookoo's booth during CES. Cookoo was the only Kickstarter project I visited that actually had their product on display-- the others were put away by the time I arrived on Friday. Peter Hauser, the project's creator, was pleasent to talk to about the project's development and the Kickstarter process. It showed that he cares about his business and project, and is looking for ways to improve Cookoo.
My initial impressions of the watch itself are good-- it's fairly good looking and solid, and though a little thick, is comfortable enough to wear. However, I cannot remember ever having worn an "analog" watch before-- only those will digital faces, and cheap ones at that (the watch I occassionally wear on vacations and during timed tests probably costed $10 or less). It took me a few minutes to figure out how to set the time on the watch, but that's kind of my fault. Funnily enough, I am so used to checking my phone for the time, I still do it, despite wearing a watch. This will probably change over time as I acclimate to wearing a watch again.
So far, the Cookoo has worked as promised. I do not receive a lot of phone calls, but the Facebook notifications are working great. For the future, it'd be good to have Twitter notifications as well.
Once the new update for iOS is released (to fix the issues with the watch disconnecting from the phone), I'll be able to test the watch out more thoroughly. I'm also looking forward to being able to control music playback through the device, since I often have my phone put away in my bag while riding the bus and listening to music.
Meeting Dieter Bohn
During the WebOS and PreCentral days, I talked to Dieter Bohn about several of my apps and being interviewed by the local news. I seeked out The Verge's trailer and kind of barged in, but I (finally) got the chance to meet Dieter in person.
The Weird
USPS
The USPS was at CES...hosting a basketball shooting competition. I'm not entirely sure what they were actually showing off, since I didn't really stop by. What I do want from them is a form of package or letter tracking. UPS and FedEx do it, so why not track every piece of mail that goes through the USPS too?
HAPIFork
CES certainly had a lot of Bluetooth enabled accessories present. From watches, to fitness monitoring equipment, to forks. Yes-- there is a fork that measures your eating habits and will vibrate if it detects you eating too fast. As you might imagine, this will be available on Kickstarter later this year.
CES was a ton of fun this year and it was cool to be able to see technologies such as OLED televisions. You could definitely see Kickstarter's influence on the show, and with Microsoft gone, CES definitely benefits from the increased number of small vendors popping up.
Kickstarter has seen its fair share of successful projects in 2012. From the Ouya game console, to the FORM 1 3D printer, to the Pebble smart watch (which I backed myself), millions of dollars have been invested into projects from startups and individuals. To show what a great year 2012 was, out of the 39 projects listed on Kickstarter's "Most Funded" page, all but four were funded in this last year.
The rising popularity of Kickstarter and sheer volume of money being invested is fantastic-- it allows for a small startup or individual to have an idea, and make it reality.
But the problem with Kickstarter lies within these successes: the fundamental misunderstanding of the website's purpose by (a lot of) individuals. After the Pebble watch became the most funded Kickstarter project ever, its presence on mainstream news outlets drew in more of the "general public" looking to order a cool watch. I've been following Kickstarter for a while and have always loved the idea of crowd funding, but until the Pebble, I never backed a project. Because of this, even I fell into the "general public" category at the time-- at least more so than some of the Kickstarter veterans.
I naively believed in September I'd have my Pebble on my wrist (and a FreedomPop iPhone sleeve), but come the beginning of the school year, I had neither.
I wasn't mad with either company, but the FreedomPop sleeve and Pebble watch were in two different situations. FreedomPop was a decently funded company with over $7M in Series A funding, while Pebble was the poster child of the crowd funding community. At this point, Pebble had been regularly updating their backers and I knew I shouldn't expect the watch soon. I always could hope I would receive it before the holidays, but it didn't seem likely.
The FreedomPop, on the other hand, was more of a mystery. All of the information anyone had was that it was "coming" in the next 4-6 weeks. But it seemed like every week, it was still 4-6 weeks away. In December, after writing FreedomPop (who at this point had shipped three different products, none of which were the iPhone sleeve), I found out that the FCC was still evaluating the case and I canceled my pre order. Was it wrong to believe a well funded company could deliver a product on time? Though I do have to admit this delay may not have been their fault, until the case is cleared by the FCC I might as well keep my $99. I do have to give them credit, however-- they refunded my money as promised without much hassle.
Now, I remain waiting for the other product I "pre ordered"-- the Pebble watch. But I'm not mad at Pebble for delaying the project. In fact, I'm quite excited for them. I've watched them grow from a video pitch on a website somewhere. I've seen every step of the manufacturing process. And now, I'm looking at an update on their website stating they have an announcement next Wednesday. I can't wait to see what they have in store, even if it's most likely just a "we're in manufacturing" announcement. Of course, there's the off chance that the Kickstarter-comment-thread-trolls are right and it's an announcement that Pebble was bought by Apple, but I'm counting on the former. Ultimately, the most important thing they have shown is competency-- Pebble has run into problems, but they have also shown they have the skills to fix them. They've gained my trust.
Unfortunately, I can't say that everyone has these same feelings for Pebble. A look at the latest update to the project, posted this morning, reveals the general public's mentality: "you guys didn't deliver the product I ordered, and I want a refund."
The problem is, no one ordered anything. No where on the Kickstarter page is the word "order" (except after they were funded, when they did place a real pre-order link with an estimate of 2013) or "buy." I do see a lot of the word "fund," however. Obviously, people have ignored the definition.
Sadly, Kickstarter even had to blog about this very issue and reiterate that the site was not a store. The problem is, the general public sees a page with a price and a green button, some nice pictures, and a news story on MSNBC portraying some project as an innovative product. Until people do enough research before dropping $150 for a watch on some website they've likely never heard about before, people are going to complain, and I'm always going to feel sorry for those that have to deal with them.
Pebble-- 2012 was a great year and it was cool to see you grow.
To the rest of the startups and individuals with ideas turning to Kickstarter to get the ball rolling-- good luck, and I hope you don't attract the attention of some mainstream news outlet, for your sake.
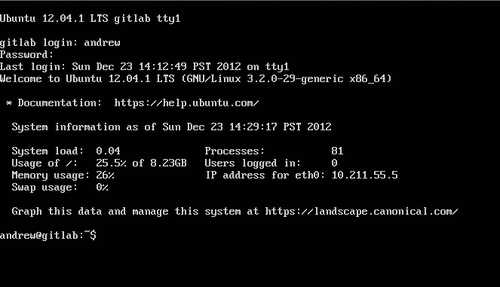
I recently wrote about using virtual machines to host your own GitLab instance. In that post, I suggested setting a static IP address for your virtual machines so they are accessible through a fixed address. Unfortunately, issues with networking and allowing the VMs to access the outside internet forced me to look for an alternate solution. Recently, I discovered a better way of accessing these VMs that also gives them internet access and a static IP address-- through a VPN using Hamachi.
Using Hamachi to Access Your VM
Personally, I used Hamachi over other VPN software. They have various binary distributions for RPM and DEB based flavors of Linux, as well as compiled ARM distributions (in case you want to try and run GitLab on your Raspberry Pi or something, which isn't a bad idea)
Once you've registered a free account (which allows you to have up to 5 clients in a network, or 32 for $29 /yr), create a new network.
A mesh network works the best here for minimal configuration. If you choose to use a hub-and-spoke network, you'll just have to make all of your servers the "hubs" and your client machines "spokes" for access between the machines to work properly.
Create the network without a password and require approval from the web portal. You can change this if you want and require a password, but it isn't necessary as approval is required by yourself in the web portal.
You can install the Hamachi client on your Mac, Windows, or Linux computer. This will allow your development machine to access the servers, which we'll setup in a minute.
Setting up Hamachi on the Servers
I have two servers in virtual machines-- a GitLab instance and a Jenkins CI server for building my projects. The process for setting up Hamachi on either of these servers is the same.
First, go to the experimental build page for LogMein Hamachi. Half way down the page you should see the section titled "LogMeIn Hamachi for Linux (Beta)." Obviously, this is a command line client for adding your servers to Hamachi networks.
Make a note of the URL for the proper file. If you followed my other guide and used Ubuntu 12.04 LTS 64 bit, you will want the "logmein-hamachi-2.1.0.86-1_amd64.deb" file.
Download and install the DEB using the following, replacing the URL with the appropriate version of Hamachi, or use the appropriate commands for your RPM based Linux distro.
cd /tmp
curl https://secure.logmein.com/labs/logmein-hamachi_2.1.0.86-1_amd64.deb -o hamachi.deb
sudo dpkg -i hamachi.deb
sudo apt-get install -f
Essentially, the commands above download the DEB to your /tmp directory and install it using dpkg. We also use the apt-get install -f to install all the dependencies of Hamachi.
Once this is done, you can use Hamachi through sudo hamachi. Typing this command will show you the current status of Hamachi, including the LogMeIn account attached, client ID, and other information.
To attach the client to your LogMeIn account, perform the following commands in your terminal.
sudo hamachi login
sudo hamachi attach [YOUR LOGMEIN EMAIL ADDRESS]
This will attach the client to your LogMeIn account after you approve on the web client. To approve the attachment, go to the LogMeIn website on your Mac or PC (not the Linux server). At the top of your client list should be a link that indicates a machine is awaiting your approval to be attached to your account. Approve the attachment and add the computer to your network that you created earlier.
Once this is done, on your Mac or PC, navigate to the IP address listed in the Hamachi control panel for your GitLab instance. You should see the login screen if everything went smoothly.
Reconfiguring GitLab for the New IP Address
Because the GitLab instance's IP address is now 25.x.x.x instead of the previous 192.x.x.x or 10.x.x.x, you'll need to edit the configuration file to reflect this.
SSH into your GitLab server and perform the following commands.
sudo su gitlab
cd ~/gitlab/config/
vi gitlab.yml
If you don't want to use vi, you can use nano or whatever editor you wish. In the gitlab.yml file, find the host: and ssh_host: fields. Change the values for both of these to the IP address of the GitLab instance.
Save the file (:wq! for vi) and reboot the server, and you should be able to use GitLab as before. As a bonus, this will even work between any new machines you add to the VPN.
GitLab is an open source clone of the popular GitHub service. In a lot of ways, it is similar to GitHub's Enterprise solution or Atlassin Stash-- it allows you to host Git repositories and a management interface yourself, potentially within your company's firewall.
While I do have a server that I use for production apps, I do not want to also place my code repositories and CI server on the same box. Renting another server will cost ~$20 a month extra on Amazon EC2 (with a Micro instance) or about the same amount on providers like Linode. For small developers, this additional cost may not be an option. Instead, you can have your own private GitLab installation running locally on your server or network, or even on your local machine in a VM, which I will show you how to do today.
Intro to GitLab
For small companies, individual developers, or even large corporations that want to maintain control of their own code, GitLab may be an interesting alternative to other software. Unlike GitHub or BitBucket, you host the GitLab installation yourself on servers you control.
It is currently on version 4.0 and available for free under the MIT license.
Setting Up GitLab
Normally, you'd set up GitLab on a dedicated (or virtual) server somewhere that is accessible from the internet or your company's intranet. In my case, only I need access to it, so I will be doing the following:
- Set up an Ubuntu 12.04 Server in Parallels
- Configure Ubuntu to use a static IP address
- Install GitLab using the provided script
- Edit the
/etc/hostsfile of my Mac so I can access the installation fromgitlab.devin my browser. - Configure the installation and add a new user
This way, I can point my browser to http://gitlab.dev and access the GitLab installation if the virtual machine is running in Parallels. I can start up and shut down the VM whenever I need, and it incurs no additional cost.
Setting Up the Virtual Machine
Because I've already bought a Parallels 7 license for my Mac, I used that. You can also use VMWare Fusion or Virtual Box (which is free) to achieve the same effect.
We will be using Ubuntu 12.04 Server LTS 64 bit, which you can download for free from the official website.
Configure a new virtual machine in any of the above applications and allocate a virtual hard drive (I used an expanding hard drive with a maximum capacity of 10 GB) and some RAM. You should allocate a minimum of 1 GB of RAM if you're planning on installing GitLab and the GitLab CI server. Personally, I allocated 1.5 GB of RAM since my Macbook Air is configured with 8 GB total and I have plenty of free RAM to spare. Video memory is not important since we will not be using a graphical interface in Ubuntu.
Attach the Ubuntu 12.04 Server LTS ISO image and follow the installation prompts, creating a user and configuring language, keyboard layout, and time.
Once the installation is completed, you are ready to configure a static IP address for the GitLab server.
Configure Ubuntu's Static IP Address
To configure a static IP address, you can use a similar process I described in my tutorial for Setting Up the Raspberry Pi as a Headless Device.
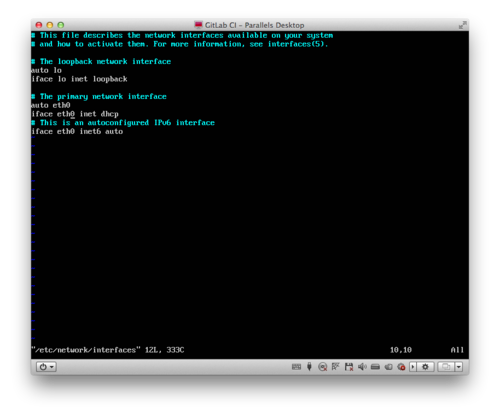
Essentially, you want to edit the /etc/network/interfaces file. You can do this by typing sudo vi /etc/network/interfaces and editing the file to change the line that reads iface eth0 inet dhcp to the following, specifying an IP address, network mask, and gateway:
iface eth0 inet static
address [IP ADDRESS]
netmask [NETMASK IP ADDRESS]
gateway [GATEWAY IP ADDRESS]
Enter the correct values for your network configuration. If you do not know these values, you can type route -n into the command prompt and copy the appropriate values down for the gateway (it's the one that's listed as "UG" under the flags column) and ifconfig for the IP address and network mask. The IP address assigned by DHCP and shown in ifconfig can be used as the static values, but know that if your DHCP server reassigns the particular IP address you chose to set as your GitLab's static IP address, you'll get some errors. It's best to choose an IP address outside of the range of addresses your DHCP server uses.
Installing GitLab
Conveniently, a script has been provided to install GitLab automatically. As indicated in the installation guide, you simply have to run the following command:
curl https://raw.github.com/gitlabhq/gitlab-recipes/master/install/v4/ubuntu_server_1204.sh | sudo domain_var=gitlab.example.com sh
Note: It is important to replace "gitlab.example.com" with the IP address that you configured above.
After the script completes, reboot the server with sudo shutdown -r now.
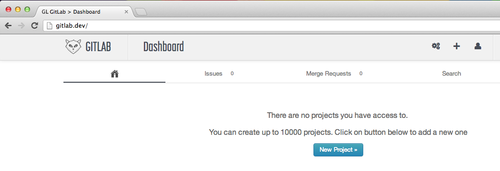
Accessing GitLab
Once the server reboots and the login prompt reappears, you can try accessing the GitLab installation directly through the IP address you configured earlier. If you configured everything correctly, you should see the GitLab login screen.
If you see a Gateway Error (502), simply wait a minute or two for the server to finish booting.
If you'd like to be able to access your GitLab installation from a "domain name," like "gitlab.dev," "gitlab.local," or others, you can do so by editing your hosts file. Note we are doing this on your computer, not the virtual machine. On Mac OS X this file is located in /etc/hosts.
To edit this file, you'll need to be an administrator. You can edit the hosts file by going into your Terminal and typing sudo vi /etc/hosts and entering your password when prompted. Simply add a new line with the following:
[IP ADDRESS] gitlab.dev
Replace the "[IP ADDRESS]" with the address of your installation and "gitlab.dev" with the domain you'd like to access GitLab through.
After you've done this, go to the domain you've set above in your web browser (you may have to add "http://" when typing the address in if it's a non-standard TLD like ".dev" or ".local"). If it works, you'll see the login page.
The default username and password for the GitLab installation are:
Username: [email protected]
Password: 5iveL!fe
You should immediately login with this username and password and either create a new administrator with your email address and password, then delete the old default user, or change the default administrator's password.
Downsides of Self Hosting GitLab Locally
Unlike GitHub, or even a version of GitLab hosted on a normal server, your local GitLab installation will only be accessible to you without further configuration. Some may say this defeats the point of having a version control system with powerful collaboration features like merge requests, but for individual developers who just want project and source code management, this will be a powerful solution.
On a related note, if you try and access the GitLab VM using the domain name you set in the hosts file from another virtual machine, it will not work. You must use the IP address directly or edit the hosts file of every VM and machine you wish to access GitLab from using a domain.
Also, the virtual machine must be running in order for you to access the GitLab installation. If you accidentally shut if off, then you'll have to start it up again. Running GitLab (and a Jenkins VM) on my Macbook Air takes up minimal processing power and there seems to be a very slight hit in battery life, but for laptop users it may be more useful to start and stop the VMs as needed.
Finally, services like GitHub invest a lot of money and talent into data backup. If you do not backup your data somewhere and the VM is corrupted or your computer is damaged, you will lose all repositories, issues, etc. Backup the virtual machine somewhere! Minimally, you should be backing up your code.
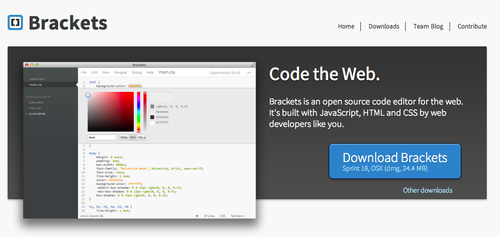
Adobe Brackets is a new text editor by Adobe built in Javascript. It certainly has some stiff competition from long time favorites like TextMate and Sublime Text 2 (my personal favorite and daily driver), but I personally have my doubts as to its future success.
What is Adobe Brackets?
Essentially, Adobe Brackets is a new text editor for developers. It is still in active development and is open source. What is unique about Brackets is the way it's built-- it is all built in HTML, CSS, and Javascript. Unlike C++ or other native languages that have a higher barrier of entry, Javascript will allow for more developers to extend and improve the editor.
The source code for Adobe Brackets is available on GitHub.
Using Brackets
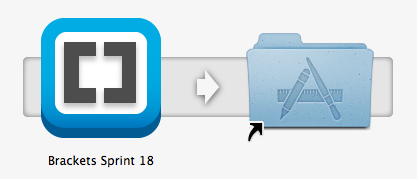
After you download Adobe Brackets and drop it into your /Applications on Mac OS X, it'll open a new window with a sample project.
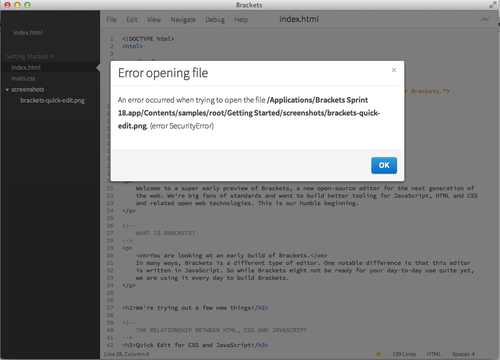
Now, being an editor in development, there are a few issues. For instance, trying to open the screenshot in the sample project resulted in an error.
You can use Brackets like a regular text editor. It has all of the basic features like syntax highlighting and all of the shortcuts (Control/Cmd + S to save) that you are used to, and pseudo-tabbed interface so you can have more than one document open at once.
Unique Features
Brackets has a few great features that I haven't seen in another text editor.
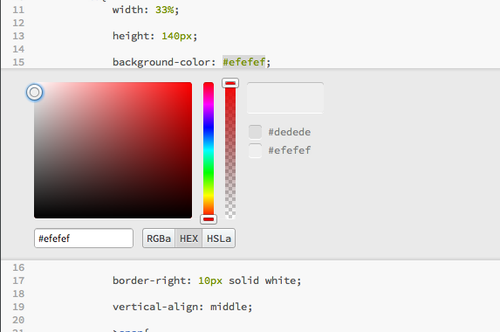
Quick Edit
You can edit colors in your CSS stylesheet with a color picker using the Quick Edit feature. Simply right click a hex color code and a color picker will pop up, which allows you to select a new color in RGB(a), Hex, or HSL(a).
Live Preview
Using the sideways lightning bolt icon, you can see live changes to your CSS. However, the feature is currently limited to Chrome and CSS, so if you update the HTML of a web page, you'll still need to refresh.
Missing Features & Down Sides
Even though there are several cool features of Brackets, it's missing a couple of features I'd like to see.
Multiple Cursors
The multiple cursors feature of Sublime Text 2 is one of the two reasons I use that editor (the other is how light weight it is, which is one reason I'll never use Eclipse or a Java based IDE). If you've never used multiple cursors before in a text editor, it's one thing you will always miss in other environments. Essentially, it allows you to place multiple cursors in your document and make multiple changes simultaneously.
Non-Native
Because Brackets isn't native, there's a few points where the app becomes confusing when compared to native apps. One big example is the application menu on Mac OS X. Normally, the menu is located in the menu bar app the top. However, with Brackets, they opted to use a non-native menu located within the app window itself.
Overall, Brackets is a great start and I'd like to see where it ends up, but because it is in development and lacking a lot of features and has a few problems (some of which will never be resolved, like the non-native app), it's hard to recommend it over other, native editors.
Recently I've been making the transition from my own Amazon EC2 server to Heroku. I've had some experience in the past with managing servers, but ultimately, I'm a developer, not a sysadmin. This meant that I was constantly hacking together a server that worked, but it never ran particularly well.
1&1
I started off on 1&1 a couple of years ago with their largest Linux VPS for my WebOS (remember that?) application, Weatherman. Because of the sheer number of users of the app and the fact that I was generating images on the fly, obviously, shared hosting was not going to be adequate. The problem was, the particular server I bought was severe overkill in the long run. During the launch of the app, the server was worthwhile and I needed the power. But over time as the WebOS platform faltered and the number of users of Weatherman decreased, I was stuck with an overpowered server that essentially broke even.
Amazon Elastic Compute Cloud
Eventually, I switched to Amazon EC2's Micro instance, which was more than enough to serve the remaining users of the app. As a bonus, being a new Amazon customer, the entire first year was free. Going from $720 a year to absolutely nothing in server costs (save for a few bucks in bandwidth) was certainly a worthwhile investment of my time. But like the 1&1 instance, the Amazon server was hacked together to work. There were only tens of remaining users at the time, so running efficiently wasn't necessarily a top priority.
Heroku
With a few projects in the pipeline that require reliability, I've decided to switch the majority of my stuff to Heroku, including TI Wizard, which has been running on 1&1's shared hosting since 2008. In fact, the only remaining reason I have an account with 1&1 is because of the domains I've purchased over the years. Even then, I absolutely hate 1&1's domain management-- it literally will take the entire 48 hours they estimate for DNS to propagate or several hours for a subdomain to register. I also have a few domains with Namecheap and they've been fantastic. It took literally 2 minutes for a new domain to be registered and under my control, and mere minutes for DNS to change to Cloudflare, on which changes are virtually instant.
Anyways, it's Heroku's simplicity that I love. I can go into the terminal, type heroku apps:create [appname], and I have a new dyno (essentially, a virtual server) ready and provisioned for my new application. If I need to show progress of a website to a client, I can create a new app and shut it down hours later for no cost at all.
Heroku allows for Node.JS, Python, Clojure, Scala, Ruby, Java, and PHP, along with custom build packs that let you use even more languages. Plus, they provide a free PGSQL database with up to 10,000 rows (or 10 million rows for $9 a month). Really, it's everything you could need to run the majority of applications with the flexibility to upgrade capacity and add additional dynos with a single command in the Terminal.
The Downsides
There are a few annoyances with Heroku. Primarily, you have to design your application with a read-only ephemeral filesystem in mind. In other words, any files you store on your server will disappear after the server is shut down, and it is not guaranteed to be on other servers your application is running on. For most applications, you should probably treat the file system as read-only or for temporary storage only. This is good practice anyways because it allows for scalability, but applications like Wordpress (there is a Heroku-specific configuration available maintained by the community and myself) that use a directory within the installation to save images, even temporarily, need reconfiguration. In this instance, a plugin to automatically move images to Amazon's cloud storage service is used to ensure the images' availability across all application instances.
Overall, moving to Heroku has been a great cost saving measure. I can essentially run the majority of my applications for free (minus Amazon CloudFront fees for hosting images) and have them managed by a team of experienced system administrators. It's a win for my websites' reliability and I'm definitely looking forward to launching some bigger, multi-dyno projects on Heroku's platform in the future.
Updated to reflect Heroku's ephemeral file system-- not read-only
I recently completed the second level of Computer Science courses (CSE 143) at the University of Washington. If you know me and talk to me in person, you probably know that I am not majoring in Computer Science, and would go so far to say I actually dislike the major. While this is a topic for another day, CSE tests have always bugged me.
The basic level Computer Science tests are outdated, and in my opinion, not necessarily indicative of a student's true programming skill.
I've had a lot of experience in programming, despite never having formal CSE training (prior to this quarter, though I wouldn't exactly say I learned a lot in CSE 143). While I took the AP Computer Science test, I never took a programming course in high school. In fact, we weren't even offered any good courses. The two that were offered, game design and web design, were titled incorrectly. They should have been called "Reserved Warcraft 3 Time" and "Halo 101," respectively.
So, I wasn't exactly missing anything by avoiding those courses. I instead fulfilled my occupational education requirement in CAD Lab (which, to a lesser extent, was filled with Halo matches against fellow students).
But because I knew how to program, I decided to take the AP Computer Science A test. I would have taken AB, but it's no longer being offered. I certainly was prepared for the code concepts and problems, but I wasn't quite as prepared for the fact that it was a written test. Other than in CSE 143 at UW and the AP Computer Science class, I don't think I have ever written down a curly brace or square bracket in my life. The only other subject I might use square brackets in, math, I choose to solely use rounded parenthesis instead (of course, this is because I am a programmer and accustomed to square brackets indicating an array element).
On one of the problems, we are required to loop through an array of objects. Simple.
for(int i = 0; i < …
Wait, in Java, is it .length, .length(), or .size() for an array? In Javascript, it's .length and PHP uses count($array)… I never use Java in practice, because I personally don't like the non-native feel of Java apps, so I didn't quite recall. Ultimately, because this was an array and not an ArrayList or some other object, I chose .length, and was right.
In practice, a programmer does not need to know every nuance of a language and know the syntax of every function because an IDE or good documentation prevents us from having to store all of these extraneous facts. I, for one, certainly don't want to remember if PHP's various functions take parameters in the "haystack", "needle" format or "needle", "haystack".
So, why not provide a locked down computer with a basic text editor that has syntax highlighting and minimal code completion (with the standard stuff you get on a cheat-sheet anyways)?
At least, on the AP test, I get it-- the testing locations are distributed nation wide with variable numbers of test takers (it was literally me, another guy, and two proctors during the AP Computer Science test), and it would be much more difficult to grade the AP Computer Science test differently than the AP Calculus test, which should be done with pencil and paper.
But three days ago in CSE 143, I sat in a room with 300 other people paying up to tens of thousands of dollars a year in tuition, and wrote a recursive function onto a thick pad of paper labeled "final exam" like it was 1984 and I was a part of the first group of students to take the AP Computer Science test.
Why should we be tested on something that we will never do in practice? Code is meant to be typed into a blinking box as much as math is meant to be written down. Sure, you can do it the other way, but why?
As a bonus, if the tests were electronic, you could even run all of the solutions through a test suite automatically and have the exam graded instantaneously. We're not judged on style on the exams anyways, plus there is no way I am commenting my code when I'm writing it out in the hour you've given me to do the exam.
For a class so obsessed with commenting and coding "the right way" (read: the professor's preference), why do we unnaturally code by pen?
Ultimately, I'm not looking for an excuse becayse I fail the exams. In fact, I got a 5 on the AP test--which would not have been affected by mistaking .length for .length()--and do very well on the written exams in the college course. I just think Computer Science, a field that is supposed to be cutting edge, needs to be taught like it's 2012.
Recently, I attended and presented at the 2012 Radiological Society of North America (RSNA) conference in Chicago, Illinois. RSNA is a massive gathering-- one of the largest in the world--and is a venue for manufacturers and medical software companies to show off the latest Radiology equipment and software. Being a software developer, I sought out several presentations by Radiology residents and graduate students that pertained to technology and medical software. During one of the hands on courses, in which the audience participated in the setup of web based Radiology software (including launching XAMPP and navigating PHPMyAdmin to view the MySQL table structure), I noticed something extremely peculiar.
While browsing the table structure of the users table, I noticed a database row (which was pre-populated during setup) containing an admin user. Among the columns were several standard entries, including the username, a flag indicating the admin status of the user, a URL, a…wait-- a URL? Normally, this wouldn't cause me to do a double take, except there was a curious string listed under the admin user's URL field. "password". I don't know about you, but to me, that looks nothing like a URL. At this point, the presenter hadn't gotten to logging into the admin panel-- she was still showing the database structure.
So, I navigated to the admin dashboard and entered "admin" as the username and "password" for the password. It worked, and I was logged in. Hoping this was mere coincidence, I proceeded to change the password of the admin user. I checked the database again-- "password" was now "hackme"-- the same string I changed the password to.
To verify my finding, I began to look into the code a little bit. Fortunately, the login form was sanitized through mysql_escape_string() to prevent against SQL injection. The programmer even acknowledged the blockage of SQL injection in the comments of the code, indicating that he or she was aware of the threat.
But diving a little deeper, in one of the pages that displayed a detailed information page for a specific data item, I noticed another problem:
$id = $_GET['id'];
$query = "SELECT * FROM reports WHERE id='$id'";
$result = mysql_query($query);
The variable, a GET variable none the less, is being inserted into the query without being sanitized. Luckily, it's not possible to simply pass '; DROP users into the GET variable because mysql_query() doesn't support stacked queries. As a bonus, the page doesn't check for authentication at all-- anyone with the URL can look at any number of reports whether they are logged in or not.
I also ran into these same issues in another piece of software demoed at the conference-- plain text passwords are stored in the database and (a lot) of SQL injection points. But looking through this second application, I also noticed something odd-- I didn't see $_GET or $_POST anywhere in the application. I searched through the files, and Sublime Text didn't return a single instance of either being used. Then it hit me-- the software was relying on PHP's register_globals. So, using the GET query strings, I could overwrite several parts of each SQL query.
So, are any of these things issues? After all, all of these applications are held within the hospital's intranet, which is locked down relatively tight. Of course they are.
Imagine if a disgruntled employee wanted to get revenge on his or her boss or coworkers-- a quick look in the database, and you've got their password to the reporting software. While this may not be the same password used everywhere else by this individual, you've minimally got a great starting point.
And what if the hospital's network is compromised, either due to a lost USB authenticator or an external intrusion? Then, you not only have the issue of patient data leaking, but you've possibly compromised the entire Radiology departments' passwords, which could lead to further intrusion into other, more secure software hosted on the intranet.
I do consider myself lucky for the amount of security knowledge I have-- something a lot of other developers never really have significant experience in. Fortunately, I've never had an intrusion into any of my projects or sites, and I largely attribute this to my paranoid nature in combination with this security knowledge. But these residents and students are primarily doctors-in-training-- not programmers. They don't have significant formal (or informal, since I've never really taken computer science classes before this year since it is a requirement in my major) training outside of, maybe, introductory computer science courses during their four years at a university (in most cases-- I know several Radiologists that are computer science majors). Programming is a hobby or a budding skill for them, and it shows. While this is certainly not anyone's fault (after all, we all started somewhere), it can potentially be dangerous in the medical field. It's not just customer data at stake-- it's the intimate personal details of the lives and heath of patients.
Note: I've omitted the majority of specific details of these applications, including the names and specific purposes.
I've done a lot of mobile development. From the small platforms, such as WebOS (great platform, terrible performance) and the Blackberry Playbook (I. Hate. Flash.), to Apple's iOS. One realm I'd never set foot in before today is the world of Android.
In the past, I've had prejudice against Google's OS based on demos and brief spurts of usage on friends' devices. It was always laggy-- something I hated. I was always jealous of iOS when I used to have a WebOS phone. But then I switched to Windows Phone 7, and impressively, the UI was fast and great (I have an iPhone now).
A couple of months ago, I got my hands on a Galaxy Tab 2 10.1 tablet. Honestly, I was confused for the first few minutes of using the tablet. Maybe it was Samsung's Touchwiz UI, but for the life of me, I couldn't figure out where the app drawer/launcher was.
Obviously, there's the home screen with a few shortcuts, and I knew if I press and held my finger on the screen, I could add widgets. But little did I know, from the same screen you add widgets from is the app launcher-- it's just hidden in another tab. I never realized this was actually a launcher, since it was in the same location that you edit your home screen widgets. I assumed it was for dragging icons to the home screen as well. Personally, I think it is completely out of place.
Anyways, after I figured it out, I began to explore the new OS. I always loved widgets. I always wanted widgets. My first WebOS app, Weatherman, essentially created a way to have a weather widget on the WebOS home screen and lock screen. But after adding a few, things began to slow down and become choppier, so I deleted the widgets. So much for that.
I heard about this app called Chameleon by Teknision. The Kickstarter pitch looked good, and I preordered the app so I could use the beta. Sure enough, the software looked amazing, but it didn't function very well (the context switching never worked for me). This was understandable, considering the beta status. One thing I never was able to reproduce from their demo videos was the fluidity of the UI. Everything always was choppy and lagged, but I assumed this was because I was on Android 4.0 versus 4.1, which had Google's "Project Butter." The Galaxy Tab 2 10.1 was relatively new and Android 4.1 had been out for a while, so I searched around for when the tablet would get the OS upgrade. Of course, no one knows and there are no guarantees.
I eventually got tired of Android's choppiness, and I stopped using the Galaxy Tab. Back to my Playbook (yikes), I guess.
Fast forward to today. I've been working with Seattle Children's Hospital on an iPad and iPhone app. It was published recently on the App Store and everything went smoothly (mostly). The most difficult part was simply getting my permissions raised to be able to have access to managing certificates and whatnot.
There's also an Android port that's coming, and after getting the Google Developer account setup, I proceeded to submit the app. It took a good couple of hours to get Titanium Appcelerator to work with the Android emulator and get the screen resolution right for screenshots on the Play store, but I finally got the APK built. Of course, I didn't know my app had to be signed with a certificate that expired in 25 years-- I thought I was being generous setting it to 10 and was confused when the APK upload was rejected for expiring too soon. (On a side note, it'd be great if Google listed the actual resolution in the AVD manager. I really hate spending time looking up what WVGDAQGW800 or whatever actually is. It's a waste of time.)
After uploading the APK, to my delight, there was a button to manage supported devices, which is great in the event I find the app doesn't work with a specific device for whatever reason. I like having control over the experience. But upon clicking the button, I immediately did a double take: "2050 supported devices." 2050. And to top it off, the majority of the devices were listed under code names and abbreviations and model numbers. "V871." "ILT-MX100." "D000-000011-N." Just great.
While the app should theoretically work across all of the phones and tablets out there, along with every (major) screen resolution, I can't ever be sure. I'm definitely not going to buy every one of those 2000 devices just to test it out.
Now I remember why I never developed for Android. What are the chances that something won't work right on one of the 2050 Android devices? Probably higher than more than I have time for.
Well, I was close.
In case you didn’t hear, Apple announced the iPhone 5, new iPod Touch, and new iPod Nano. While I personally didn’t expect the appearance of an iPad Mini at this event, it does leave me wondering exactly where the iPad Mini will fit in.
The new iPod/iPad pricing lineup consists of the following:
- iPod Shuffle at $49
- iPod Nano at $149
- iPod Touch (4th Gen) at $199
- iPod Touch (5th Gen) at $299
- iPad 16 GB at $499
So, where exactly does the iPad Mini fit in? At $399? That’s not exactly competitive compared to Amazon’s new Kindle Fire HD, which starts at $199. It’d be pretty easy for someone to say, “the iPad Mini is double the price of the Fire and is the same size.” And the larger Kindle Fire HD 8.9", which is closer to the original iPad’s size, is only $300.
But Apple wouldn’t price the iPad Mini at $299– the same price as the iPod Touch–which leaves one price point left: $350. This is still cheap enough in the consumer’s mind (it isn’t “$400”), and yet it doesn’t occupy the price point of the iPod Touch. It also distances it from the regular sized iPad.
In any event, you certainly won’t be seeing an iPad Mini for $299 or less.
Every morning, I wake up, open my laptop, and open a specific set of sites. I eat my breakfast while reading, save some pages for the bus ride, and then head to work. Every morning, it’s the same set of sites.
Hacker News is a new favorite of mine. It’s a great resource for some good articles to read. Engadget, despite having a poor reputation for the quality of its comments, is still a great tech blog. The Verge is relatively new, but like Engadget, it’s a great place for news on computers and electronics.
And there’s Lifehacker, which has some interesting tips and tricks, while Macrumors has all of the Mac news I could possibly need.
There’s also my Twitter feed. I follow a couple of Node.JS news bots, as well as some designers, developers, and products such as the Pebble. It makes for a great source of quick news snippets.
And then there’s Gizmodo.
A few years back, Gizmodo was one of the two sites (the other was Engadget) that I read regularly. My interest in computers was budding and I wanted to absorb all of the news I could possibly read. Both of the sites I picked up from my father, and they were pretty good at reporting tech news.
Just take a look for yourself– June 4th, 2008, Gizmodo.com (thanks Wayback Machine). Every single post was related to technology. Sure, some of it was a bit…unconventional…but it was all electronics or technology.
And then came the iPhone 4 in 2010. Gizmodo ran an exclusive detailing how they “obtained” Apple’s next generation phone, and it turns out they weren’t lying. Not long afterwards, Apple revealed the device on stage and Steve Jobs joked about how we’d probably find the design familiar.
I believe this is where Gizmodo started to go down hill. It was no longer about the technology, and started to become more and more about getting page views.
April 2010. Weird things began to pop up on Gizmodo around this time.
“I Want to Get My Kids to the Egg Child Care Center”? What?
“Yin Yang Bunk Beds”?
“The Better Marriage Blanket Dampens Farts to Save Relationships”?
Suddenly, Gizmodo turned into a mashup of architecture and criticism of products you’d find on some humor blog. At least it was mostly tolerable and most of it could be ignored. But hey, if it capture more people from random search queries, then it was worth the effort. They were addicted to the traffic that their iPhone exclusive brought in and had to get their fix.
“Bomb Squad Sent Out To Defuse A…Box Filled With Kittens”
“The World’s Largest Gummy Worm Is Wrong On So Many Levels”
And to top it off, the leading copy for the gummy worm article?
It’s 26 inches long. It has a 5 inch girth. It has a ribbed body, and weighs in at 3 lbs. It’s the World’s Largest Gummy Worm, and I feel dirty watching this guy try to eat it.
Wonderful. Thanks for that insightful commentary.
Fast forward to the beginning of 2011, and Gizmodo changed it’s design. Personally, I hated it. It was too “AJAX-y” and distracted from reading the articles, which is what I came for in the first place. Ads were plastered over the feature image for each article, and the entire page and its copy was often dimmed to show an ad. I get it– you need to make money. I like to make money too. But the ad placement was so obtrusive, it’s now difficult to read articles on the site. And if you have Ad Block on, sometimes the page won’t load correctly and the entire header becomes a blank white rectangle.
A lot of people complained about it, but over time, everyone got used to it. Just like how everyone complains about Facebook’s Timeline, but’ll get over it in a couple of months.
But now, Gizmodo is reporting on HP’s new PC:
“HP Spectre One: Could This Be the Ideal Touch-Friendly, All-In-One PC?”
The problem? Gizmodo is reporting on a touch screen PC that doesn’t exist. The HP Spectre One is not a touch screen PC. In fact, HP made it pretty clear they omitted touch to keep the design slim.
How in the world can you get that so wrong? Every other tech site on the planet reported the story correctly with HP’s statement on the matter, and yet Gizmodo’s writers didn’t even take the time to check their facts.
Ok, so it’s a simple mistake. We all make them. But take a look at some other articles posted recently by Gizmodo:
“Dubai Is Officially the Craziest City in the World Now”
Yeah, so it’s about architecture. Ignoring that, take a look at the “article” itself:
By the powers bestowed in me by the Ministry of Silly Underpants and after carefully examining and considering the numerous photographic and videographic documents covering its many insane and absurd architectural structures, I hereby declare Dubai the craziest city in the world.
I’m sorry– what? I’m actually embarrassed for Gizmodo. I trusted them at some point in their lifetime, and now they’ve somehow they’ve turned into Captain Underpants.
Gizmodo– I’ve been reading your site for the last couple of years. I’ve watched you grow, and in my eyes, I’ve watched you morph into this cesspool of word vomit and ridiculous articles about stuff that really shouldn’t be on a site called Gizmodo.
I know there’ll be people who disagree with me, but for every one that does, there’s another that shares my same thoughts.
Even if I never visit your site again, at least I won’t have to miss out on the Apple announcement.